The Two-Color Star Quilt – Pattern is a timeless masterpiece in the world of quilting, offering a striking visual impact through the art of simplicity and high contrast. When you choose to work with a Two-Color Star Quilt – Pattern, you are embracing a design tradition that dates back centuries, yet remains incredibly modern and versatile for today’s home decor. This specific pattern allows quilters to focus on the precision of their piecing and the bold interaction between just two shades, creating a rhythmic beauty that is often lost in more cluttered, multi-colored projects.
Whether you are a seasoned quilter or a beginner looking for your next challenge, the Two-Color Star Quilt – Pattern provides a rewarding experience that highlights the geometry of the star motif. The beauty of this Two-Color Star Quilt lies in its adaptability; you can opt for a classic blue and white “Barn Star” look or a more contemporary black and cream aesthetic. Because the pattern relies on only two fabrics, selecting high-quality cotton is essential to ensure the star points remain crisp and the overall finish looks professional and polished.
In this comprehensive guide, we will explore every aspect of creating your own Two-Color Star Quilt – Pattern, from selecting the perfect fabric to mastering the sewing techniques required for those perfect points. Following a structured quilt pattern is the best way to ensure your blocks align correctly and your seam allowance remains consistent throughout the assembly. Let’s dive into the world of minimalist quilting and discover why the Two-Color Star Quilt continues to be a favorite among textile artists worldwide.
1 Understanding the Foundations of the Two-Color Star Quilt – Pattern
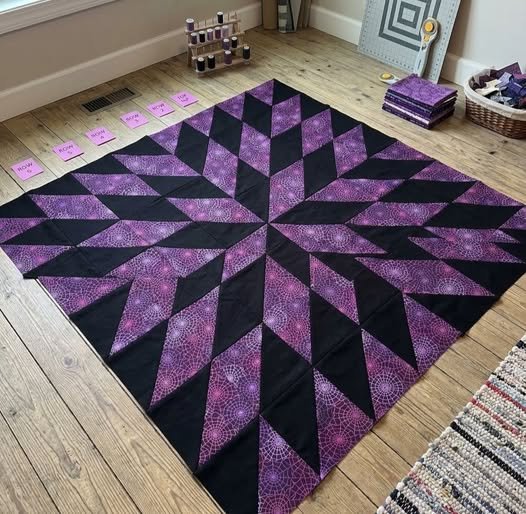
The Two-Color Star Quilt – Pattern is defined by its use of a single “star” color and a single “background” color, creating a silhouette effect. This pattern usually utilizes the Sawtooth Star or the Lone Star design, both of which are iconic in the quilting community. By limiting the palette, the Two-Color Star Quilt emphasizes the negative space, making the central star pop with intensity.
When we talk about a pattern in quilting, we refer to the blueprint or set of instructions used to cut and join fabric. A Two-Color Star Quilt – Pattern provides the specific measurements for half-square triangles (HSTs) and square units. These units are the building blocks of the star, and following the pattern ensures that your points don’t get “chopped off” during the final assembly.
Choosing your two colors is the most exciting part of starting a Two-Color Star Quilt. For a traditional look, many quilters choose a deep navy and a crisp white, which evokes a nautical or colonial feel. If you prefer a modern Two-Color Star Quilt – Pattern, consider using a bright neon against a dark charcoal background to create a “glowing” effect on your quilt top.
The term Two-Color Star Quilt also implies a certain level of balance in the design. You must decide which color will be the “star” and which will be the “ground.” If your star color is darker than your background, the pattern will look grounded and heavy. If the star is lighter, it will appear to float, giving your Two-Color Star Quilt – Pattern a more ethereal and light quality.
Precision is the hallmark of any successful Two-Color Star Quilt – Pattern. Because there are no other colors to distract the eye, any misalignment in the star points will be more noticeable. This is why using a rotary cutter and a quilting ruler is highly recommended to maintain the integrity of the Two-Color Star Quilt design from start to finish.
Finally, the pattern usually includes a border or a binding instruction that complements the two-tone theme. Most quilters choose to bind their Two-Color Star Quilt in the darker of the two fabrics to “frame” the work. This final touch ensures that the Two-Color Star Quilt – Pattern looks complete and professionally executed, ready for display or gifting.
2 Selecting Fabric and Tools for Your Two-Color Star Quilt
To begin your Two-Color Star Quilt – Pattern, you must first calculate the yardage required for both your primary and secondary fabrics. Since you are only using two colors, ensure you buy enough of the same dye lot to avoid subtle color shifts. A Two-Color Star Quilt requires a significant amount of background fabric, so it is often wise to buy an extra half-yard just in case of cutting errors.
The quality of the fabric significantly impacts how the Two-Color Star Quilt – Pattern turns out after washing. We recommend 100% quilter’s weight cotton, which has a tight weave and minimal shrinkage. When you are working with a Two-Color Star Quilt, pre-washing your fabrics is crucial, especially if you are using a high-contrast pairing like red and white, to prevent “bleeding.”
In terms of tools, a 1/4-inch sewing foot is your best friend when executing a Two-Color Star Quilt – Pattern. This specific foot helps you maintain a consistent seam allowance, which is vital for the star blocks to fit together perfectly. If your seams are even slightly off, the Two-Color Star Quilt will not lay flat, causing “waves” in the final quilt top.
Marking tools are also essential for the Two-Color Star Quilt – Pattern. You will likely need to draw diagonal lines on the back of your fabric squares to create half-square triangles. Using a heat-erasable pen or a water-soluble marker ensures that your guidelines disappear once the Two-Color Star Quilt is finished, leaving only clean lines and beautiful stitching.
Don’t overlook the importance of a fresh sewing machine needle before starting a new Two-Color Star Quilt – Pattern. A sharp needle prevents skipped stitches and ensures that the heavy seams where multiple points meet are handled with ease. For a Two-Color Star Quilt, a size 80/12 universal or sharp needle is generally the best choice for standard cotton fabrics.
Lastly, a large cutting mat provides the workspace needed to manage the long strips of fabric often required by a Two-Color Star Quilt – Pattern. Organization is key; keep your “star” pieces and “background” pieces in separate piles. Labeling your cut pieces according to the pattern instructions will save you time and prevent confusion as you assemble the Two-Color Star Quilt.
3 Step-by-Step Assembly of the Star Blocks
The heart of the Two-Color Star Quilt – Pattern is the assembly of the individual star blocks. Most versions of this pattern utilize an 8-pointed star design. You will start by creating the center square and then building the points outward using HSTs or “flying geese” units. This modular approach makes the Two-Color Star Quilt manageable even for those with limited space.
As you follow the Two-Color Star Quilt – Pattern, pay close attention to the pressing instructions. In two-color quilting, it is common to “press to the dark side” so that the seam allowance doesn’t show through the lighter fabric. Proper pressing ensures that the Two-Color Star Quilt remains crisp and that the points of the star are as sharp as possible.
The next stage of the Two-Color Star Quilt – Pattern involves joining the units into rows. A standard star block is usually a 3×3 grid. When sewing these rows together, use pins to align the intersections. In a Two-Color Star Quilt, these “join points” are where the magic happens; if they match up perfectly, the star looks like one continuous piece of art.
Once your blocks are complete, the Two-Color Star Quilt – Pattern will guide you on how to set them. You can sew them “block-to-block” for a dense star field, or use sashing to separate them. Using sashing in a Two-Color Star Quilt can add even more visual interest, especially if you use the background color to make the stars appear as if they are floating in space.
After the blocks are joined, you have completed the quilt top portion of the Two-Color Star Quilt – Pattern. This is the time to check for any loose threads or open seams. It is much easier to fix a small mistake now than after the Two-Color Star Quilt has been layered with batting and backing fabric for the final quilting process.
The final step in assembly for this pattern is adding the borders. A simple border in the contrasting color can make a Two-Color Star Quilt look much larger and more formal. Follow your Two-Color Star Quilt – Pattern measurements strictly here, as borders that are too long will cause the edges of your quilt to ruffle or flare out.
4 Quilting and Finishing Your Two-Color Masterpiece
Now that your Two-Color Star Quilt – Pattern top is finished, it’s time to decide on the quilting design. You can choose “stitch in the ditch” to keep the focus entirely on the star shapes, or use a contrasting thread to create an intricate topstitching pattern. For a Two-Color Star Quilt, geometric quilting lines often complement the sharp angles of the star pattern beautifully.
Layering your Two-Color Star Quilt involves creating a “quilt sandwich” with the top, the batting, and the backing. Use safety pins or basting spray to keep the layers from shifting. Since a Two-Color Star Quilt – Pattern is often minimalist, the quality of your quilting stitches will be very visible, so take your time and maintain a steady pace.
Choosing the right batting is also a key part of the Two-Color Star Quilt – Pattern process. If you want a flat, modern look, choose a 100% cotton or bamboo batting. If you want a more traditional, “puffy” Two-Color Star Quilt, a polyester or wool blend will provide more loft and make the quilt feel warmer and more substantial.
The Two-Color Star Quilt – Pattern isn’t truly finished until the binding is applied. Binding is the fabric wrap that covers the raw edges of the quilt. For a sleek look, use the same color as the border. For a “pop,” use the contrasting color from your Two-Color Star Quilt to create a thin, sharp frame around the entire piece.
Once the binding is sewn on (usually by machine to the front and hand-stitched to the back), give your Two-Color Star Quilt a final press. This helps set the stitches and gives the Two-Color Star Quilt – Pattern a professional, finished appearance. Many quilters also like to add a quilt label to the back with the date and their name.
Owning a completed Two-Color Star Quilt is a point of pride for many makers. It represents hours of careful cutting, sewing, and planning. Because you followed a high-quality Two-Color Star Quilt – Pattern, you now have a functional piece of art that can be passed down through generations, maintaining its beauty and structural integrity for years to come.
Frequently Asked Questions (FAQ)
1. Is a Two-Color Star Quilt – Pattern suitable for beginners?
Yes! While it requires precision, many Two-Color Star Quilt – Patterns are designed specifically for beginners. By focusing on only two fabrics, a beginner can master the basics of seam allowance and HST construction without getting overwhelmed by color choices.
2. What are the best colors for a Two-Color Star Quilt?
Classic combinations include Blue/White, Red/White, and Black/Cream. However, you can use any two colors as long as there is enough value contrast (one light, one dark) to make the star pattern visible.
3. How much fabric do I need for a standard Two-Color Star Quilt?
Yardage varies by size (Throw, Twin, Queen, King). Generally, for a throw-sized Two-Color Star Quilt – Pattern, you will need approximately 3 to 4 yards of background fabric and 2 yards of the star fabric. Always check your specific pattern for exact requirements.
4. Can I use prints instead of solid colors for this pattern?
Absolutely! A “Tone-on-Tone” print works beautifully in a Two-Color Star Quilt. As long as the prints read as a single color from a distance, the Two-Color Star Quilt – Pattern will remain clear and striking.
5. How do I prevent my points from getting cut off?
To keep your points sharp in a Two-Color Star Quilt, ensure you are sewing a “scant” 1/4-inch seam. When joining the star units, look for the “X” created by previous seams on the back of the fabric; sewing exactly through that “X” ensures perfect points.
Conclusion
Creating a Two-Color Star Quilt – Pattern is a journey into the heart of traditional quilting. Throughout this article, we have covered the importance of selecting the right fabric, the necessity of precise cutting and sewing, and the final steps of quilting and binding. The Two-Color Star Quilt is more than just a blanket; it is a study in symmetry, contrast, and craftsmanship.
By following a structured pattern, you ensure that your hard work results in a stunning visual piece that highlights the iconic star motif. We hope this guide inspires you to start your own two-tone project and experience the satisfaction of completing a timeless design.