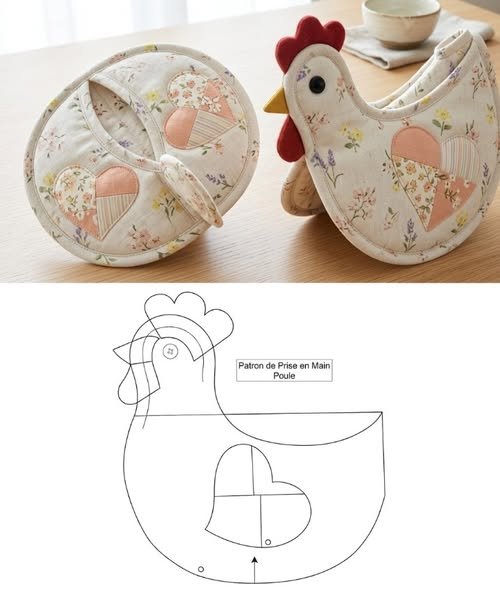
The Fabric Chicken Egg Holder – Pattern is one of the most charming and functional projects you can undertake if you love farmhouse decor and practical sewing crafts. There is something deeply satisfying about gathering fresh eggs and placing them into a handmade nest that looks just as delightful as the kitchen it sits in. Whether you are an experienced quilter or a beginner looking for a weekend project, creating a Fabric Chicken Egg Holder allows you to combine your love for textiles with a highly useful kitchen accessory that keeps your eggs safe and organized.
Choosing the right Pattern is the essential first step in ensuring your project turns out both sturdy and aesthetically pleasing. A well-designed Fabric Chicken Egg Holder – Pattern typically includes specific measurements for the “nest” pockets, ensuring that each egg is cradled individually to prevent cracking. By using high-quality cotton fabrics and a bit of batting, you can transform simple scraps into a whimsical hen-shaped basket. This project is not only a great way to use up your fabric stash but also makes for a heartfelt, handmade gift for friends and family who appreciate rustic charm.
As you dive into this guide, you will discover that the Fabric Chicken Egg Holder – Pattern is versatile enough to be customized with various colors and textures to match any interior design. From selecting the perfect Pattern to the final decorative stitches, every step of the process is an opportunity to express your creativity. In the following sections, we will break down the materials needed, the preparation phase, the step-by-step assembly, and the professional finishing touches required to make your Fabric Chicken Egg Holder a standout piece in your home.
1. Selecting the Perfect Materials for Your Fabric Chicken Egg Holder – Pattern
The foundation of a successful Fabric Chicken Egg Holder begins with selecting the right high-quality materials to ensure durability. Since this item will be handled frequently in the kitchen, choosing 100% cotton fabric is highly recommended because it is breathable, easy to wash, and holds its shape well. You will want to pick a main fabric for the body of the chicken and a contrasting fabric for the wings and beak to make the Pattern pop visually.
In addition to your primary fabrics, a sturdy Fabric Chicken Egg Holder – Pattern requires the right type of interfacing or batting. Using a medium-weight fusible fleece gives the “hen” the necessary structure to stand upright while providing a soft cushion for the eggs. Without this internal support, your holder might collapse under the weight of the eggs, so never skip the stabilizing layer when following your Pattern instructions.
Don’t forget the importance of thread quality when working on your Fabric Chicken Egg Holder. A strong polyester or cotton-wrapped polyester thread will ensure that the seams remain intact even after multiple trips through the washing machine. Matching the thread color to your fabric creates a seamless look, or you can use a contrasting thread for decorative topstitching to highlight the unique lines of the Pattern.
Accuracy is vital, so ensure you have a sharp pair of fabric shears or a rotary cutter and a self-healing mat ready. A well-executed Fabric Chicken Egg Holder – Pattern relies on precise cuts, especially for the curved sections of the chicken’s head and tail. If your cuts are jagged, the final assembly will be much more difficult, and the symmetry of your fabric hen may be compromised.
Small notions often make the biggest difference in the final appearance of your Fabric Chicken Egg Holder. You will need small black beads or embroidery floss to create the eyes, and perhaps some decorative buttons for the wing attachments. These small details bring the Pattern to life, giving your egg holder a personality that store-bought plastic versions simply cannot replicate.
Lastly, always pre-wash your fabrics before starting the Fabric Chicken Egg Holder – Pattern. Cotton fabrics are notorious for shrinking, and there is nothing more frustrating than finishing a beautiful project only to have it warp after the first wash. By prepping your materials correctly, you ensure that the dimensions of your Pattern stay true and that your egg holder remains a functional piece of art for years.
2. Preparing and Cutting Your Fabric Chicken Egg Holder – Pattern Pieces
Before you touch your sewing machine, you must prepare your workspace and your Pattern templates. Start by printing or drawing your Fabric Chicken Egg Holder – Pattern onto heavy cardstock if you plan on making more than one. This makes tracing onto the fabric much easier and ensures that every piece you cut is identical in size, which is crucial for the internal egg pockets to line up correctly.
Once your templates are ready, lay your fabric flat on a clean surface and press out any wrinkles with a hot iron. Steam pressing is a “pro-tip” for anyone working with a Fabric Chicken Egg Holder – Pattern, as it ensures the fabric is completely flat and stable. Place your Pattern pieces according to the grainline of the fabric to prevent the finished holder from stretching or twisting out of shape over time.
Pin your Pattern pieces securely to the fabric or use fabric weights to hold them in place while you trace. Using a heat-erasable fabric pen is the best way to mark the lines of your Fabric Chicken Egg Holder – Pattern, as the marks will disappear once you give the final project a press. Make sure to mark all notches and pivot points indicated on the Pattern to guide you during the assembly phase.
After tracing, carefully cut out each piece, including the main body, the base, the wings, the comb, and the beak. If your Fabric Chicken Egg Holder – Pattern includes a lining, repeat the process with your lining fabric. Keeping your pieces organized in stacks—body pieces, wing pieces, and structural pieces—will save you a significant amount of time and mental energy once the sewing begins.
Now is the time to apply your fusible fleece or interfacing to the wrong side of the exterior fabric pieces. Follow the manufacturer’s instructions for your iron settings to ensure a strong bond that won’t bubble or peel. This step is what transforms a flat piece of cloth into a three-dimensional Fabric Chicken Egg Holder, providing the “bones” of the project that support the weight of a full dozen eggs.
Double-check your work against the Fabric Chicken Egg Holder – Pattern requirements one last time before moving to the machine. Ensure you have the correct number of mirrored pieces for the wings and the body sides. Being meticulous during the cutting and preparation phase is the secret to a professional-looking Pattern result that looks like it came from a high-end boutique rather than a home craft room.
3. Assembling the Body and Pockets of Your Fabric Chicken Egg Holder – Pattern
The assembly phase is where the magic happens and your Fabric Chicken Egg Holder begins to take shape. Start by sewing the smaller details first, such as the comb and beak, and then sandwiching them between the two main body pieces of the Pattern. This “inside-out” method ensures that when you turn the fabric right side out, the decorative elements are perfectly positioned at the top of the hen’s head.
Once the head and back seams are joined, you will focus on the most functional part of the Fabric Chicken Egg Holder – Pattern: the egg pockets. Most patterns achieve this by using a long strip of fabric that is pleated or gathered and then sewn to the interior lining. These dividers are what keep the eggs separated and safe, so ensure your stitching is reinforced at the top and bottom of each pocket for maximum strength.
Carefully pin the pocket strip to the lining fabric, following the markings from your Fabric Chicken Egg Holder – Pattern. Use a walking foot on your sewing machine if you have one, as it helps move the multiple layers of fabric and batting through the machine evenly. Slowly stitch down the vertical lines to create individual slots; these slots are specifically sized in the Pattern to accommodate standard large chicken eggs.
Joining the base of the chicken to the side walls is often the most challenging part of the Fabric Chicken Egg Holder – Pattern because of the curves. Take your time and use plenty of pins or clips to hold the circular or oval base in place. Sewing slowly and “walking” the needle around the curves will prevent puckering and ensure that your Fabric Chicken Egg Holder sits flat on your kitchen counter without wobbling.
After the exterior and interior (lining) are both assembled, you will insert the lining into the exterior shell with right sides facing each other. Sew around the top edge, leaving a small gap for turning, as specified in your Fabric Chicken Egg Holder – Pattern. This technique, known as “birthing” the project, allows you to hide all raw edges inside, resulting in a clean and professional finish that is highly durable.
Turn the chicken right side out through the gap and use a blunt tool, like a chopstick or a turning tool, to push out the seams and the beak. Press the top edge firmly with your iron to set the shape. Closing the turning gap can be done with a hidden ladder stitch by hand or a very close topstitch around the entire rim, completing the structural assembly of your Fabric Chicken Egg Holder – Pattern.
4. Final Details and Tips for Customizing Your Fabric Chicken Egg Holder – Pattern
The final stage of creating your Fabric Chicken Egg Holder involves adding the personality and flair that makes it unique. Using your Pattern as a guide, attach the wings to the sides of the body using a decorative button or a simple whip stitch. Some crafters like to add a bit of stuffing to the wings to give them a 3D effect, which adds to the whimsical farmhouse aesthetic of the finished piece.
Embroidering the eyes is a safe and traditional way to finish your Fabric Chicken Egg Holder – Pattern, especially if the item will be around children. Using a simple French knot or a small satin stitch with black embroidery floss creates a classic look. If you prefer a more modern style, you can use safety eyes or even small painted details, provided the paint is non-toxic and fabric-safe for a kitchen environment.
To make your Fabric Chicken Egg Holder even more functional, consider adding a sturdy handle at the top. You can incorporate this into the Pattern by sewing a fabric strap or using a braided rope handle. This allows you to carry your eggs directly from the coop to the kitchen with ease, making the holder a true “working” piece of equipment rather than just a decoration.
Maintenance of your Fabric Chicken Egg Holder is easy if you followed the material recommendations. Because you used high-quality cotton and batting in your Pattern, you can spot clean it with a damp cloth or toss it in the wash on a gentle cycle. Reshaping it while damp and letting it air dry will keep the hen looking plump and ready for the next batch of fresh eggs.
If you want to sell your creations, following a popular Fabric Chicken Egg Holder – Pattern and adding your own unique twist is a great business move. You can experiment with seasonal fabrics—like sunflowers for summer or holly prints for Christmas—to create limited edition versions. The versatility of this Pattern makes it a favorite among Etsy sellers and craft fair vendors who want to offer something both cute and practical.
Ultimately, completing this Fabric Chicken Egg Holder – Pattern provides a sense of accomplishment and a beautiful way to display your harvest. Every time you reach for an egg to bake or cook, you’ll be reminded of the creativity and care you put into your sewing. We hope this guide inspires you to grab your favorite fabrics and start stitching your very own fabric hen today!
FAQ: Everything You Need to Know About the Fabric Chicken Egg Holder – Pattern
How many eggs does a standard Fabric Chicken Egg Holder hold? Most Pattern designs are created to hold between 10 to 12 eggs, depending on the size of the pockets. Some larger versions of the Fabric Chicken Egg Holder can be scaled up to hold 18 or even 24 eggs if you have a very productive backyard flock.
Can I make this project if I am a beginner? Yes! While there are some curves involved, a Fabric Chicken Egg Holder – Pattern is generally considered an intermediate-beginner project. If you can sew a straight line and are comfortable pinning curves, you can definitely succeed with this craft.
What is the best fabric to use for an egg holder? Quilting cotton is the gold standard for a Fabric Chicken Egg Holder – Pattern. It is easy to work with, comes in thousands of prints, and provides the right balance of flexibility and strength.
Do I need a special sewing machine for this? No special machine is required, though a “walking foot” is very helpful for sewing through the layers of fabric and batting. A standard domestic machine with a sharp universal needle will work perfectly for any Fabric Chicken Egg Holder – Pattern.
How do I clean my fabric egg holder? Most handmade Fabric Chicken Egg Holder items can be machine washed on a cold, gentle cycle. It is best to air dry the item and then give it a quick press with a steam iron to restore its shape and crispness.
Can I resize the Pattern? Absolutely. You can use a photocopier to enlarge or shrink your Fabric Chicken Egg Holder – Pattern. Just remember that if you shrink it too much, standard large eggs may no longer fit in the pockets.
Conclusion
Creating a Fabric Chicken Egg Holder – Pattern is a wonderful journey that blends traditional sewing skills with modern kitchen utility. Throughout this article, we have covered everything from selecting durable cotton fabrics and structural batting to the intricate steps of assembling the body and those all-important egg pockets.
By following the Pattern closely and adding your own decorative touches, you have learned how to create a piece that is not only a functional storage solution but also a charming piece of farmhouse art. We hope this step-by-step guide has given you the confidence to start your sewing project and bring a bit of handmade joy into your home.