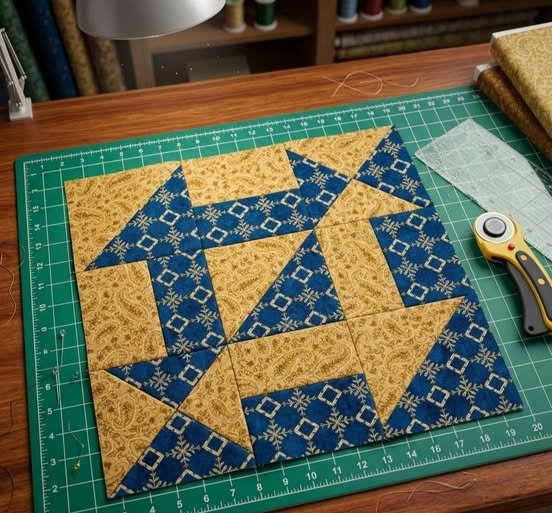
The Churn Dash Quilt Block – Pattern is a cornerstone of American quilting history, representing a simple yet visually powerful design that has remained a favorite for generations of crafters. Its name originates from the resemblance to the various parts of an old-fashioned butter churn, with the central square representing the churn itself and the surrounding units mimicking the “dash” or the wooden handle used to agitate the cream. Mastering a Churn Dash Quilt Block – Pattern is often considered a rite of passage for beginners because it introduces the three most fundamental units of patchwork: the square, the rectangle, and the half-square triangle.
As you embark on creating a Churn Dash Quilt Block – Pattern, you are engaging in a project that offers incredible versatility through color placement and fabric selection. While traditional versions often feature a “civil war” palette of navy, burgundy, and cream, modern quilters have reinvented the Churn Dash Quilt Block – Pattern using bold solids, neon prints, and large-scale floral motifs. This adaptability makes it a perfect choice for everything from a vintage-inspired heirloom quilt to a sleek, minimalist wall hanging that complements contemporary home decor.
In this comprehensive guide, we will explore the technical nuances that ensure your Churn Dash Quilt Block – Pattern turns out perfectly flat and precisely squared every time. We will break down the essential terminology, provide tips on maintaining an accurate seam allowance, and discuss how to choose fabrics that make the geometric “dash” pop against the background. By the end of this article, you will have the confidence to incorporate this classic quilt block into your next large-scale project, whether you are making a single block or a full king-sized quilt.
1. Preparing Your Materials for the Churn Dash Quilt Block – Pattern
The first step in any successful Churn Dash Quilt Block – Pattern is selecting the right high-quality quilting cotton. Because this block relies on crisp lines and sharp points, using a fabric with a stable weave is essential to prevent stretching during the sewing process. You generally need two contrasting fabrics: a “focus” fabric for the dash and a “background” fabric that provides the necessary negative space to make the Churn Dash Quilt Block – Pattern stand out.
Understanding Fabric Value is a critical term for this specific design. Value refers to the lightness or darkness of a color; if your two fabrics have values that are too similar, the “dash” shape will disappear. To ensure your handmade quilt block has maximum impact, choose a dark-value print for the frame and a light-value solid or tone-on-tone for the background. This contrast is what gives the Churn Dash Quilt Block – Pattern its iconic, graphic appearance.
Before you begin cutting your pieces for the Churn Dash Quilt Block – Pattern, it is highly recommended to use Fabric Starch. Spraying your fabric with starch before cutting makes the cotton feel like paper, which significantly reduces the fraying of edges. More importantly, starch helps stabilize the bias edges of the triangles you will be sewing, ensuring that they do not distort when they pass through the feed dogs of your sewing machine.
The Cutting List for a standard Churn Dash Quilt Block – Pattern typically involves cutting squares for the corners and center, and rectangles for the side units. Using a sharp rotary cutter and an acrylic ruler is the best way to ensure every piece is exactly the same size. In a geometric block like this, even a 1/16th of an inch error in cutting can multiply across the rows, leading to a finished quilt block that is difficult to join with others.
Another term you should be familiar with is Fussy Cutting. This involves targeting a specific part of a fabric print—like a small bird or a flower—and centering it within the middle square of the Churn Dash Quilt Block – Pattern. Fussy cutting adds a personalized, artistic touch to an otherwise geometric design, turning a standard patchwork pattern into a unique piece of storytelling that captures the viewer’s attention.
Finally, consider the Grain of the Fabric. When cutting the rectangles and squares for your Churn Dash Quilt Block – Pattern, try to align your cuts with the “straight of grain” (the threads running parallel to the selvage). This provides the least amount of stretch, which is vital for maintaining the straight, architectural lines of the dash. Attention to these small details during the preparation phase is what separates a hobbyist quilt project from a professional-grade masterpiece.
2. Technical Piecing and Half-Square Triangle Construction
The “corners” of the Churn Dash Quilt Block – Pattern are made of Half-Square Triangles (HSTs). These units are created by sewing two different colored triangles together to form a square. The most common way to make them for a Churn Dash Quilt Block – Pattern is the “two-at-a-time” method, where you draw a diagonal line on the back of a square, sew a quarter-inch on both sides of that line, and then cut it apart.
The Quarter-Inch Seam Allowance is the most important technical rule in the construction of the Churn Dash Quilt Block – Pattern. To ensure your points meet perfectly and your block ends up the correct size, you must use a scant quarter-inch. This means your seam is just a hair narrower than a true quarter-inch, which accounts for the space the fabric takes when it folds over at the seam. This tiny adjustment is the secret to a professional Churn Dash Quilt Block – Pattern.
Nesting Seams is a technique used when joining the rows of your Churn Dash Quilt Block – Pattern. By pressing the seam allowances of the top row to the left and the middle row to the right, the seams will “lock” together when you put the rows right sides together. This prevents the fabric from shifting and ensures that the corners of your patchwork units align perfectly without the need for excessive pinning.
The term Pressing to the Dark Side is a traditional quilting instruction that applies heavily to the Churn Dash Quilt Block – Pattern. By pressing the seam allowances toward the darker fabric, you prevent the darker threads from showing through the lighter background fabric on the front of the quilt. Flat, well-pressed seams are essential for a quilt block that lies perfectly flat, making the final quilting process much easier and more enjoyable.
Chain Piecing is a productivity technique that is perfect for the Churn Dash Quilt Block – Pattern. Instead of stopping to cut the thread after every unit, you feed the pairs of fabric through the machine one after another in a long chain. This keeps your seam allowance consistent and saves a significant amount of thread. For a block with many small parts like the Churn Dash, chain piecing helps you stay organized and efficient.
Lastly, you must perform the Square Up process. After sewing your HSTs for the Churn Dash Quilt Block – Pattern, use a square ruler to trim them to the exact size specified in the pattern. This removes any minor “wonkiness” and ensures that every sub-unit is a perfect square before they are joined together. Squaring up is the final quality control step that ensures your finished quilt block is a perfect 12.5-inch square (or whatever size your pattern dictates).
3. Layout Variations and Artistic Design Choices
Once you have mastered the individual Churn Dash Quilt Block – Pattern, you can begin to experiment with the Quilt Layout. Placing the blocks side-by-side in a simple grid creates a timeless “checkerboard” effect. However, if you add Sashing—strips of fabric between the blocks—you can give each Churn Dash its own frame, which is a great way to use a bold “accent” color that ties the entire quilt top together.
The On-Point Layout is another way to transform the look of the Churn Dash Quilt Block – Pattern. By rotating the blocks 45 degrees so they sit like diamonds, you create a dynamic sense of movement. While this requires the addition of “setting triangles” at the edges of the quilt, the result is a sophisticated and modern quilt design that looks much more complex than a standard grid, making your handmade craft stand out.
Secondary Patterns are a fascinating result of how you arrange your Churn Dash Quilt Block – Pattern. When the blocks are sewn together without sashing, the corners and side units of adjacent blocks meet to create new shapes, like stars or smaller squares, in the “negative space” between the churn dashes. This “pattern within a pattern” is one of the joys of traditional quilting and allows a simple patchwork block to create a very intricate final quilt top.
Consider the Scrappy Quilt approach for your Churn Dash Quilt Block – Pattern project. Instead of using just two fabrics, you can use a different “focus” fabric for every single block while keeping the background fabric consistent. This “scrappy but organized” look is a wonderful way to use up your fabric stash while still maintaining a cohesive design. The Churn Dash is particularly well-suited for scraps because its units are small and geometric.
Directional Prints are a technical consideration when using certain fabrics in your Churn Dash Quilt Block – Pattern. If your fabric has a print that only goes one way (like stripes or little houses), you must be careful when cutting and sewing so that the print isn’t upside down or sideways in some of the units. Taking the time to align these prints shows a high level of craftsmanship and results in a more polished and professional textile project.
Finally, let’s talk about the Borders. Adding one or more borders to your assembled Churn Dash Quilt Block – Pattern units serves as the final frame. You might choose a wide, dark border to “contain” the energy of the blocks, or a pieced border that incorporates smaller versions of the churn dash. The border is also where you can let your decorative quilting shine, using swirls or feathers to contrast with the straight lines of the patchwork.
4. Final Quilting and Professional Finishing Touches
After the “top” of your Churn Dash Quilt Block – Pattern project is complete, you must prepare the “Quilt Sandwich.” This consists of the top, the batting (the middle insulating layer), and the backing fabric. For a classic block like this, a 100% cotton batting is often preferred because it provides a “flat” look that emphasizes the precision piecing of your churn dash units.
Basting is the process of temporarily holding the three layers together before the final quilting begins. You can use curved safety pins or a temporary spray adhesive. For the Churn Dash Quilt Block – Pattern, it is vital to baste every 3 or 4 inches to ensure there are no wrinkles or “tucks” on the back of the quilt. Proper basting ensures that your quilting stitches are even and that the fabric doesn’t shift under the needle.
When it comes to the actual quilting, Stitch in the Ditch is a popular choice for the Churn Dash Quilt Block – Pattern. This involves sewing exactly in the seams of the patchwork. It is an almost invisible way to secure the quilt while making the “dash” shapes pop out slightly from the background. It is a clean, modern way to finish a geometric quilt that allows the fabric and the pattern to be the stars of the show.
For a more traditional look, you might choose Echo Quilting. This involves sewing lines that follow the shape of the Churn Dash Quilt Block – Pattern, about a quarter-inch away from the seams. This creates a “ripple” effect that adds incredible texture and depth to the quilt. Echo quilting is a great way to practice your machine control and adds a level of handmade charm that is highly valued in the quilting community.
The Binding is the final fabric strip that covers the raw edges of your Churn Dash Quilt Block – Pattern project. A “double-fold” binding is the most durable choice. You can choose a binding fabric that matches the “dash” color to create a unified frame, or a contrasting stripe for a playful “finishing touch.” Learning how to create perfect mitered corners during the binding process is the mark of a truly skilled quilter.
Lastly, never forget the Quilt Label. A Churn Dash Quilt Block – Pattern is a piece of art that can last for decades, and a label ensures that your story is preserved. Include your name, the date, and the name of the pattern. You can even include a small dedication if the quilt is a gift. The label is the final “signature” on your quilting masterpiece, marking the successful completion of a beautiful journey through the world of traditional patchwork.
FAQ: Frequently Asked Questions about the Churn Dash Quilt Block – Pattern
1. Is the Churn Dash Quilt Block – Pattern suitable for a beginner?
Yes, it is one of the best blocks for a beginner. It teaches you how to make Half-Square Triangles, sew straight seams, and align points. Because the units are relatively large, it is very forgiving and a great way to build confidence before moving on to more complex quilt patterns.
2. What is the standard size for a Churn Dash Quilt Block?
While you can make them any size, the most common size for a Churn Dash Quilt Block – Pattern is 12 inches (finished). This means the block is 12.5 inches before it is sewn into the quilt. This size is convenient for calculating how many blocks you need for various quilt sizes, such as a twin or queen bed.
3. Why are my points getting cut off in the corners?
This usually happens because the seam allowance is too wide. If your seam is a full quarter-inch or more, the points will be hidden when you join the blocks. Switching to a scant quarter-inch and ensuring you are “pressing to the side” will help preserve those beautiful sharp points in your Churn Dash.
4. How much fabric do I need for a Churn Dash quilt?
For a standard lap quilt (roughly 60″ x 60″) using 12-inch blocks, you will typically need about 2.5 yards of background fabric and 2 yards of focus fabric for the “dashes.” This estimate includes enough for the binding but always check your specific pattern’s fabric requirements before buying.
5. Can I use a “fat quarter” to make this block?
Absolutely! A single fat quarter (an 18″ x 21″ piece of fabric) is more than enough to make the “focus” parts of two or three 12-inch Churn Dash Quilt Block – Patterns. This makes it a very “fat-quarter friendly” design, perfect for collectors of fabric bundles.
6. What is the best way to quilt a Churn Dash?
The “best” way depends on your style. Straight-line quilting following the geometric lines of the block is modern and fast. If you want a softer look, Free Motion Quilting with a floral or “swirl” design provides a beautiful contrast to the sharp angles of the Churn Dash Quilt Block – Pattern.
Conclusion
In this article, we have thoroughly explored the timeless beauty and technical construction of the Churn Dash Quilt Block – Pattern. We’ve covered the essential first steps of selecting high-contrast fabrics and stabilizing them with starch, as well as the mastery of Half-Square Triangles and the vital scant quarter-inch seam.
We also discussed how layout choices like sashing and on-point construction can transform a simple block into a complex work of art, and how the final steps of basting, quilting, and binding ensure your project becomes a durable heirloom. The Churn Dash remains a favorite because it balances simplicity with endless creative potential, making it a joy to sew for quilters of all levels.