The Bird Quilt Block – Pattern is a timeless favorite among textile artists who want to bring a touch of nature’s elegance into their home decor. Whether you are aiming to capture the vibrant colors of a songbird or the serene silhouette of a forest dweller, this specific design offers a wonderful opportunity to practice precision piecing while expressing your artistic flair. Crafting a Bird Quilt Block – Pattern allows quilters to utilize small fabric scraps effectively, making it both an eco-friendly project and a rewarding creative challenge for enthusiasts of all skill levels.
In the world of quilting, the Bird Quilt Block – Pattern stands out because of its versatility; it can be featured as a bold centerpiece in a wall hanging or repeated across a full-sized bedspread for a whimsical, feathered effect. To achieve the best results with your Bird Quilt Block – Pattern, it is essential to focus on high-quality fabric selection and accurate cutting, as the charm of the bird often lies in the sharp angles of its beak and the gentle curves of its wings. By mastering this design, you gain a foundational technique that can be adapted into countless variations, from seasonal holiday themes to modern minimalist interpretations.
As you prepare to start your next project, remember that a well-executed Bird Quilt Block – Pattern relies heavily on the “stitch and flip” method or foundation paper piecing to ensure every feather looks perfect. This article will guide you through the essential steps to create a stunning piece, ensuring your work is professional enough for a gallery but cozy enough for a living room. We will dive into the technical details of the Bird Quilt Block – Pattern, helping you troubleshoot common issues and optimize your workflow for a seamless sewing experience that yields beautiful, long-lasting results.
1. Selecting the Best Fabric for Your Bird Quilt Block – Pattern
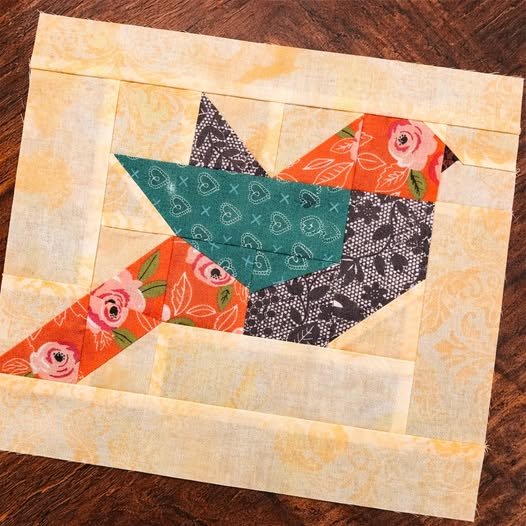
Choosing the right materials is the first and most critical step in bringing your Bird Quilt Block – Pattern to life. For the body of the bird, consider using high-contrast quilting cotton to ensure the silhouette pops against the background fabric. Bright blues, warm cardinals, or soft teals are popular choices that mimic real-life plumage while adding visual interest to your textile layout.
The background of your Bird Quilt Block – Pattern should ideally be a neutral or low-volume print to keep the focus on the feathered subject. Whites, creams, or very pale grays work best to simulate the sky or a bright window view, providing a clean canvas for your sewing project. Avoid using busy prints for both the bird and the background, as this can make the design look cluttered and lose its distinct shape.
Texture plays a significant role in the overall feel of the Bird Quilt Block – Pattern. You might want to experiment with small-scale floral prints for the wings or a solid batik fabric to give the bird a more organic, shaded appearance. Mixing different fabric types adds depth and a professional touch to your finished quilt, making it a true conversation piece in any collection.
Don’t forget the importance of starching your fabric before you begin cutting your Bird Quilt Block – Pattern. Since many bird designs involve small triangles and bias edges, starching helps maintain the fabric’s integrity and prevents stretching. This simple preparation step ensures that your points remain crisp and your blocks stay perfectly square throughout the assembly process.
When planning your color palette, think about the season you want your Bird Quilt Block – Pattern to represent. Deep oranges and browns create a lovely autumnal feel, while pastel pinks and greens are perfect for a spring-themed nursery quilt. Your choice of colors tells a story, so take a moment to audition your fabrics next to each other before making the final cut.
Lastly, ensure you have enough fabric for the “beak” and “legs” of your Bird Quilt Block – Pattern. These are often very small pieces that require a contrasting color like yellow, orange, or black. Having a dedicated scrap bin for these tiny details will save you time and allow you to add those perfect finishing touches that make the bird look truly lifelike.
2. Essential Tools and Cutting Techniques for Precision
To successfully complete a Bird Quilt Block – Pattern, you need a few specialized tools that every serious quilter should have in their kit. A sharp rotary cutter and a high-quality cutting mat are non-negotiable for achieving the clean lines required for this design. Precision is key, especially when dealing with the small half-square triangles that often form the head and tail of the bird.
A clear acrylic ruler with easy-to-read markings will help you measure each segment of your Bird Quilt Block – Pattern with total accuracy. Many quilters prefer using a 6.5-inch square ruler, as it is easy to handle and perfect for trimming down blocks to a uniform size. Consistent measurements are the secret to a flat quilt top that doesn’t wave or pucker at the seams.
Marking tools are equally important when working on a Bird Quilt Block – Pattern. Use a water-soluble fabric pen or a Hera marker to trace your sewing lines, particularly for the “diagonal stitch” method. This ensures that even the most intricate parts of the bird’s anatomy are aligned correctly before you commit to the final seam, reducing the need for the seam ripper.
When you begin cutting the components for your Bird Quilt Block – Pattern, always follow the “measure twice, cut once” rule. Group your fabric pieces by color and size to stay organized, perhaps using small labeled trays or clips. This organization prevents confusion, especially if you are making multiple blocks at once for a larger handmade quilt project.
The orientation of the grainline is a technical detail that can impact your Bird Quilt Block – Pattern significantly. Whenever possible, keep the straight grain of the fabric on the outer edges of the block to provide stability. This prevents the block from becoming distorted when you eventually sew it to neighboring blocks, ensuring your quilt maintains its geometric integrity over time.
Finally, consider using a 1/4 inch presser foot on your sewing machine to maintain a consistent seam allowance. In a detailed design like the Bird Quilt Block – Pattern, even a slight deviation in seam width can cause the pieces to misalign. Keeping your seams accurate will result in a professional-looking block where all the points meet perfectly at every junction.
3. Step-by-Step Assembly of the Bird Quilt Block – Pattern
The assembly of a Bird Quilt Block – Pattern usually begins with the smaller sub-units, such as the head and the tail. You will often start by creating half-square triangles (HSTs) or using the “snowball” technique on square corners. These small units are the building blocks that define the character and movement of your bird within the fabric frame.
Once your sub-units are ready, you will typically join them into rows to build the body of the Bird Quilt Block – Pattern. It is vital to press your seams carefully as you go; most quilters recommend pressing toward the darker fabric to prevent the seam allowance from showing through the lighter sections. This keeps the quilt top looking tidy and flat.
Pinning is your best friend when joining the rows of your Bird Quilt Block – Pattern. Align the intersections where the bird’s wing meets the body, and use fine glass-head pins to hold them in place. Even if you are an experienced sewist, pinning ensures that the intricate parts of the patchwork don’t shift under the needle, preserving the sharp details of the design.
As the Bird Quilt Block – Pattern takes shape, you will notice how the different colors and shapes interact to create a sense of motion. The placement of the bird’s eye—often a small embroidered knot or a tiny bead—is a late-stage addition that brings the whole block to life. This tiny detail is what transforms a simple geometric shape into a charming avian character.
After the central bird is assembled, you will likely add “border” or background strips to bring the Bird Quilt Block – Pattern to its final desired size. This framing process is a great time to check that your block is still square. If it has become slightly skewed, a gentle “squaring up” with your rotary cutter will fix the problem before the block is integrated into a larger piece.
The final step in the assembly of a Bird Quilt Block – Pattern is a thorough final pressing. Use a dry iron or a light mist of sizing to set the seams firmly. A well-pressed block is much easier to quilt later on, whether you choose to do free-motion quilting or simple “stitch in the ditch” to highlight the bird’s silhouette and give it texture.
4. Creative Ways to Use Your Bird Quilt Block – Pattern
The beauty of the Bird Quilt Block – Pattern lies in its adaptability across various home decor and gift items. You don’t have to commit to a full-sized quilt; a single block can be turned into a stunning decorative pillow cover. This is a quick way to add a touch of handmade charm to your living room or bedroom with minimal time investment.
Another popular application for the Bird Quilt Block – Pattern is in the creation of quilted tote bags. By using the bird as a focal point on the front pocket, you create a unique accessory that showcases your love for textile arts. Use durable fabrics like denim or canvas for the rest of the bag to ensure it can withstand daily use while protecting your quilted masterpiece.
Table runners featuring a series of Bird Quilt Block – Pattern designs are perfect for seasonal decorating. Imagine a row of red cardinals for a winter theme or bright yellow goldfinches for a summer brunch setting. These smaller projects allow you to experiment with different color schemes without the pressure of finishing a massive quilt, making them great for gift-giving.
Wall hangings are perhaps the best way to display a particularly detailed Bird Quilt Block – Pattern. By adding a simple mitered border and some intricate quilting around the bird, you create a piece of “fabric art” that can be hung in a nursery, a sunroom, or a home office. It serves as a permanent reminder of your crafting skills and creative vision.
For those who enjoy garment sewing, a Bird Quilt Block – Pattern can even be incorporated into the back of a denim jacket or as a patch on a vest. This “quilted fashion” trend is growing in popularity and allows you to wear your art. It’s a bold statement that combines traditional quilting techniques with modern style and personal expression.
Finally, consider making a “learning quilt” for a child using the Bird Quilt Block – Pattern. Each block could feature a different species of bird in its natural colors, helping the child learn about nature while staying warm under a cozy, handmade blanket. This meaningful project turns your quilting hobby into an educational tool and a cherished family heirloom.
FAQ: Frequently Asked Questions About Bird Quilt Block – Pattern
How difficult is the Bird Quilt Block – Pattern for beginners?
While it looks complex, many versions of the Bird Quilt Block – Pattern are beginner-friendly if you have a basic understanding of half-square triangles and seam allowances. Start with a pattern that uses larger pieces before moving on to miniature or highly detailed versions.
What is the best size for a Bird Quilt Block – Pattern?
The most common sizes are 6-inch, 10-inch, and 12-inch squares. A 12-inch Bird Quilt Block – Pattern is often easier for beginners because the pieces are larger and easier to handle under the sewing machine.
Can I use the Bird Quilt Block – Pattern for foundation paper piecing?
Absolutely! Foundation paper piecing (FPP) is one of the most popular ways to make a Bird Quilt Block – Pattern because it allows for extreme precision with very small pieces and sharp angles that are difficult to achieve with traditional piecing.
What fabrics are best for the bird’s beak and eyes?
For the beak, a small scrap of solid yellow or orange cotton is perfect. For the eye, you can use a tiny black button, a French knot made with embroidery floss, or a small dot of fabric paint to bring your Bird Quilt Block – Pattern to life.
How do I quilt around the bird without ruining the design?
Many quilters prefer “echo quilting,” where you sew lines that follow the silhouette of the bird about a quarter-inch away. This makes the Bird Quilt Block – Pattern stand out and gives the background a sense of movement, like wind or sky.
Are there different types of Bird Quilt Block – Patterns available?
Yes, there are hundreds of variations, ranging from the traditional “Bird in the Air” block to modern, realistic representations of owls, hummingbirds, and chickens. You can find a Bird Quilt Block – Pattern to suit almost any aesthetic.
Conclusion
In this article, we explored the wonderful world of the Bird Quilt Block – Pattern, covering everything from the initial fabric selection to the final assembly and creative applications.
We discussed how choosing the right quilting cotton, using precise cutting tools, and mastering the assembly of small sub-units can lead to a professional and beautiful result. Whether you are making a pillow, a tote bag, or a full-sized heirloom, the Bird Quilt Block – Pattern remains one of the most charming and versatile designs in the textile arts. We hope this guide inspires you to pick up your needle and thread and start creating your own feathered friends. Please leave your sincere opinion and any suggestions for future patterns you would like to see featured here!