The Crochet Monstera Leaves – Pattern is a fantastic way to bring the vibrant, tropical aesthetic of the “Swiss Cheese Plant” into your home without ever having to worry about watering or sunlight. These iconic heart-shaped leaves with their natural perforations have become a staple in modern interior design, and recreating them with yarn allows for endless creative possibilities. Whether you are looking to create a stunning wall hanging, a unique set of coasters, or even a decorative garland, mastering this specific botanical design will elevate your crochet portfolio to a whole new level of artistry.
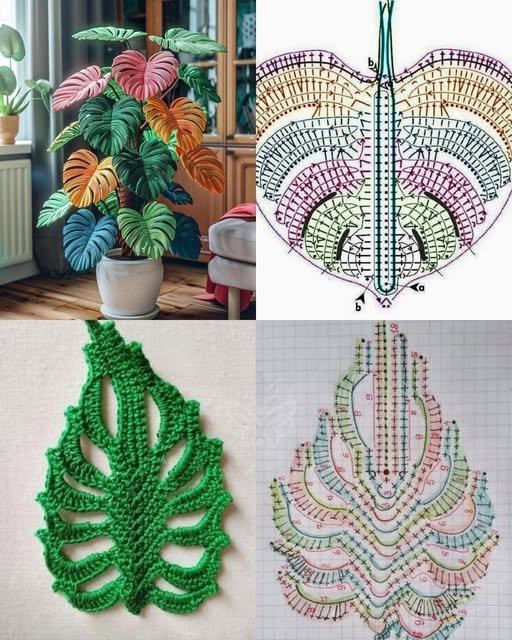
When you dive into a Crochet Monstera Leaves – Pattern, you are essentially learning how to manipulate negative space within a solid crochet fabric. The secret to achieving that authentic tropical look lies in the strategic placement of chains and skipped stitches, which mimic the natural splits—known as fenestrations—found in real Monstera deliciosa leaves. This project is perfect for intermediate crocheters, but with a bit of patience, even an ambitious beginner can master the rhythmic increases and decreases needed to form the characteristic pointed tip and wide base.
Working on a Crochet Monstera Leaves – Pattern also offers a wonderful opportunity to experiment with different shades of green, from deep forest hues to bright lime tones, or even variegated yarns that simulate natural light patterns. In this comprehensive guide, we will break down the essential steps, from selecting the right mercurized cotton yarn to the final shaping techniques that ensure your leaves lie flat and look crisp. By following these professional tips and SEO-friendly strategies, you will be able to create a high-quality botanical piece that looks like it came straight from a high-end boutique.
1. Choosing the Best Materials for Your Crochet Monstera Leaves – Pattern
To get the best results from your Crochet Monstera Leaves – Pattern, selecting the right fiber is paramount. I highly recommend using a mercurized cotton yarn in a medium or light weight, such as size 4 (worsted) or size 3 (DK). Cotton provides the necessary “stitch definition” that allows the leaf’s unique shape and internal holes to stand out clearly without the fuzziness that wool or acrylic might bring.
The choice of crochet hook size will determine the overall scale and stiffness of your leaf. For a decorative piece that needs to hold its shape, such as a coaster or a wall ornament, using a slightly smaller hook than recommended on the yarn label is a smart trick. This creates a tighter tension, ensuring that your Crochet Monstera Leaves – Pattern doesn’t become floppy or lose its silhouette over time.
Color theory plays a massive role in making your Crochet Monstera Leaves – Pattern look realistic. Nature isn’t just one shade of green; consider using a yarn with a slight sheen to mimic the waxy surface of a real leaf. You can also use “scrap yarn” to practice the shaping before committing to your final project, as this pattern requires careful attention to the placement of each stitch.
Don’t forget the importance of notions like stitch markers and a sharp tapestry needle. Because the Crochet Monstera Leaves – Pattern involves asymmetrical increases to create the “split” effect, marking the central vein of the leaf is incredibly helpful. This prevents you from losing your place and ensures that both sides of the leaf remain balanced and proportional as you work upward.
If you plan on using these leaves as part of a larger crochet home decor project, consider the environment where they will be displayed. If they are going near a window, a high-quality cotton will resist fading better than most synthetics. This attention to material quality ensures that your hard work stays vibrant and beautiful for years to come, making the investment in good yarn well worth it.
Lastly, think about the “drape” versus “structure.” A Crochet Monstera Leaves – Pattern intended for a soft blanket applique might require a softer acrylic blend, whereas a leaf meant to stand upright in a vase will benefit from a stiff cotton and perhaps even a bit of hidden floral wire. Always align your material choice with the intended final use of your beautiful handmade leaf.
2. Essential Techniques for Shaping a Crochet Monstera Leaves – Pattern
The most distinctive part of a Crochet Monstera Leaves – Pattern is the creation of the holes or “splits.” This is usually achieved by using a combination of high stitches (like treble or double-treble crochet) and foundation chains. By skipping a set number of stitches from the previous row and chaining across the gap, you create that iconic “Swiss cheese” look that makes the Monstera so recognizable.
Achieving the perfect heart shape requires a mastery of increases and decreases. Most Crochet Monstera Leaves – Pattern designs start at the base near the stem, quickly widening out with multiple stitches into a single loop. As you move toward the top, you will switch to decreases to taper the leaf into a sharp, elegant point, requiring a steady hand and consistent tension.
Working in the “back loops only” (BLO) is a technique often used in a Crochet Monstera Leaves – Pattern to create a central vein. This creates a raised ridge that runs down the middle of the leaf, adding a three-dimensional texture that looks incredibly realistic. It provides a structural spine that helps the leaf keep its form when it is handled or moved.
The “Magic Ring” or Magic Circle is the best way to start your leaf if you are working from the center out. This technique allows you to pull the center tight, leaving no hole at the base where the stem meets the foliage. It is a hallmark of professional crochet and ensures that your Crochet Monstera Leaves – Pattern looks polished and high-end from the very first stitch.
To ensure the edges don’t curl, many patterns suggest a final round of slip stitches or single crochet around the entire perimeter. This “bordering” technique stabilizes the leaf and gives you a clean edge to work with if you decide to sew the leaf onto another surface. It is a small step that makes a huge difference in the final quality of the botanical crochet project.
Patience is key when learning the rhythm of the Crochet Monstera Leaves – Pattern. Because the pattern is often non-repetitive to mimic nature’s organic growth, you will need to count your stitches carefully in every row. Using a printed pattern diagram or a row counter can help you stay organized and avoid the frustration of having to frog your work because of a missed increase.
3. How to Block and Finish Your Crochet Monstera Leaves – Pattern
Once you have finished the stitching portion of your Crochet Monstera Leaves – Pattern, the leaf might look a bit crumpled or distorted. This is perfectly normal! “Blocking” is the essential next step to make the leaf look professional. By pinning the damp leaf onto a foam board in the exact shape you want and letting it air dry, you “lock” the fibers into place.
For a Crochet Monstera Leaves – Pattern that needs extra rigidity—like a decorative placemat—you can use a liquid fabric stiffener during the blocking process. Simply dip the leaf in a mixture of water and stiffener, squeeze out the excess, and pin it down. This ensures the leaf stays perfectly flat and the internal holes remain open and visible even after heavy use.
Weaving in the ends is the final technical hurdle. In a Crochet Monstera Leaves – Pattern, the holes make it a bit trickier to hide the yarn tails. The trick is to weave the tail through the “meatier” parts of the stitches or along the central vein ridge. Use a sharp needle to split the yarn fibers, which creates more friction and prevents the ends from popping out later.
If you are creating a Monstera leaf garland, you will need to join several leaves together. You can do this by crocheting a long foundation chain and joining the stems of the leaves at regular intervals with a single crochet stitch. This creates a sturdy, cohesive piece of handmade decor that can be draped over a mantle or across a window frame.
Adding a “stem” is often the finishing touch for a Crochet Monstera Leaves – Pattern. This can be a simple cord made of chain stitches, or a more complex I-cord for a thicker, more realistic look. If you want the leaf to be poseable, you can crochet around a piece of thin green wire, allowing you to bend the leaf into a natural-looking curve.
Finally, consider the presentation of your work. If you are sharing your Crochet Monstera Leaves – Pattern on social media or a blog, take photos in natural light against a neutral background. High-quality images that showcase the stitch texture and the intricate splits will attract more viewers and demonstrate the high level of craftsmanship involved in your botanical creations.
4. Creative Ways to Use Your Crochet Monstera Leaves – Pattern
One of the most popular uses for a Crochet Monstera Leaves – Pattern is as a functional coaster. Because cotton is absorbent, these leaves are perfect for protecting your furniture while adding a pop of tropical color to your living room. You can make a set of four in different shades of green to create a cohesive but varied “jungle” look for your coffee table.
For those who love wall art, a large-scale Crochet Monstera Leaves – Pattern can be mounted inside a shadow box or attached to a wooden dowel. This creates a modern, minimalist piece of yarn art that fits perfectly with the “urban jungle” interior design trend. It is a great way to fill empty wall space with something tactile and handmade.
You can also incorporate these leaves into your fashion accessories. A small Crochet Monstera Leaves – Pattern makes for a charming keychain, a backpack charm, or even a pair of statement earrings if made with fine crochet thread. The versatility of the design means you can scale it up or down simply by changing your yarn and hook size.
If you enjoy making crochet pillows, you can sew several Monstera leaves onto a plain cushion cover to create a 3D tropical effect. This adds layers of texture to your home decor and is much easier than trying to crochet an entire patterned pillowcase from scratch. It is an excellent way to upcycle old home textiles with a fresh, handmade touch.
In the world of gift-giving, a handmade Crochet Monstera Leaves – Pattern is a thoughtful present for plant lovers, especially those who might not have a “green thumb.” It provides the beauty of the Monstera without the maintenance. Pairing a set of leaves with a cute ceramic pot or a “plant lady” mug makes for a perfect, personalized gift set.
Lastly, consider using the Crochet Monstera Leaves – Pattern as a recurring motif in a larger project, like a “Tropical Temperature Blanket.” You could crochet a leaf for every day of a vacation or a special month, using colors that represent the weather. This turns a simple pattern into a meaningful piece of storytelling through the medium of fiber art.
FAQ – Frequently Asked Questions
What is the best way to keep my crochet leaves from curling?
The best way to prevent curling in a Crochet Monstera Leaves – Pattern is through “wet blocking.” Pinning the damp leaf to a flat surface and letting it dry completely is usually enough. If it still curls, check your tension; you may be crocheting too tightly, and switching to a larger hook might solve the problem.
Can I make these leaves bigger without a new pattern?
Yes! You can easily scale up a Crochet Monstera Leaves – Pattern by using thicker yarn (like bulky weight) and a larger hook. Conversely, to make them smaller for jewelry, use embroidery floss or crochet thread with a 1.0mm or 1.5mm hook. The proportions of the pattern will remain the same.
How do I clean my crochet Monstera leaves?
Since most leaves are made with cotton, they are usually hand-washable. Use lukewarm water and a drop of gentle soap. Avoid scrubbing, as this can cause the fibers to pill. Lay them flat to dry and re-block them if necessary to restore their original shape after they are clean.
Why are the holes in my leaf looking messy?
Messy holes in a Crochet Monstera Leaves – Pattern usually happen if the chains are too loose. Try to keep your chain tension consistent and ensure you are skipping the correct number of stitches. If the gap looks too large, try reducing the number of chains by one to “tighten” the look of the fenestration.
What color green looks most realistic?
For a “real” look, look for “Olive,” “Forest,” or “Sage” green yarns. If you want a more “Neon” or “Pop Art” style, “Chartreuse” or “Kelly Green” are great choices. Using a variegated yarn that transitions between light and dark green can also mimic the natural variegation found in some Monstera varieties.
Is this pattern difficult for a beginner?
It is considered an “intermediate” project because of the counting and the shaping. However, if you are familiar with basic stitches like the double crochet and chain stitch, you can certainly do it! Just take it row by row and don’t be afraid to use stitch markers to keep track of your progress.
Conclusion
In this tutorial, we have explored the wonderful world of the Crochet Monstera Leaves – Pattern, covering everything from the best mercurized cotton yarn to use to the advanced shaping techniques required for those iconic splits.
We’ve learned that “blocking” is the secret weapon for a professional finish and that these leaves can be used for everything from coasters to wall art. By combining the organic beauty of nature with the versatile art of crochet, you can create timeless pieces of handmade decor that brighten any space.