The Totally Tulips Quilt – Pattern is a breath of fresh air for any quilter looking to bring the vibrant beauty of a spring garden into their home through the art of textile design. This specific project has gained immense popularity in the quilting community because it perfectly balances a modern aesthetic with traditional piecing techniques, making it a versatile choice for various skill levels. Whether you are creating a seasonal wall hanging or a large heirloom bedspread, the floral motifs found in this design offer a cheerful and timeless appeal that resonates across generations of makers.
Embarking on the journey of a Totally Tulips Quilt – Pattern requires a thoughtful approach to color and fabric selection, as the visual impact of the tulips depends largely on the contrast between the blooms and the background. Many quilters find joy in using a “scrappy” approach, utilizing leftover fabric from previous projects to create a multicolored field of tulips, while others prefer a more disciplined, monochromatic palette for a sophisticated look. Regardless of your stylistic choice, the geometric structure of the tulip block provides a satisfying rhythm to the sewing process that keeps the project engaging from the first cut to the final stitch.
In this comprehensive guide, we will break down the essential steps to mastering the Totally Tulips Quilt – Pattern, focusing on accuracy in cutting, efficient piecing methods, and the finishing touches that elevate a simple quilt to a work of art. Understanding the mechanics of the tulip block is key to ensuring that your flower points are sharp and your stems are perfectly aligned. By following these professional tips and SEO-friendly strategies for project management, you will be well on your way to completing a stunning floral masterpiece that showcases your dedication to the craft of quilting and patchwork.
1. Preparing Your Workspace and Fabric for the Totally Tulips Quilt – Pattern
The foundation of a successful Totally Tulips Quilt – Pattern starts long before you sit down at your sewing machine, beginning instead at your cutting mat. Achieving crisp, clean edges on your tulip petals requires high-quality quilting cotton that has been properly pressed to remove all wrinkles. Using a spray starch or fabric stabilizer can be a game-changer here, as it provides the fabric with the stiffness needed to prevent stretching during the assembly of small triangles.
When gathering your materials for the Totally Tulips Quilt – Pattern, pay close attention to your rotary cutter blade; a dull blade can lead to inaccurate cuts, which will cause your blocks to become distorted. Accuracy is paramount when working with the “snowballing” technique often used for tulip corners. You will need a variety of green fabrics for the leaves and stems, and a vibrant selection of solids or small prints for the flower heads themselves to make the pattern “pop.”
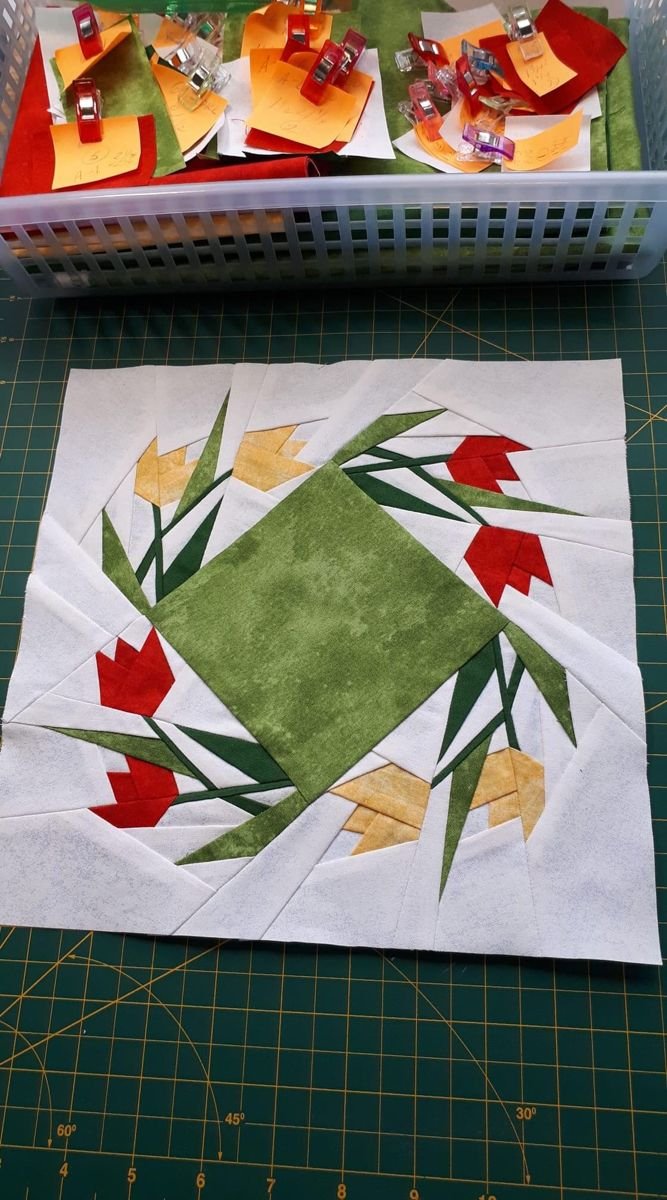
Organization is another vital component of managing a Totally Tulips Quilt – Pattern efficiently. Many experienced quilters use labeled bins or design boards to keep the different components of the flower—the petals, the base, and the leaves—separated by color or size. This prevents confusion during the assembly-line style of sewing, also known as chain piecing, which saves a significant amount of time and thread throughout the construction process.
Before making your first cut, always double-check the fabric requirements listed in your Totally Tulips Quilt – Pattern. It is a common mistake to overlook the amount of background fabric needed, especially if you are creating a “negative space” design where the tulips appear to float. Buying all your background fabric from the same bolt ensures that the color remains consistent across the entire quilt top, avoiding any subtle dye-lot variations that can be distracting.
Lighting and ergonomics play a subtle but crucial role in the outcome of your Totally Tulips Quilt – Pattern. Ensure your cutting table is at a comfortable height to avoid back strain and that you have ample overhead light to distinguish between similar fabric shades. A well-prepared workspace allows you to focus entirely on the precision of your quarter-inch seam allowance, which is the golden rule for ensuring all your tulip blocks finish at the correct size.
Finally, consider the thread you will use for your Totally Tulips Quilt – Pattern. A high-quality 50-weight cotton thread in a neutral color like light grey or tan usually blends perfectly with most fabrics. Avoid using cheap, lint-heavy threads that can clog your machine and weaken the seams over time. Investing in the right notions from the start is an SEO-friendly tip for your crafting health, ensuring your project is as durable as it is beautiful.
2. Mastering the Geometry of the Totally Tulips Quilt – Pattern Blocks
The heart of the Totally Tulips Quilt – Pattern lies in the construction of the individual flower blocks, which typically utilize Half-Square Triangles (HSTs) and the “easy corner” method. To create the rounded look of a tulip petal using square pieces of fabric, you will frequently sew on the diagonal. Drawing a fine line with a ceramic pencil on the back of your squares will guide your needle and ensure that each petal is symmetrical and sits perfectly within the block’s grid.
As you piece your Totally Tulips Quilt – Pattern, the “stitch and flip” technique becomes your primary tool for creating the diagonal lines of the flower. This involves placing a small square on the corner of a larger rectangle, sewing across the diagonal, and flipping the fabric over to create a triangle. While simple in theory, the secret to a professional finish is trimming the excess fabric exactly a quarter-inch from the seam to reduce bulk and keep the quilt top flat.
Pressing is just as important as sewing when it comes to the Totally Tulips Quilt – Pattern. For floral designs with many intersecting seams, pressing your seams open can help the quilt lie flatter, though many traditionalists prefer pressing toward the darker fabric. Consistency is key; if you choose to press to the side, ensure you are consistent throughout the entire quilt block assembly so that your nested seams lock together perfectly when joining the blocks into rows.
The stem and leaf assembly of the Totally Tulips Quilt – Pattern provides the structural “growth” of the design. This section usually involves thin strips of fabric and smaller triangles. Because these pieces are often narrow, your seam accuracy is tested here more than anywhere else. If your seam is even a hair too wide, your stems will look crooked or disappear entirely. Take your time with these units, as they provide the essential verticality that makes the tulip recognizable.
Once you have completed a few blocks of your Totally Tulips Quilt – Pattern, it is wise to lay them out on a design wall or a flat floor. This allows you to see how the colors interact and if any particular tulip stands out too much or fades into the background. Seeing the “big picture” early on gives you the opportunity to swap blocks around or adjust your color choices before the final assembly, ensuring a balanced and harmonious composition.
Do not be discouraged if your first few blocks in the Totally Tulips Quilt – Pattern aren’t perfect. Quilting is a skill developed through repetition, and the tulip motif is particularly forgiving because flowers in nature are naturally unique. Use a seam ripper sparingly for major errors, but remember that many minor imperfections will “quilt out” once the batting and backing are added. The goal is a finished quilt that brings joy, not a quest for absolute geometric perfection.
3. Assembling the Quilt Top and Adding Borders to Your Pattern
Joining the individual blocks of your Totally Tulips Quilt – Pattern into a full quilt top is where the magic truly happens. You can choose to sew the blocks directly to one another for a “field of flowers” effect, or you can add sashing—thin strips of fabric between the blocks. Sashing acts like a frame for each tulip, giving the viewer’s eye a place to rest and making each individual bloom stand out more clearly within the overall design.
When sewing long rows together for your Totally Tulips Quilt – Pattern, use plenty of pins to keep the intersections aligned. It is very easy for the fabric to shift slightly over a long distance, which can cause the rows to bow or the flower stems to miss their marks. Pinning at every intersection ensures that the horizontal and vertical lines of your patchwork remain straight, giving the finished project a professional, high-end appearance.
Borders serve as the final “frame” for your Totally Tulips Quilt – Pattern. You might choose a simple solid border to keep the focus on the flowers, or a “piano key” border made of scraps to add extra energy. To prevent your borders from waving or ruffling, always measure the center of your quilt and cut your border strips to that exact length, rather than simply sewing a long strip and cutting off the excess at the end.
If your Totally Tulips Quilt – Pattern is intended as a gift or a nursery item, consider adding a personalized touch in the borders. Small embroidered details or a custom-printed fabric can make the quilt feel even more special. This stage of the process is about adding your unique signature to the work, moving beyond the basic instructions to create something that reflects your specific artistic voice and personality.
During the assembly of the Totally Tulips Quilt – Pattern top, keep an eye on your “fuzz” and thread tails. As you move the large piece of fabric around, it can collect lint or stray threads that might show through lighter background fabrics once the quilt is layered. Keeping a clean workspace and trimming your threads as you go will save you a lot of headache during the final quilting and binding phases of the project.
Once the top of your Totally Tulips Quilt – Pattern is finished, give it one final, thorough pressing. This is the moment to celebrate your hard work! A flat, well-pressed quilt top is much easier to “sandwich” with the batting and backing. This step marks the transition from piecing to quilting, where you will decide how to add the decorative stitching that will hold all the layers together and add texture to your tulips.
4. Quilting Designs and Finishing Touches for Your Tulip Masterpiece
Deciding how to quilt your Totally Tulips Quilt – Pattern is an opportunity to add another layer of storytelling to your work. A simple “stitch in the ditch” approach keeps the focus on the piecing, while free-motion quilting with swirls or leaves can mimic the movement of wind through a garden. If you are a beginner, straight-line quilting with a walking foot is a modern and effective way to complement the geometric lines of the tulip petals.
The choice of quilt batting will affect the weight and “loft” of your Totally Tulips Quilt – Pattern. Cotton batting provides a traditional, flat look that crinkles beautifully after the first wash, while polyester or wool batting can offer more definition to your quilting stitches. Consider the intended use of the quilt—a lightweight cotton is perfect for a summer throw, while a thicker batting is better suited for a cozy winter bedspread.
Binding is the final step that “locks” the edges of your Totally Tulips Quilt – Pattern. A double-fold bias binding is the most durable method, providing a clean edge that can withstand years of use and washing. For a pop of color, try a striped binding or a contrasting solid that picks up one of the colors from the tulip blooms, tying the entire design together into a cohesive and polished package.
Don’t forget to add a quilt label to the back of your Totally Tulips Quilt – Pattern. A label should include your name, the date, the location, and perhaps a short note about who the quilt was made for. This turns your project into a documented piece of history, ensuring that future generations know the story behind the hands that spent hours stitching each tulip into place.
If you are sharing your Totally Tulips Quilt – Pattern online, take photos in natural, indirect light to capture the true colors of your fabric. High-quality images are essential for content creators in the handicraft niche, as they allow fellow quilters to see the detail of your stitching and the beauty of your fabric choices. Sharing your journey on social media can inspire others to start their own floral quilting projects.
Completing a Totally Tulips Quilt – Pattern is a significant achievement that showcases your growth as a maker. Each finished quilt is a testament to your patience, precision, and passion for the art of quilting. Whether it ends up on a bed, a wall, or wrapped around a loved one, your tulip quilt is a permanent reminder of the beauty that can be created with just a needle, thread, and a bit of imagination.
FAQ – Frequently Asked Questions
Is the Totally Tulips Quilt – Pattern suitable for a beginner?
Yes! While it looks intricate, the tulip block is mostly made of basic squares and triangles. If you can sew a straight line and maintain a consistent quarter-inch seam, you can definitely succeed with this pattern. Start with a smaller project, like a pillow or a table runner, to practice the blocks before moving on to a full-sized quilt.
How much fabric do I need for a lap-sized Totally Tulips Quilt – Pattern?
A typical lap quilt (approx. 50″ x 60″) usually requires about 3 to 4 yards of background fabric and a variety of fat quarters or scraps for the tulips and leaves. Always check the specific requirements on your Totally Tulips Quilt – Pattern printout, as sashing and borders can significantly increase the total yardage needed.
Can I use flannel instead of quilting cotton for this pattern?
Absolutely. Flannel makes for a very cozy and soft Totally Tulips Quilt – Pattern, but be aware that flannel tends to fray more and can stretch easily. Use plenty of starch when pressing and consider using a slightly larger seam allowance or pins to keep the pieces from shifting while you sew.
How do I prevent my tulip points from getting “chopped off” in the seams?
The secret to sharp points in the Totally Tulips Quilt – Pattern is to sew just a hair’s breadth outside the “X” created by previous seams. When you look at the back of your pieced unit, you will see where the seams intersect; avoiding sewing directly through that intersection will keep your points crisp when you flip the fabric over.
What is the best way to wash a handmade tulip quilt?
To preserve the colors and stitching of your Totally Tulips Quilt – Pattern, wash it in cold water on a gentle cycle with a “color catcher” sheet to prevent dyes from running. It is best to air dry the quilt or tumble dry on a very low heat setting to prevent excessive shrinkage or damage to the fibers.
Can I make the tulips different sizes in the same quilt?
While most Totally Tulips Quilt – Pattern instructions use a uniform block size, you can certainly scale the blocks up or down. However, this requires some math to ensure the stems and leaves still align. It is often easier to find a pattern that specifically offers multiple block sizes if you want a more eclectic, “wildflower” look.
Conclusion
In this detailed guide, we have explored every facet of creating a Totally Tulips Quilt – Pattern, from the initial fabric preparation and precision cutting to the intricate block assembly and the final quilting flourishes.
We discussed the importance of seam accuracy, the utility of a design wall, and the various construction techniques that make the tulip motif so iconic in the world of patchwork and quilting. By following these steps, you have the tools to create a vibrant, floral-inspired quilt that brings the joy of spring into any room.