The Patchwork Basket – Pattern is one of the most versatile and charming projects a sewing enthusiast can undertake, offering a perfect blend of utility and artistic expression. Creating your own storage solutions through quilting allows you to customize every detail, from the color palette to the structural rigidity, ensuring the final piece complements your home decor perfectly. In this detailed guide, we will explore the intricate steps of transforming fabric scraps into a functional masterpiece that serves as both a beautiful ornament and a practical organizer for your craft room or living space.
When you decide to follow a Patchwork Basket – Pattern, you are diving into a world where tradition meets modern functionality. Patchwork has long been a way to preserve memories through fabric, and applying these techniques to a three-dimensional object like a basket adds a new layer of excitement to the craft. This project is ideal for those who want to practice their precision piecing and quilting-in-the-ditch skills while producing something that is immediately useful in daily life, proving that handmade items are often superior to mass-produced alternatives.
Throughout this comprehensive tutorial, we will focus on the Patchwork Basket – Pattern as a foundational skill for any modern quilter. We have designed this content to be easy to follow, ensuring that even those new to the hobby can achieve professional-looking results by paying close attention to seam allowances and material selection. By the end of this article, you will not only have a completed project but also a deeper understanding of how interfacing and layering work together to create durable, high-quality textile art that stands the test of time.
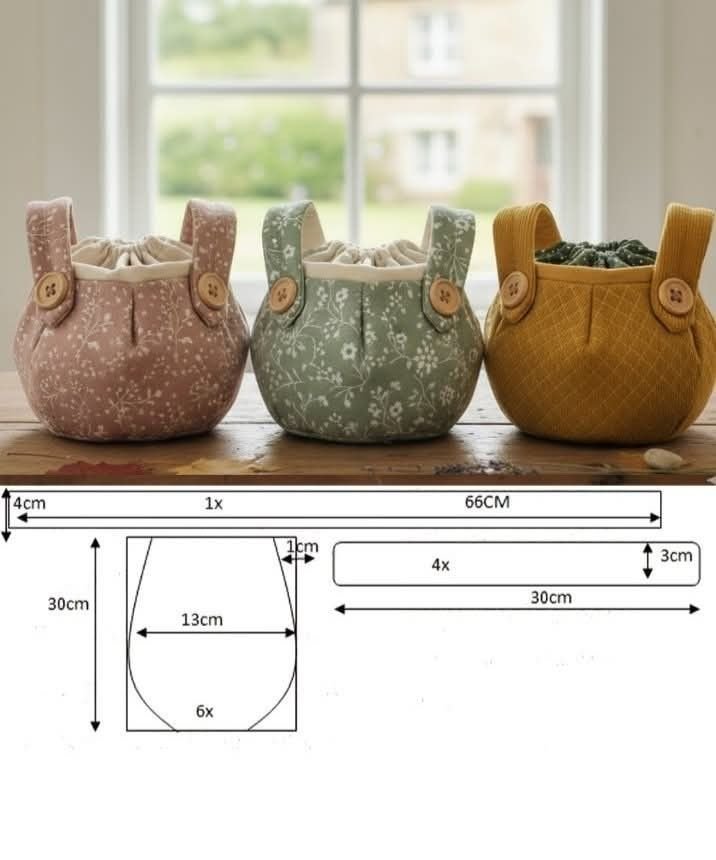
1. Selecting the Right Fabrics and Tools for Your Patchwork Basket – Pattern
The success of your Patchwork Basket – Pattern begins with the selection of high-quality 100% cotton fabric. Cotton is preferred because it holds its shape well, is easy to press, and comes in an infinite variety of prints. When choosing your scraps, try to balance scale and color, mixing larger floral prints with smaller geometric designs to create a visually stimulating patchwork layout that draws the eye without feeling cluttered or overwhelming.
In addition to your main fabrics, the “hidden” materials in a Patchwork Basket – Pattern are just as important. You will need a heavy-weight fusible stabilizer or Peltex to give the basket its walls. Without proper support, a fabric basket will collapse under its own weight, so investing in a high-quality stiffener is the secret to achieving that crisp, professional look that distinguishes a handmade treasure from a simple bag.
Your cutting tools must be in top condition before you start the Patchwork Basket – Pattern. A sharp rotary cutter and a non-slip quilting ruler are essential for ensuring that every square and rectangle is cut with mathematical precision. Even a slight deviation in cutting can lead to misaligned corners during the assembly phase, so take your time during the preparation stage to ensure every piece is perfectly squared.
The thread you choose for your Patchwork Basket – Pattern should be strong yet thin enough to disappear into the seams. A 50wt cotton thread is the industry standard for quilting, providing the necessary strength to hold the structural panels together while allowing the fabric to lay flat. Neutral colors like grey, tan, or white are excellent choices as they blend seamlessly with most fabric collections, making your construction work virtually invisible.
Marking tools are another vital component when working on a Patchwork Basket – Pattern. You will need a water-soluble pen or tailor’s chalk to mark your quilting lines and pivot points. These marks act as a roadmap for your sewing machine, helping you maintain straight lines and perfect 90-degree angles, which is especially important when you begin joining the side panels to the bottom base of the basket.
Finally, consider using Wonder Clips instead of traditional pins for this specific project. Since a Patchwork Basket – Pattern involves sewing through multiple layers of fabric and heavy interfacing, pins can often bend or distort the fabric. Clips provide a much firmer grip on thick layers, keeping everything perfectly in place as you navigate the bulky seams around the corners and the top binding of the basket.
2. Preparing and Piecing the Exterior Panels of the Basket
Once your materials are ready, the next phase of the Patchwork Basket – Pattern is the piecing of the exterior shell. This is where your creativity truly shines as you arrange your fabric strips or squares into a cohesive design. Whether you choose a classic Log Cabin style or a simple Checkered Board look, the key is to press your seams open or to the side consistently to reduce bulk at the intersections of the fabric.
Proper pressing is a “make or break” step in any Patchwork Basket – Pattern. Using a hot iron with a bit of steam helps the fibers “lock” together, creating a flat surface that is much easier to quilt later. If your seams are lumpy, the fusible interfacing won’t adhere properly, which can lead to bubbles or wrinkles in the finished product. Always press from the front to ensure there are no hidden folds caught in the seam.
After your patchwork panels are assembled, it is time to fuse them to your chosen stabilizer. This step of the Patchwork Basket – Pattern transforms limp fabric into a sturdy building material. Follow the manufacturer’s instructions carefully, applying heat and pressure for the recommended amount of time. This bond ensures that the fabric and the stiffener move as one single unit during the sewing process, preventing any shifting or stretching.
Quilting the panels is the next exciting part of the Patchwork Basket – Pattern. You can choose simple straight-line quilting or more decorative free-motion designs to secure the fabric to the stabilizer. Beyond aesthetics, this quilting adds structural integrity, essentially “bolting” the layers together. The more quilting you do, the stiffer and more durable the walls of your basket will be, ensuring it holds its shape for years.
When cutting the finalized panels to size, always “square up” your work. A Patchwork Basket – Pattern relies on perfect geometry to come together correctly. Use your ruler to trim away any excess batting or stabilizer that may have shifted during the quilting process. Having clean, straight edges will make the final assembly much less frustrating and will result in a basket that sits perfectly level on a flat surface.
If your Patchwork Basket – Pattern includes handles, now is the time to prepare them. Sturdy handles can be made by folding fabric over a strip of webbing or several layers of interfacing. Reinforcing the attachment points with a cross-stitch or “X” pattern is a professional touch that ensures the handles can withstand the weight of whatever you choose to store inside, from heavy yarn cakes to children’s toys.
3. Assembling the Structure and Lining the Interior
The assembly of the Patchwork Basket – Pattern involves joining the side panels to create a continuous loop. This is where the three-dimensional form begins to emerge. It is crucial to use a heavy-duty needle (size 90/14 or 100/16) on your sewing machine to pierce through the thick layers of stabilized patchwork. Slow and steady wins the race here; take your time as you move across the thickest seam intersections.
Joining the bottom base to the sides is often considered the most challenging part of a Patchwork Basket – Pattern. To make this easier, find the center points of all four sides and the base, and match them up using clips. Sewing around the corners requires a bit of manipulation of the fabric; stop with your needle down, lift the presser foot, and pivot the fabric to navigate the turns smoothly without creating puckers.
Creating the lining is a mirror image of the exterior assembly, but usually without the heavy stabilizer. A lighter fusible fleece can be used for the lining of your Patchwork Basket – Pattern to give it a soft, padded feel. When sewing the lining, remember to leave a 4-inch gap in the bottom seam. This “turning hole” is essential for the “bag-in-a-bag” method of assembly, allowing you to turn the whole project right side out.
To join the two layers of your Patchwork Basket – Pattern, place the exterior basket inside the lining with right sides together. The handles should be tucked down between the two layers, pointing toward the bottom. Match up the side seams and the top raw edges carefully. This creates a clean finished edge at the top of the basket once it is turned, hiding all the raw seams and stabilizer inside the “sandwich.”
Sewing around the top rim of the Patchwork Basket – Pattern requires a steady hand. If your machine has a free arm, use it to slide the basket onto the machine for easier maneuvering. Ensure that your seams are strong, as the top edge of a basket often experiences the most stress. Double-stitching or using a smaller stitch length can provide extra security for this high-traffic area of the garment.
The “moment of truth” arrives when you pull the exterior through the hole in the lining. Once the Patchwork Basket – Pattern is right side out, push the lining down into the basket and use a blunt tool to crisp up the corners. Close the hole in the lining with a ladder stitch or a very close machine stitch. A final press and a top-stitch around the upper rim will give your basket a professional, store-bought finish.
4. Customization and Maintenance of Your Fabric Basket
One of the best things about the Patchwork Basket – Pattern is the ability to adapt it to any size. By simply increasing the dimensions of your squares or adding more panels, you can create anything from a tiny jewelry dish to a large laundry hamper. Once you understand the basic logic of the boxed corner and the stabilized wall, you are no longer limited by the instructions and can design your own variations.
Adding embellishments to your Patchwork Basket – Pattern can elevate the design even further. Consider incorporating embroidery, buttons, or even lace trim to the exterior panels before you quilt them. For a more modern look, you can use leather scraps for the handles, attached with metal rivets. These small details turn a functional item into a personalized gift that friends and family will cherish for its uniqueness.
Maintenance is an important consideration for a fabric-based project. Because a Patchwork Basket – Pattern often contains heavy interfacing, it is generally not recommended to put it in the washing machine, as this can cause the stabilizer to break down or warp. Instead, spot clean the fabric with a damp cloth and mild soap. If the basket loses its shape over time, a quick blast of steam from an iron can usually “reset” the stabilizer.
Storage of your Patchwork Basket – Pattern is easy, as many designs can be folded flat when not in use, depending on the type of interfacing used. If you used a very rigid stabilizer like Peltex, it is better to keep them stuffed with tissue paper or other fabrics to maintain their structural memory. Keeping them out of direct sunlight will also prevent the vibrant colors of your quilt shop quality fabric from fading over time.
For those looking to sell their work, a well-made Patchwork Basket – Pattern is a high-demand item at craft fairs. Buyers appreciate the “slow fashion” and “zero-waste” aspect of using fabric scraps to create something beautiful. Focus on creating themed collections, such as holiday baskets or nursery organizers, to appeal to specific markets and maximize your potential for sales in the handmade economy.
In conclusion, mastering the Patchwork Basket – Pattern is a journey of skill-building that rewards you with a tangible, beautiful result. Each basket you make will be better than the last as you refine your technique and experiment with new materials. Sewing is a continuous learning process, and projects like this provide the perfect canvas for practicing the technical aspects of quilting while enjoying the immediate satisfaction of a finished, functional piece of art.
FAQ – Frequently Asked Questions
What is the best stabilizer to use for a Patchwork Basket – Pattern?
For a basket that stands up straight on its own, a heavy-weight non-woven stabilizer is best. Peltex 71F (single-side fusible) or Peltex 72F (double-side fusible) are the gold standards in the quilting world. If you want something slightly more flexible but still sturdy, Soft and Stable by Annie is an excellent foam-based alternative that provides great “rebound” and structure.
Can I use a regular sewing machine for a Patchwork Basket – Pattern?
Yes, most domestic sewing machines can handle this project, but you must use the correct needle. A Denim needle or a Top-stitch needle size 90/14 is recommended because they are designed to pierce through thick layers without breaking. If your machine struggles with the thickness, try using a walking foot to help feed the heavy layers evenly through the feed dogs.
How do I choose the right size for my Patchwork Basket – Pattern?
Start by deciding what you want to store. A 6-inch cube is perfect for thread or makeup, while a 12-inch cube is better for yarn or toys. When calculating your fabric, remember to add a 1/4 inch seam allowance to every side of your pieces. If you want a specific finished size, always cut your fabric at least a half-inch larger than the target dimensions.
Can I make a Patchwork Basket – Pattern waterproof?
While cotton fabric isn’t waterproof, you can make the lining water-resistant by using laminated cotton or a product called Odicoat, which turns regular fabric into a wipeable, water-resistant surface. This is a great modification if you plan to use the basket in a bathroom or kitchen where it might encounter moisture or spills.
What should I do if my basket walls are still floppy?
If your walls aren’t stiff enough, you can add a second layer of interfacing to the lining or insert a piece of plastic canvas between the exterior and the lining before closing the top seam. Another trick is to do very dense straight-line quilting (about 1/4 inch apart); this compresses the fibers and naturally stiffens the fabric panels.
How do I clean a Patchwork Basket – Pattern?
Spot cleaning is the safest method. Use a soft brush or cloth with a mix of water and a tiny drop of gentle detergent. Avoid soaking the basket, as some stabilizers can become “mushy” when fully saturated. If you must wash it, do so by hand in cold water and air dry it by stuffing it with a dry towel to help it keep its shape while drying.
Conclusion
This article provided a deep dive into the creative process of making a Patchwork Basket – Pattern, covering everything from the initial fabric selection and interfacing requirements to the final top-stitching and customization techniques.
We learned that the secret to a successful fabric basket lies in the preparation—accurate cutting, firm stabilizers, and precise piecing are the pillars of a professional result. By following these steps, you can turn a pile of simple scraps into an organized and stylish storage solution that adds a personal touch to any room.