Creating an Easter Bunnies in Patchwork – Pattern is one of the most delightful ways to celebrate the spring season while honing your sewing skills. Patchwork is a versatile art form that allows you to combine various fabric scraps into a cohesive and charming design, and there is no better subject for this than the iconic Easter bunny. In this detailed guide, we will explore how to bring these festive characters to life through careful planning, precise cutting, and creative stitching.
The beauty of following an Easter Bunnies in Patchwork – Pattern lies in the ability to customize every detail, from the color of the bunny’s ears to the texture of the background fabric. Whether you are creating a wall hanging, a table runner, or a festive quilt for a child’s bedroom, the process of piecing together small fragments of fabric into a recognizable shape is both meditative and rewarding. This project is perfect for using up your “stash” of pastel fabrics while creating something that can be cherished for years to come.
In this comprehensive tutorial, we will break down the steps required to master the Easter Bunnies in Patchwork – Pattern, ensuring your final project looks professional and polished. We will focus on seam allowance, fabric selection, and fussy cutting techniques that elevate a simple craft into a work of art. By following these structured guidelines, you will gain the confidence to handle intricate shapes and nested seams, making your holiday decorating both personal and professional.
1. Selecting Fabrics for Your Easter Bunnies in Patchwork – Pattern
The foundation of a successful Easter Bunnies in Patchwork – Pattern begins with choosing the right textiles. For a spring-themed project, high-quality 100% cotton quilting fabric is the gold standard because it holds its shape well and doesn’t fray excessively during the piecing process. Look for a mix of tonal prints, small florals, and gingham patterns to give your bunnies a whimsical and traditional aesthetic.
When planning your Easter Bunnies in Patchwork – Pattern, color value is just as important as the print itself. You need enough contrast between the bunny and the background so the silhouette remains clear. If you choose a light cream background, consider using medium-to-dark pinks, blues, or lavenders for the bunny’s body to ensure the patchwork design “pops” and is easily recognizable from a distance.
Texture can also play a significant role in your Easter Bunnies in Patchwork – Pattern. While most of the project will use flat cotton, you might consider incorporating a small piece of flannel or minky fabric for the bunny’s tail to add a tactile element. This contrast in materials makes the finished piece more engaging, especially if the quilt is intended for a young child who will enjoy the different sensations.
Don’t overlook the importance of pre-washing your fabrics before starting the Easter Bunnies in Patchwork – Pattern. Since this project often uses high-contrast colors like bright whites next to deep purples, pre-washing prevents “bleeding” later on. It also ensures that all fabrics have undergone their initial shrinkage, so your seams stay flat and square after the first time you wash the completed quilt.
A successful Easter Bunnies in Patchwork – Pattern often benefits from a cohesive color palette. You might choose a “shabby chic” look with muted pastels or a modern vibrant look with bright neons. Whatever your choice, sticking to a specific color story throughout the project helps unify the different patchwork blocks and makes the final result look like a professionally designed piece.
Lastly, consider the scale of the prints in your Easter Bunnies in Patchwork – Pattern. Small-scale prints are generally better for the smaller pieces of the bunny, such as the ears or paws. If the print is too large, it can get “lost” when cut into small triangles or squares, losing the charm of the fabric. Micro-dots and pin-stripes are excellent choices for adding detail without overwhelming the small patchwork sections.
2. Mastering the Piecing Techniques for the Easter Bunnies in Patchwork – Pattern
The core of the Easter Bunnies in Patchwork – Pattern often relies on the Half-Square Triangle (HST) technique. HSTs are the building blocks of many animal-shaped quilt blocks, allowing you to create the slanted lines needed for the bunny’s ears and the curve of its head. Mastering a consistent 1/4 inch seam allowance is vital here to ensure all your points line up perfectly during assembly.
Another essential skill for this Easter Bunnies in Patchwork – Pattern is the “stitch and flip” method, often used for adding corners to squares. This technique helps create the rounded appearance of the bunny’s body without requiring you to sew difficult curved seams. By drawing a diagonal line on a small square and sewing along it, you can easily “snowball” the corners of your larger blocks for a soft, organic look.
Accurate cutting is the secret ingredient to a flat Easter Bunnies in Patchwork – Pattern. Using a rotary cutter, a self-healing mat, and a sharp acrylic ruler ensures that every piece is squared up correctly. Even a small discrepancy of an eighth of an inch can multiply across a block, leading to a finished bunny that is lopsided or difficult to join to other blocks.
Pressing is just as important as sewing in the Easter Bunnies in Patchwork – Pattern. Instead of “ironing” (which can stretch the fabric), you should “press” the iron down onto the seams. For this specific pattern, pressing seams open can help reduce bulk where multiple points meet, though many quilters prefer pressing to the dark side to prevent the seam allowance from showing through lighter fabrics.
Organization is key when working on a multi-piece Easter Bunnies in Patchwork – Pattern. It is helpful to use alphabetical labels or “wonder clips” to keep track of your pieces (Piece A, Piece B, etc.). Laying out your pieces on a design wall or a flat table before you start sewing allows you to check your color placement and ensure no blocks are rotated incorrectly before they are permanently joined.
If your Easter Bunnies in Patchwork – Pattern includes very small or intricate pieces, you might want to try Foundation Paper Piecing (FPP). This method involves sewing the fabric directly onto a paper template, which guarantees perfect precision for sharp points. FPP is especially useful for the thin, pointy ears of the bunny, where traditional piecing might result in lost points or bulky corners.
3. Assembling the Block and Adding Embellishments
Once the individual sections of your Easter Bunnies in Patchwork – Pattern are sewn, it is time to assemble the full block. Usually, this involves joining the “ear unit” to the “head unit” and then attaching them to the “body unit.” Take your time to nest your seams—this is where the seams of two joining pieces are pressed in opposite directions so they “lock” together, resulting in perfectly aligned corners.
After the main body of the Easter Bunnies in Patchwork – Pattern is complete, you can focus on the face. While some patterns use patchwork for the eyes and nose, applique is a popular alternative. You can use a small circle of black fabric for the eyes and a pink triangle for the nose, securing them with a blanket stitch or a tight zigzag stitch on your sewing machine.
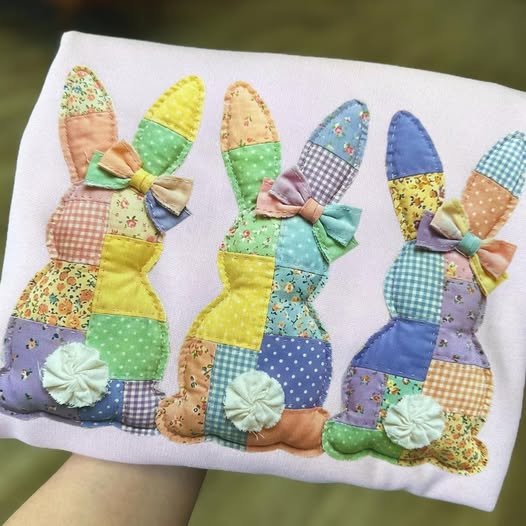
Adding a “tail” is the crowning glory of any Easter Bunnies in Patchwork – Pattern. A 3D pompom made of yarn is a classic choice, but if the item will be washed frequently, a circular yo-yo fabric embellishment is more durable. Simply cut a circle of fabric, sew a running stitch around the edge, pull it tight, and sew it onto the bunny’s backside for a cute, dimensional effect.
The background of your Easter Bunnies in Patchwork – Pattern block provides a great opportunity for decorative quilting. You could quilt “echo lines” around the bunny to make it stand out, or stitch small “grass” or “flower” shapes in the negative space. This extra layer of detail adds depth to the patchwork and helps secure the batting and backing fabrics together.
If you are making a larger project with multiple Easter Bunnies in Patchwork – Pattern blocks, consider using sashing. Sashing is the strips of fabric that act as a border between blocks. Using a contrasting color for the sashing can help each individual bunny stand out, while adding cornerstones (small squares where the sashing intersects) adds an extra level of sophisticated detail to the layout.
Finalizing the edges of your Easter Bunnies in Patchwork – Pattern project requires a sturdy binding. A double-fold bias binding in a coordinating spring color provides a clean, professional frame for your work. Whether you machine-stitch the binding for speed or hand-sew it for a hidden finish, ensure the corners are neatly mitered to keep the project looking sharp and high-quality.
4. Care, Display, and SEO Best Practices for Quilters
To keep your Easter Bunnies in Patchwork – Pattern looking fresh year after year, proper storage is essential. Avoid folding your quilts in the same spot for long periods, as this can create permanent creases or weaken the fibers. Instead, roll the quilt or re-fold it occasionally in different directions. Keep it in a breathable cotton bag rather than plastic to prevent moisture buildup or yellowing.
If you are sharing your Easter Bunnies in Patchwork – Pattern online, remember that lighting is everything. Photograph your work in natural, indirect sunlight to capture the true colors of the fabric. Close-up shots of your stitching and the bunny’s face help potential followers or customers appreciate the hand-crafted detail and the quality of your patchwork technique.
For those blogging about their Easter Bunnies in Patchwork – Pattern, using alt-text on your images is a great SEO tip. Describe the image accurately (e.g., “Close up of pink patchwork bunny ear with floral fabric”) to help search engines understand your content. This also makes your site more accessible to visually impaired readers who use screen readers to enjoy your hobby.
Engaging with the quilting community can boost the visibility of your Easter Bunnies in Patchwork – Pattern project. Use relevant hashtags on social media like #ModernQuilt, #EasterSewing, and #PatchworkBunny. Sharing “behind the scenes” photos of your fabric selection or your messy sewing room makes you more relatable to your audience and builds a loyal following.
When writing your own tutorials for an Easter Bunnies in Patchwork – Pattern, always provide a PDF download or a clear printable diagram. Users appreciate content that is easy to follow away from the computer screen. Providing both metric and imperial measurements ensures that your tutorial is accessible to quilters all over the world, regardless of where they live.
Finally, remember that the goal of creating an Easter Bunnies in Patchwork – Pattern is joy. Don’t stress over a slightly crooked seam or a point that isn’t perfectly sharp. The charm of handmade patchwork lies in its imperfections and the love that went into every stitch. Celebrate your progress, learn from each block, and enjoy the process of creating a festive heirloom for your family.
FAQ – Frequently Asked Questions
What is the best size for an Easter Bunnies in Patchwork – Pattern block?
Most quilters find that a 12-inch square block is the most versatile. This size is large enough to show detail but small enough to be used in various projects, from pillows to large quilts. However, you can scale the pattern down to 6 inches for a mini-quilt or up to 18 inches for a statement floor cushion.
Can I use scraps from other projects for this pattern?
Absolutely! The Easter Bunnies in Patchwork – Pattern is an excellent “scrap buster.” Since bunnies are small, you can use very tiny pieces of fabric for the ears and tail. Just make sure the scraps are of a similar weight and material (preferably all cotton) so they sew together smoothly.
Do I need a special sewing machine foot for patchwork?
While not strictly necessary, a 1/4 inch quilting foot is highly recommended. It has a built-in guide that helps you maintain a perfectly consistent seam allowance. If you don’t have one, you can place a piece of painter’s tape on your machine’s throat plate to mark the 1/4 inch line.
How do I make the bunny’s eyes look professional?
For the best results, use fusible web (like HeatnBond) to iron the eyes onto the patchwork before sewing. This keeps the small pieces from shifting. You can also use embroidery to hand-stitch the eyes with a satin stitch or use small safety eyes if the project is for decorative use only.
Is this pattern suitable for beginners?
Yes, especially if you focus on a simplified version of the Easter Bunnies in Patchwork – Pattern. Beginners should look for designs that use larger squares and fewer triangles. As you become more comfortable with matching seams, you can progress to more intricate designs with smaller pieces.
How do I stop my quilt blocks from becoming distorted?
Distortion often happens when you pull the fabric while sewing or when you use too much steam while ironing. To keep your Easter Bunnies in Patchwork – Pattern square, use a dry iron and use starch or a fabric stabilizer to give the cotton pieces more rigidity before you start cutting and sewing.
Conclusion
In this guide, we have explored the wonderful world of creating an Easter Bunnies in Patchwork – Pattern. We covered everything from the importance of selecting the right color values and fabric types to the technical aspects of HST construction and accurate seaming.
We also touched on the small details that bring a bunny to life, such as applique eyes and 3D tails, ensuring your project is as cute as it is well-made. By following these steps and practicing your quilting techniques, you can create a beautiful holiday decoration that reflects your personal style and craftsmanship.