The Crochet Lattice Stitch – Pattern is a sophisticated and visually captivating technique that brings a touch of architectural elegance to the world of fiber arts. Characterized by its crisscross design and openwork structure, this stitch mimics the look of a garden trellis, providing a beautiful balance between solid texture and delicate negative space. It is a favorite among makers who want to elevate their projects, offering a rhythmic flow that is both meditative to create and stunning to behold once finished.
Mastering the Crochet Lattice Stitch – Pattern allows you to expand your creative repertoire, enabling the production of items that look far more complex than they actually are. Whether you are aiming to create a breathable summer shawl, a decorative throw pillow, or a structural market bag, this stitch provides the versatility needed for diverse applications. The beauty of this pattern lies in its geometry, where slanted stitches intersect to create diamond-shaped windows that highlight the unique quality of your chosen yarn.
In this comprehensive guide, we will dive deep into the mechanics of the Crochet Lattice Stitch – Pattern, ensuring you understand every nuance from the foundation chain to the final row. We have structured this article to be highly readable and informative, adhering to the best practices for digital content and SEO optimization. By following these steps, you will not only learn a new skill but also gain the confidence to incorporate this intricate design into your own custom designs and professional fiber art collections.
1. Getting Started with the Crochet Lattice Stitch – Pattern
To begin your journey with the Crochet Lattice Stitch – Pattern, you first need to understand its mathematical foundation. Most variations of this stitch rely on a specific multiple of stitches, often plus a few extra for the turning chain. Ensuring your foundation chain is accurate is the secret to preventing the fabric from pulling or warping as you build height.
Selection of materials is the next logical step when preparing for a Crochet Lattice Stitch – Pattern. Because this is an openwork design, using a smooth, mercerized cotton or a crisp linen blend can help accentuate the “lattice” lines. These yarns have excellent stitch definition, making the diagonal overlaps stand out clearly against the background.
The choice of crochet hook size also plays a pivotal role in the final aesthetic of the project. If you want a very airy and light result, using a hook slightly larger than recommended on the yarn label can create a draped, ethereal effect. Conversely, a smaller hook will result in a more structured and rigid diamond lattice look.
Before committing to a large project, always work up a practice swatch. This allows you to get a feel for the “cross-over” movement required by the Crochet Lattice Stitch – Pattern. It also gives you a chance to check your tension, ensuring that the slanted stitches aren’t too tight, which could cause the fabric to bunch up.
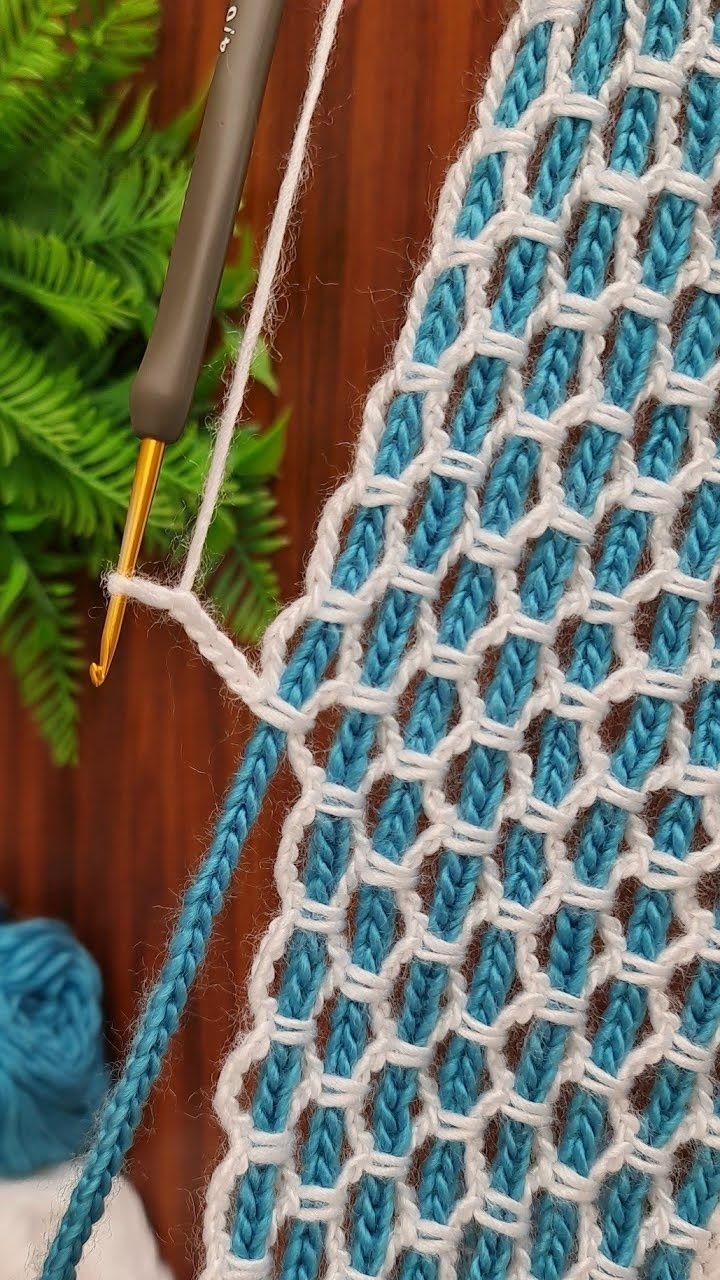
Understanding the visual language of the Crochet Lattice Stitch – Pattern involves recognizing how the treble crochet or front post stitches are used to create the diagonal lines. These elongated stitches are worked into rows below the current one, creating that signature 3D overlapping effect that makes the pattern so distinctive.
Finally, keep your workspace well-lit and organized. Since the Crochet Lattice Stitch – Pattern involves skipping stitches and working into specific spaces, being able to clearly see your stitch placement is vital. Many crocheters find that using stitch markers at the beginning and end of rows helps maintain straight edges throughout the process.
2. Technical Steps for Creating the Lattice Effect
The core of the Crochet Lattice Stitch – Pattern usually involves a series of rows that alternate between establishing a base and creating the decorative “bars.” You will often start with a row of simple stitches like single crochet or half double crochet to provide a stable foundation for the more complex work that follows.
The “crisscross” magic happens when you work crossed double crochet or elongated stitches. In a typical Crochet Lattice Stitch – Pattern, you might skip several stitches, work your tall stitch, and then go back to work into the skipped stitches. This physical crossing of the yarn creates the intersection that defines the lattice.
Consistency is everything when working on a Crochet Lattice Stitch – Pattern. You must ensure that each “leg” of the lattice is worked with the same amount of yarn height. If one side is looser than the other, your diamonds will look lopsided, which can be difficult to fix during the blocking process later on.
As you progress through the rows, you will notice that the Crochet Lattice Stitch – Pattern starts to repeat. Most designs use a 4-row or 6-row repeat. Memorizing this sequence allows you to crochet more fluidly, as you start to recognize the “neighborhoods” where each stitch belongs without constantly checking the written instructions.
One common challenge with the Crochet Lattice Stitch – Pattern is managing the edges. Because the lattice can pull inward, it is often helpful to work a solid border of two or three stitches at each end. This provides a clean frame and makes it much easier to seam pieces together if you are making a garment.
Advanced versions of the Crochet Lattice Stitch – Pattern might incorporate beads or color changes at the intersection points. By changing yarn colors every few rows, you can create a multi-toned trellis that looks like a stained-glass window. This technique is particularly popular for high-end handmade home decor items.
3. Optimizing Your Project for a Professional Finish
Once the body of your Crochet Lattice Stitch – Pattern is complete, the finishing touches will determine whether it looks “homemade” or “handmade professional.” The first step is to weave in your ends securely. Use a tapestry needle to hide the yarn tails within the denser parts of the stitch work to ensure they don’t peek through the lattice holes.
Blocking is absolutely essential for the Crochet Lattice Stitch – Pattern. Because the stitches are slanted, they naturally want to bias or lean in one direction. By pinning the garment out to its intended dimensions and lightly steaming it, you “lock” the lattice into its perfect geometric shape, making the holes uniform.
Consider the weight of the finished Crochet Lattice Stitch – Pattern. Openwork designs can sometimes stretch over time due to gravity, especially if you are using heavy fibers like 100% acrylic. To prevent this, you can add a ribbed border or a reinforced neckline to provide extra structural support for the weight of the piece.
Adding a lining is another option for items like bags or skirts made with the Crochet Lattice Stitch – Pattern. Since the stitch is quite open, a fabric lining in a contrasting or matching color can protect the items inside and provide a beautiful background that makes the crochet lace pop.
For those looking to sell their work, documenting the Crochet Lattice Stitch – Pattern through high-quality photography is key. Showcasing the texture against a neutral background helps potential buyers appreciate the complexity of the work. Clear visuals are a huge part of successful digital marketing for crafters.
Finally, remember to keep a record of your hook size and yarn brand for every Crochet Lattice Stitch – Pattern you complete. If you ever need to repair the item or want to replicate the results for a customer, having those technical details on hand is invaluable for maintaining brand consistency.
4. Creative Applications and Variations of the Lattice
The Crochet Lattice Stitch – Pattern is not limited to flat blankets; it can be adapted for circular projects as well. Working the lattice in the round is perfect for creating crochet hats or circular vests. It requires a bit more focus on the “join” at the end of each row to ensure the pattern remains seamless.
Another popular variation is the Raised Lattice Stitch, which uses front post treble crochets to create a texture that sits on top of the fabric. This version is much thicker and warmer, making it a fantastic choice for winter sweaters or heavy textured blankets where you want a 3D effect.
You can also experiment with the “size” of the lattice. By increasing the number of skipped stitches and the height of the crossing stitches, you can create a “Jumbo” Crochet Lattice Stitch – Pattern. This look is very trendy for modern, oversized interior design pieces like floor poufs or chunky throws.
Integrating the Crochet Lattice Stitch – Pattern with other textures, such as the popcorn stitch or puff stitch, can create a highly ornate “mixed media” look. Placing a puff stitch in the center of each lattice diamond adds a touch of whimsical detail that is perfect for baby blankets or decorative wraps.
For a minimalist approach, use the Crochet Lattice Stitch – Pattern with a very thin, lace-weight yarn. This transforms the design into something resembling fine jewelry or vintage lace. It is a time-consuming process, but the results are heirloom-quality pieces that can be passed down through generations.
Lastly, don’t be afraid to innovate. The Crochet Lattice Stitch – Pattern is a framework for your imagination. Whether you use it as a small accent panel on a sleeve or as the main event for a full-sized bedspread, this stitch remains one of the most versatile and respected techniques in the fiber arts community.
FAQ – Frequently Asked Questions
Is the Crochet Lattice Stitch – Pattern difficult for beginners?
It is considered an intermediate stitch because it requires knowledge of skipping stitches and working into specific spaces. However, a brave beginner who understands basic stitches like the double crochet can master it with a bit of practice and a slow-paced tutorial.
What is the best yarn weight for this pattern?
While you can use any weight, DK (double knitting) or Worsted weight yarn is ideal for learning. These weights allow you to see the stitch definition clearly without the yarn being too thin to handle or too thick to see the lattice holes.
Does the Crochet Lattice Stitch – Pattern use a lot of yarn?
Yes, because of the overlapping nature of the stitches and the height required for the “legs” of the lattice, this stitch can be a bit of a “yarn eater.” It is always recommended to have at least 15-20% more yarn than you would for a standard solid stitch project.
Can I use this stitch for a baby blanket?
Absolutely! The Crochet Lattice Stitch – Pattern is beautiful for baby blankets. However, keep in mind that the holes are a bit larger, so you may want to ensure the yarn is very soft and that the tension is tight enough to prevent tiny fingers from getting caught.
How do I fix a mistake in the lattice?
Because the pattern relies on a specific sequence, mistakes are usually visible within a few rows. If the diamonds don’t line up, it’s best to “frog” (rip out) the stitches back to the error. Counting your stitches at the end of every row is the best way to prevent this.
Can I work the lattice stitch with two colors?
Yes! Working the background rows in one color and the “lattice” rows in another creates a stunning contrast. This highlights the architectural nature of the Crochet Lattice Stitch – Pattern and makes the diagonal lines truly stand out.
Conclusion
In this guide, we have explored the intricate world of the Crochet Lattice Stitch – Pattern, covering everything from the mathematical foundations and material selection to the advanced finishing techniques like blocking and seaming. We discussed how this stitch provides a unique blend of structure and transparency, making it a versatile tool for any fiber artist. By understanding the 4-row repeat and the importance of consistent tension, you can create professional-grade items that showcase your technical skill and creative vision.
We hope you found this tutorial helpful and that it inspires you to start your next project today. The Crochet Lattice Stitch – Pattern is a beautiful addition to any collection, and we can’t wait to see how you use it. Please leave your sincere opinion in the comments and share your suggestions for what you would like to learn next.