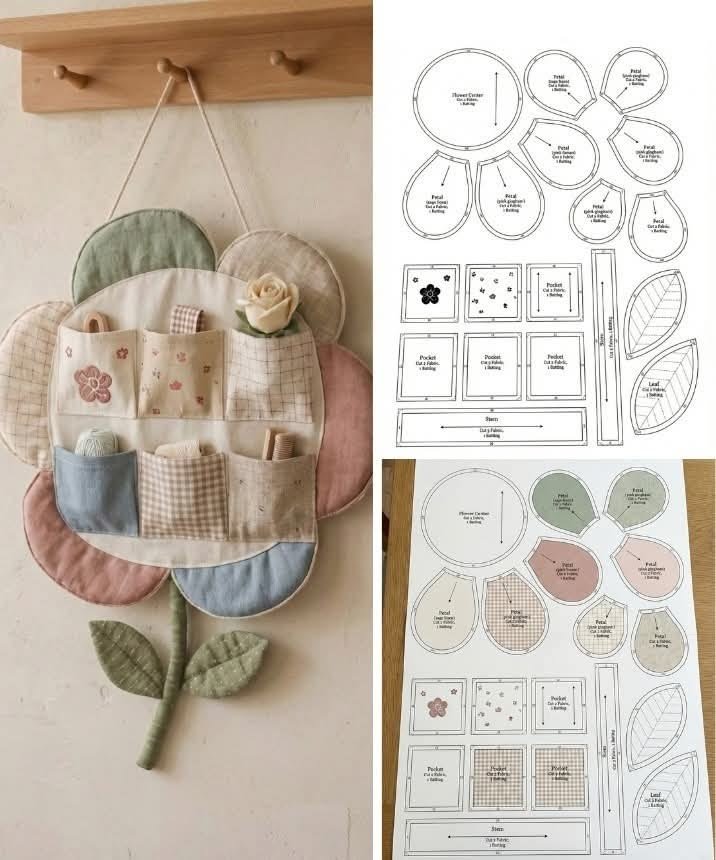
The Cottage Flower Wall Organizer – Pattern is a delightful project that combines the charm of rustic aesthetics with the practicality of modern home storage solutions. If you have been looking for a way to bring a touch of the countryside into your living space, this handmade wall hanging is the perfect answer. By following this comprehensive crafting guide, you will learn how to create a piece that is not only functional but also serves as a beautiful work of art for your home office, bedroom, or craft room.
Creating your own Cottage Flower Wall Organizer – Pattern allows for a level of customization that store-bought items simply cannot match. You have the freedom to choose a color palette that complements your existing decor, whether you prefer soft pastels, vibrant floral hues, or earthy tones. This project is particularly rewarding because it utilizes various textile techniques to create 3D textures, making the flowers look like they are blooming right off your wall.
Beyond its visual appeal, the Cottage Flower Wall Organizer – Pattern serves as an essential tool for creative organization. It features specialized pockets designed to hold everything from crochet hooks and scissors to stationary and dried lavender. In this article, we will break down the essential steps, materials, and SEO-friendly tips to ensure your project is a success, helping you master the art of functional home decor while enjoying the therapeutic process of crafting.
1. Essential Materials and Tools for Your Cottage Flower Wall Organizer – Pattern
To begin your Cottage Flower Wall Organizer – Pattern, you must first gather high-quality materials that ensure durability. I highly recommend using 100% cotton yarn or a heavy-duty canvas fabric as the base, as these materials provide the structural integrity needed to hold the weight of your items. Choosing the right crafting supplies is the first step toward a professional finish.
The floral elements of this floral wall hanging require a variety of textures to achieve that authentic cottage look. Consider using mercerized cotton for a slight sheen on the petals, or perhaps a wool blend for a cozy, rustic feel. Having a set of ergonomic crochet hooks or sharp sewing needles will make the assembly process much smoother and more enjoyable for your hands.
Don’t forget the structural components like a wooden dowel or a sturdy branch to hang your finished piece. This adds to the Cottagecore aesthetic and ensures the organizer hangs flat against the wall. You will also need a measuring tape and stitch markers to keep your dimensions consistent throughout the pattern construction phase.
For those interested in sustainable crafting, this project is an excellent opportunity to use up scrap yarn or leftover fabric pieces. The small flowers and leaf accents are perfect for upcycling materials, reducing waste while adding a unique, eclectic charm to your work. Mixing different fiber types can also add a sophisticated mixed-media look to the organizer.
Planning your color story is a vital part of the preparation. Look for inspiration in nature, such as a spring garden or a wildflower meadow, to select your complementary colors. Using high-contrast shades for the centers of the flowers can make the design pop, ensuring that your Cottage Flower Wall Organizer – Pattern becomes a focal point in any room.
Lastly, ensure you have a clear workspace with good lighting. Precision is key when following a detailed craft pattern, especially when joining the small pockets to the main backing. Having all your organized craft tools within reach will allow you to stay in the creative flow and produce a high-quality handmade organizer you can be proud of.
2. Understanding the Base Structure and Pocket Placement
The foundation of the Cottage Flower Wall Organizer – Pattern starts with a solid rectangular base. This part of the pattern design acts as your canvas, and it is important to keep your stitches or seams tight so the fabric doesn’t sag over time. A double crochet stitch or a sturdy canvas weave usually provides the best stability for this purpose.
Once the base is complete, the next phase involves the strategic placement of the pockets. Think about what you intend to store; smaller pockets are ideal for sewing notions, while larger ones can accommodate notebooks or tablets. Mapping out the layout before attaching anything is a pro-tip for crafters that prevents mistakes and ensures visual balance.
When you start attaching the pockets to your Cottage Flower Wall Organizer – Pattern, use a reinforced stitch at the corners. These areas experience the most tension when the organizer is in use, so extra durability is essential. This attention to detail is what separates a beginner project from a long-lasting functional heirloom.
The beauty of this cottage-style pattern lies in its hidden complexity. You can vary the heights of the pockets to create a staggered, organic look that mimics a garden. This asymmetrical design adds visual interest and allows for more versatile storage options, making the piece as practical as it is beautiful for home organization.
Incorporate the floral motifs as you build the pockets. Some flowers can be stitched directly onto the front of the pockets, while others can “vining” up the sides of the wall organizer. This integration makes the Cottage Flower Wall Organizer – Pattern feel like a cohesive piece of art rather than just a storage unit with decorations stuck on top.
Always double-check your alignment using a transparent ruler. Even a slight tilt can be noticeable once the piece is hung on the wall. Taking the time to pin everything in place before the final assembly is a best practice in textile arts that guarantees your DIY wall organizer looks professionally made and perfectly aligned.
3. Mastering the Floral Embellishments and Leaf Motifs
The heart of the Cottage Flower Wall Organizer – Pattern is, of course, the flowers. To achieve a vintage cottage look, focus on patterns like the African Flower, basic roses, and delicate daisies. Using a variety of floral stitch patterns creates a rich, textured surface that invites touch and admiration from anyone who sees it.
To make your flowers look more realistic, try using gradient yarn or variegated threads. This creates a natural color transition in the petals without requiring constant color changes. In the world of crochet and sewing, these small details elevate the Cottage Flower Wall Organizer – Pattern and give it a high-end, “boutique” appearance.
Leaves are just as important as the blossoms in this nature-inspired project. Work with different shades of green—from sage to forest green—to add depth. Different leaf patterns, such as pointed willow leaves or rounded clover shapes, will add to the botanical accuracy and charm of your hand-stitched wall art.
Layering is a secret technique used by experts. Instead of flat flowers, try stacking two or three different-sized circles to create a 3D bloom. This adds a sense of luxury and weight to the Cottage Flower Wall Organizer – Pattern, making it a standout piece of handmade home decor that captures the essence of a blooming garden.
Don’t be afraid to experiment with beadwork or embroidery in the centers of your flowers. A few well-placed French knots or a shiny seed bead can mimic pollen and add a touch of sparkle. These embellishment techniques personalize your organizer, making your version of the Cottage Flower Wall Organizer – Pattern truly one-of-a-kind.
Once your flowers and leaves are finished, arrange them in clusters. Grouping your floral motifs in the corners or along the top edge creates a frame for the functional pockets. This balance between decorative art and utilitarian design is the core philosophy behind a successful cottage-themed craft project.
4. Finishing Touches and Displaying Your Creation
The final stage of the Cottage Flower Wall Organizer – Pattern involves blocking your work to ensure it holds its shape. Blocking is a process of wetting the fibers and pinning them to a specific measurement to dry. This step is crucial for textile projects because it smooths out the stitches and gives the organizer a crisp, clean finish.
Now it’s time to insert the hanging rod. Slide your wooden dowel through the top loops of the organizer and secure it with a decorative cord or a crochet chain. Choosing a high-quality cord ensures that your Cottage Flower Wall Organizer – Pattern stays securely on the wall, even when the pockets are full of tools.
Check all your loose ends and weave them in securely. There is nothing worse than a beautiful handmade item unraveling because of a loose thread. Use a tapestry needle to hide the tails behind the thickest part of the stitches, which is a standard finishing technique for high-quality fiber arts.
Consider adding a fabric backing to the entire piece. This not only hides the messy backside of your embroidery or stitches but also adds an extra layer of stability. A simple cotton muslin or a floral print fabric can finish the Cottage Flower Wall Organizer – Pattern beautifully, making it look as good from the back as it does from the front.
When choosing where to hang your new floral organizer, look for a spot with good natural light to highlight the textures. It works perfectly as office organization for pens and planners, or in a hallway for keys and mail. The versatility of this pattern means it can adapt to almost any room in your home while adding warmth.
Finally, take some high-quality photos of your work! If you are a content creator or a craft blogger, sharing your journey with the Cottage Flower Wall Organizer – Pattern can inspire others. Using SEO keywords like “DIY organizer” and “cottagecore decor” will help your beautiful creation find an audience of fellow craft enthusiasts online.
FAQ: Common Questions About the Cottage Flower Wall Organizer – Pattern
Can a beginner complete this pattern?
Yes, while the Cottage Flower Wall Organizer – Pattern looks complex, it is made of basic shapes. If you know how to do a single crochet or basic straight stitch, you can build the base. The flowers can be added as you improve your skills, making it a great skill-building project.
What is the best type of yarn for this organizer?
For the best results, use worsted weight cotton yarn. Cotton is less stretchy than acrylic or wool, which means your wall hanging won’t grow or sag when you put heavy items like scissors or phones in the pockets.
How do I clean my wall organizer?
Since it is a textile wall piece, I recommend spot cleaning with a damp cloth and mild soap. If you used high-quality cotton, you could hand wash it gently, but be careful not to agitate the delicate floral embellishments too much to maintain their shape.
How long does it take to finish the project?
Depending on your experience level, the Cottage Flower Wall Organizer – Pattern typically takes about 10 to 15 hours to complete. It is a perfect weekend craft project that you can work on bit by bit while watching your favorite shows.
Can I adjust the size of the organizer?
Absolutely! The modular design of this pattern allows you to simply add more rows to the base or increase the width. You can create a small one-pocket version for a nursery or a large multi-pocket organizer for a full craft room setup.
Conclusion
In this article, we have explored the intricate details of creating a Cottage Flower Wall Organizer – Pattern, from selecting the right durable materials to mastering the 3D floral motifs.
We discussed the importance of structural integrity, the art of pocket placement, and the professional finishing techniques like blocking and adding a fabric backing. This project is a perfect marriage of aesthetic beauty and functional storage, providing a wonderful outlet for your creativity while helping you declutter your space in style.