Fabric Weaving – Tutorial is an incredible way to transform simple strips of cloth into a durable, textured masterpiece that adds a unique touch to any sewing or home decor project. This ancient technique, which involves interlacing two sets of threads or fabric strips at right angles, has seen a massive resurgence in the modern crafting world. Whether you are looking to create a sturdy base for a new handbag, a decorative pillow cover, or a custom piece of wall art, mastering the art of weaving fabric allows for endless creativity and color exploration.
In this comprehensive Fabric Weaving – Tutorial, we will dive deep into the mechanics of creating woven panels using various materials and tools. The beauty of this craft lies in its accessibility; you don’t need a massive floor loom to achieve professional results. By using basic items like interfacing, quilting pins, and a cork board, you can simulate the weaving process right on your worktable. This method is particularly effective for those who want to practice sustainable crafting by repurposing fabric scraps or long-form strips of cotton.
To ensure your success, this Fabric Weaving – Tutorial focuses on the structural integrity of the weave, ensuring that your final product is not only beautiful but also functional. We will discuss how to select the right fabric weight, the importance of bias tape makers, and the best ways to secure your edges so they don’t fray during the assembly process. By the end of this guide, you will have the confidence to design your own weaving patterns and integrate these stunning textured panels into your everyday sewing repertoire.
1. Essential Tools and Materials for Your Fabric Weaving – Tutorial
The first step in any successful Fabric Weaving – Tutorial is gathering the right supplies to ensure precision and ease. You will primarily need high-quality cotton fabric, preferably in contrasting colors or patterns to make the woven design pop. Using rotary cutters and a self-healing mat is highly recommended to ensure that your strips are perfectly straight and consistent in width, which is vital for a tight weave.
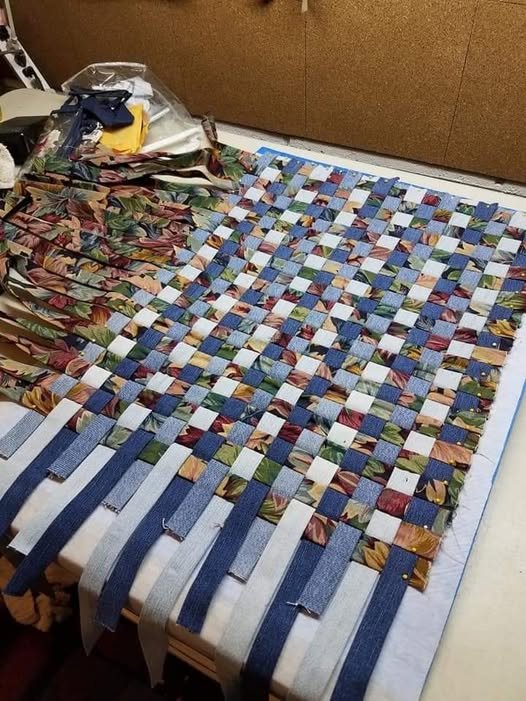
Beyond the fabric itself, a foam or cork blocking board acts as your temporary loom, providing a stable surface to pin your strips. You will also need a generous supply of glass-head pins or T-pins to hold the vertical strips, known as the warp, firmly in place while you work. These tools prevent the fabric from shifting, which is the most common challenge beginners face when starting a Fabric Weaving – Tutorial.
Another secret weapon for professional weavers is fusible interfacing. Applying a lightweight heat-activated adhesive to the back of your fabric strips before weaving can give them extra body and prevent stretching. If you prefer a more finished look, using a bias tape maker to fold the raw edges of your strips inward will result in a clean, polished appearance without any visible fraying.
The choice of thread and needles also plays a role if you plan to quilt the woven panel later. High-tensile polyester thread is excellent for securing the perimeter of your weave once it is finished. Additionally, a weaving needle or a large bodkin can be incredibly helpful for threading the horizontal strips, or the weft, through the tensioned warp strips with minimal effort.
Measurement is the final pillar of your toolkit. A clear acrylic ruler is indispensable for maintaining a 90-degree angle throughout the process. Since the Fabric Weaving – Tutorial relies on geometric accuracy, checking your alignment every few rows will save you from having to undo your hard work later. Precision at the start leads to a professional finish.
Finally, consider the workspace itself. Having a flat, well-lit area is essential for seeing the intricate over-under patterns. Many crafters find that using a marking pen (water-soluble or heat-erasable) helps in identifying the center point of the board. With these tools ready, you are prepared to move from the preparation phase into the actual construction of your woven fabric panel.
2. Preparing Your Strips and Setting Up the Warp
The foundation of a great Fabric Weaving – Tutorial starts with the preparation of the strips. Most crafters prefer strips between 1 inch and 2 inches wide, depending on the scale of the project. If you are using raw edges, remember to account for the fold-over width; for example, a 2-inch strip through a 1-inch bias tape maker creates a perfect 1-inch finished strip.
Once your strips are cut and pressed, it is time to set up the warp. In weaving terminology, the warp refers to the vertical strips that are pinned to the board first. Lay your strips side-by-side on your weaving board, ensuring there are no gaps between them. Pin each strip at the top, making sure they are taut but not over-stretched, as this could cause the fabric to pucker.
Consistency is the most important factor during this stage of the Fabric Weaving – Tutorial. If one strip is looser than the others, your final weave will look uneven. Use your acrylic ruler to ensure the strips are perfectly vertical. Many experts suggest pinning the bottom of the warp strips as well, though some prefer leaving them loose to make the under-over interlacing easier.
The color arrangement of your warp determines the “background” of your design. You can create gradient effects or checkered patterns simply by alternating colors in this phase. In this Fabric Weaving – Tutorial, we recommend a simple two-color alternation for beginners to help keep track of the weaving logic. This visual contrast makes it much easier to spot a mistake in the weave.
If you are working on a larger project, consider using a temporary spray adhesive on a piece of stabilizer placed underneath the warp. This adds another layer of security, keeping the strips from sliding horizontally. However, for most small-to-medium panels, high-quality quilting pins are more than sufficient to keep everything aligned while you prepare to introduce the weft.
Before moving to the next step, do a final “tension check.” Run your hand lightly over the warp strips; they should feel like a solid sheet of fabric rather than individual ribbons. This level of preparation is what separates a DIY look from a professional textile design. Now that your warp is secure, you are ready to begin the rhythmic process of interlacing the weft.
3. Mastering the Weave: The Over-Under Technique
The core of the Fabric Weaving – Tutorial is the actual interlacing of the weft strips. The weft is the set of horizontal strips that travel across the warp. Starting at the top, take your first weft strip and slide it under the first warp strip, then over the second, and repeat. This is known as a plain weave or tabby weave, and it is the strongest and most common structure in textile arts.
For the second row, you must reverse the pattern. If the first row started “under,” the second row must start “over” the first warp strip. This staggering of the intersections is what locks the fabric together. As you work through this Fabric Weaving – Tutorial, you will notice a grid pattern emerging. Use your fingers to gently “beat” or push the weft strip up against the previous row to keep the weave tight.
As you add more rows, the friction between the fabric strips will start to hold the piece together naturally. However, it is still vital to pin the ends of each weft strip to the board. This maintains the lateral tension and prevents the edges from bowing inward. Maintaining a perfect square grid is the hallmark of a high-quality Fabric Weaving – Tutorial execution.
Once you are comfortable with the basic plain weave, you can experiment with twill weaves or basket weaves. A basket weave involves treating two warp and two weft strips as a single unit, creating a chunkier, more pronounced texture. These variations add depth and complexity to your Fabric Weaving – Tutorial projects, allowing for truly customized textile art.
One common mistake is pulling the weft strips too tight as they exit the warp. This creates a “waist” in the middle of your panel. To avoid this, lay the weft strip across the warp in a slight arc before pinning the end, then gently flatten it into place. This ensures there is just enough slack for the strip to navigate the “over and under” path without distorting the warp alignment.
Throughout this process, keep your fabric glue pen or wash-away tape handy. If you find a strip is particularly slippery, a tiny dot of glue at the intersection can hold it until you are ready for the final stitching. Mastering this stage of the Fabric Weaving – Tutorial requires patience, but the visual reward of the emerging pattern is incredibly satisfying.
4. Finishing Touches and Securing Your Woven Panel
After completing your desired dimensions, the final stage of the Fabric Weaving – Tutorial is securing the edges so you can remove the pins and use the fabric. The most effective way to do this is by using a basting stitch around the entire perimeter. Using your sewing machine, sew a straight line approximately 1/8 inch from the edge. This “locks” all the warp and weft strips in their permanent positions.
For added stability, many crafters choose to fuse a piece of lightweight interfacing to the back of the entire panel while it is still pinned to the board. Carefully place the interfacing (adhesive side down) over the weave and press with a hot iron. The heat will bond the woven strips to the backing, turning your individual pieces of fabric into a single, cohesive woven textile sheet.
Once the panel is fused or basted, you can trim the excess fabric from the edges. Use your rotary cutter and ruler to square up the panel. It is often helpful to cut the panel slightly larger than your final needed size to allow for any minor shifting during the sewing process. This extra margin is a standard safety measure in any professional Fabric Weaving – Tutorial.
Now that your panel is secure, you can treat it like any other piece of fabric. You can quilt it, add decorative topstitching, or even cut it into specific shapes for appliqué. The woven texture provides a beautiful surface for free-motion quilting, as the needle follows the natural grids of the weave. This adds another layer of professional detail to your project.
If you are using the woven panel for a bag or a cushion, consider adding a lining fabric. Even with interfacing, the back of a woven panel can be slightly irregular. A smooth lining protects the interior threads and provides a clean finish. This Fabric Weaving – Tutorial emphasizes that the “inside” of your work should be just as tidy as the outside.
Finally, take a moment to admire the unique texture you have created. No two woven panels are exactly alike, especially when using hand-dyed fabrics or varied prints. You have successfully navigated the complexities of textile construction. This Fabric Weaving – Tutorial has provided you with the foundation to explore more complex patterns and larger-scale installations in the future.
Frequently Asked Questions (FAQ)
What is the best type of fabric for a Fabric Weaving – Tutorial?
High-quality quilting cotton is the gold standard for weaving. It has a tight weave itself, which prevents fraying, and it comes in an endless array of colors. You can also use denim scraps, linen, or even synthetic ribbons, provided they aren’t too stretchy.
How do I prevent the fabric strips from fraying?
Using a bias tape maker to fold the raw edges inward is the most effective method. Alternatively, you can use pinking shears to cut your strips or apply a thin layer of fabric sealant or fray check to the edges. Fusing the strips with interfacing before weaving also significantly reduces fraying.
Can I wash a project made with fabric weaving?
Yes, but you must secure the weave first. If you have basted the edges and fused the back with interfacing, it should hold up well in a gentle wash cycle. For best results, treat woven items like handmade quilts—wash on cold and air dry to maintain the integrity of the weave.
Do I need a special loom for this Fabric Weaving – Tutorial?
No, you do not need a traditional loom. A simple cork board, foam insulation board, or even a thick piece of cardboard can serve as your base. As long as you can push pins into the surface to hold your tension, you can create a beautiful woven panel.
What is the difference between Warp and Weft?
In any Fabric Weaving – Tutorial, the warp refers to the vertical strips that are held under tension on the board. The weft refers to the horizontal strips that you weave in and out of the warp. A helpful way to remember is that “weft” rhymes with “left,” and these strips move from left to right.
How can I make my weaving look more complex?
Once you master the basic 1×1 plain weave, try a 2×2 basket weave or a staggered twill. You can also vary the widths of your strips—using wide warp strips with thin weft strips creates a unique “ribbed” effect. Playing with color theory and pattern mixing is the easiest way to add visual complexity.
Conclusion
In this Fabric Weaving – Tutorial, we have explored the journey of creating a handcrafted textile from scratch, starting from the selection of essential tools to the final securing techniques. We covered how to prepare your warp and weft strips, the importance of maintaining consistent tension, and the various ways to lock your design in place using interfacing or basting stitches. By following these steps, you have transformed simple pieces of cloth into a complex, durable, and visually stunning woven panel that can be used in countless sewing projects.
Weaving is more than just a craft; it is a rhythmic, meditative process that allows you to engage with fabric in a deeply tactile way. We hope this guide has inspired you to look at your fabric stash with new eyes and experiment with your own color combinations and patterns. Please leave your sincere opinion in the comments below and share your suggestions for future tutorials or any unique variations you discovered while practicing your weaving!