Starting your next creative project with this Crochet Butterfly Keychain- Tutorial is a wonderful way to combine your love for fiber arts with a practical, everyday accessory. These charming little butterflies are not only incredibly quick to make but also serve as the perfect way to use up those small scraps of yarn that every crafter has tucked away in their stash. Throughout this Crochet Butterfly Keychain- Tutorial, we will explore how to create a delicate, winged creature that can brighten up your keys, backpack, or even serve as a thoughtful handmade gift for friends and family.
The beauty of a Crochet Butterfly Keychain- Tutorial lies in its simplicity and the endless possibilities for customization. You can experiment with different color combinations, from soft pastels for a spring-themed look to vibrant, neon shades for a more modern and bold statement piece. Because these butterflies are small, they provide instant gratification, making this Crochet Butterfly Keychain- Tutorial an ideal choice for a weekend afternoon project or a productive activity while you are watching your favorite show or traveling.
As we dive into the technical steps of this Crochet Butterfly Keychain- Tutorial, you will find that the pattern is designed to be accessible for those who have mastered the basic crochet stitches. We will be using a combination of magic rings, double crochet stitches, and chain spaces to build the wings and the body of the butterfly. This SEO-optimized guide ensures that you have all the information needed to produce a professional-quality Crochet Butterfly Keychain- Tutorial result that looks just as good as a store-bought accessory, but with the added warmth of a handmade item.
1. Selecting the Right Materials for Your Crochet Butterfly Keychain
Before you begin the actual stitching in this Crochet Butterfly Keychain- Tutorial, you need to gather the correct supplies to ensure a sturdy and beautiful result. For a keychain, we highly recommend using mercerized cotton yarn because it has a slight sheen and is much more durable than acrylic, which can pill over time with frequent handling. A weight 2 (Fine) or weight 3 (Light) yarn is typically the best choice for achieving a delicate, detailed look without the butterfly becoming too bulky or heavy for your keys.
Choosing the right crochet hook size is the next vital step in our Crochet Butterfly Keychain- Tutorial. Generally, you should use a hook that is slightly smaller than what the yarn label recommends; for example, a 2.5mm or 3.0mm hook works beautifully with light cotton. This creates tighter stitches, which helps the butterfly maintain its shape and prevents any stuffing or structural elements from showing through. A tighter tension ensures that your finished project remains crisp and professional throughout its life.
In this Crochet Butterfly Keychain- Tutorial, the hardware is just as important as the yarn. You will need a standard metal split ring or a lobster claw clasp to turn your crochet motif into a functional keychain. These can be found at any local craft store or ordered in bulk online. Having a pair of needle-nose pliers on hand can be very helpful for opening and closing the jump rings securely so that your beautiful butterfly doesn’t accidentally fly away from your keys.
Don’t forget the small details that bring the character of this Crochet Butterfly Keychain- Tutorial to life. You will need a tapestry needle with a large eye for weaving in your yarn ends and for sewing the butterfly’s body if your chosen pattern isn’t made in one piece. A small amount of embroidery floss in a contrasting color like black or brown is perfect for creating the antennae, giving your butterfly a realistic and whimsical finishing touch that stands out.
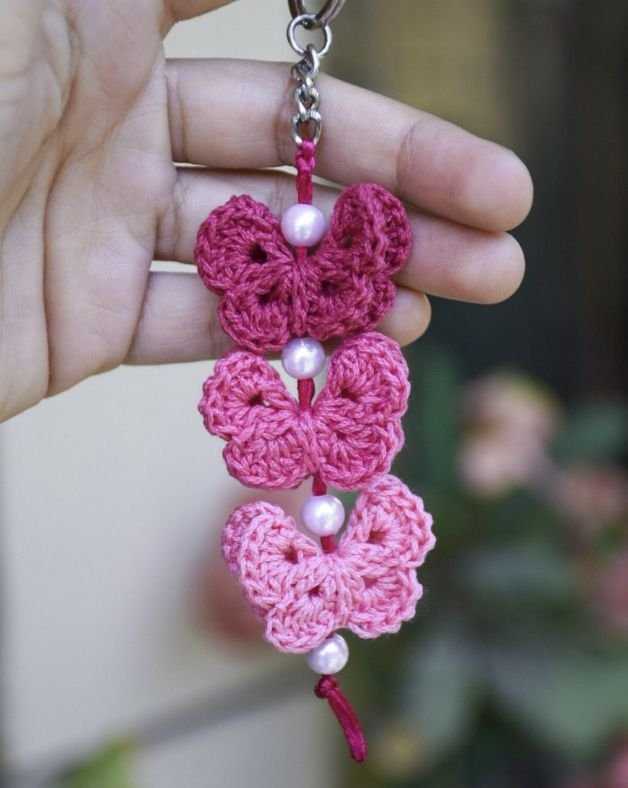
Color theory plays a big role in the success of your Crochet Butterfly Keychain- Tutorial. Since butterflies in nature are known for their symmetry, you might want to choose two coordinating colors—one for the inner wing detail and one for the outer border. Alternatively, using a variegated yarn can create a stunning multi-colored effect without the need to change yarns constantly. This makes the process much faster and adds a unique, organic feel to every single keychain you create.
Finally, keep a pair of sharp embroidery scissors nearby to ensure clean cuts. In this Crochet Butterfly Keychain- Tutorial, messy yarn tails can ruin the look of the small wings, so precision is key. If you want your butterfly to be extra stiff and durable, you might also consider using a fabric stiffener spray once the project is finished. This prevents the wings from curling over time and keeps the keychain looking brand new even after months of use.
2. Mastering the Basic Stitches and the Magic Ring
The foundation of our Crochet Butterfly Keychain- Tutorial starts with the magic ring (also known as a magic circle). This technique is essential for projects worked in the round because it allows you to pull the center hole tightly shut, leaving no visible gap. If you find the magic ring difficult, you can substitute it by chaining four and joining with a slip stitch, but the magic ring provides the most polished and professional finish for your butterfly’s center.
Most of the wing structure in this Crochet Butterfly Keychain- Tutorial is built using double crochet (dc) and treble crochet (tr) stitches. These taller stitches allow us to create the expansive, fan-like shape of the upper wings quickly. By grouping several of these stitches into a single chain space, you create the “shell” effect that mimics the natural curves of a butterfly. Practicing your tension on these stitches will ensure that both wings are the same size and shape.
The chain stitch (ch) is used throughout the Crochet Butterfly Keychain- Tutorial to create the necessary height and to act as a bridge between different parts of the wing. For example, a “ch-2” or “ch-3” space often serves as the corner or the tip of the wing. Mastering the count of these chains is vital because it determines how pointy or rounded your butterfly’s wings will appear. Accurate counting is the secret to a symmetrical and aesthetically pleasing final product.
In this Crochet Butterfly Keychain- Tutorial, we also use the slip stitch (sl st) as a utility stitch. It is primarily used to join rounds or to move the yarn to a new position on the piece without adding extra height. When you finish a wing and need to start the next one, the slip stitch helps you transition smoothly. It is also the perfect stitch for creating a thin, defined border around the entire butterfly if you decide to add a second color for extra detail.
An often-overlooked part of the Crochet Butterfly Keychain- Tutorial is the single crochet (sc), which we typically use for the body of the butterfly. The smaller, denser nature of the single crochet provides a sturdy “spine” for the wings to attach to. If your pattern involves folding a circular crochet piece in half to create the butterfly shape, the single crochet or a series of chains will be used to wrap around the middle to cinch the wings into place.
Understanding how to read a crochet diagram or pattern shorthand is very helpful for this Crochet Butterfly Keychain- Tutorial. Many people find that seeing the visual representation of how the stitches “fan out” from the center makes the logic of the wings much clearer. Whether you prefer written instructions or visual charts, the goal remains the same: creating a balanced, lightweight, and beautiful butterfly that can withstand the daily wear and tear of being a keychain.
3. Step-by-Step Assembly and Shaping Techniques
Once you have crocheted the main components of your Crochet Butterfly Keychain- Tutorial, it is time for the assembly phase. If you followed a “circle-to-butterfly” method, you will have a round flower-like piece that needs to be folded. To do this, fold the circle in half so the larger “petals” (the upper wings) are on top. This transformation is the most magical part of the Crochet Butterfly Keychain- Tutorial, as a simple floral shape suddenly takes on the silhouette of an insect.
To secure the folded shape in this Crochet Butterfly Keychain- Tutorial, you will create the body and antennae. This is usually done by taking a long strand of yarn or embroidery floss and wrapping it around the center of your folded piece several times. Knot the yarn at the top, leaving two long tails. These tails are then knotted again at the ends to represent the antennae. This simple wrapping technique adds structural integrity and defines the butterfly’s form instantly.
If your Crochet Butterfly Keychain- Tutorial calls for separate wings, you will need to use your tapestry needle to sew them to the body. Use a whip stitch or a mattress stitch to ensure the join is invisible but strong. When sewing, make sure to go through both loops of the stitches to prevent the wings from sagging. This ensures that your butterfly stays “in flight” even when it is hanging vertically from a set of heavy metal keys.
Integrating the hardware is a critical step in the Crochet Butterfly Keychain- Tutorial. You should never attach the metal ring directly to a single strand of yarn, as the metal can eventually cut through the fibers. Instead, crochet a small loop of 6 to 8 chain stitches at the top of the butterfly’s head or between the wings, and attach the metal ring to this reinforced crochet loop. This distributes the weight and movement, making your keychain much more durable.
Blocking your finished piece can elevate the results of your Crochet Butterfly Keychain- Tutorial. Even a small item benefits from “wet blocking”—simply dampen the butterfly, pin it into the desired shape on a foam mat, and let it dry completely. This opens up the stitches, flattens any curling edges, and ensures the wings are perfectly symmetrical. It is a small extra step that makes a massive difference in the final SEO-worthy presentation of your craft.
For those who want to add a bit of “flair” to their Crochet Butterfly Keychain- Tutorial, consider adding small seed beads or sequins. You can sew these onto the wing tips using a fine needle and thread. Not only do they add a bit of sparkle, but they also give the keychain a bit more weight, which some people prefer so they can easily find their keys in a large bag. Just ensure the beads are sewn on very securely to prevent them from falling off during daily use.
4. Customization and SEO Tips for Your Craft Blog
If you are following this Crochet Butterfly Keychain- Tutorial to create content for your own blog or shop, customization is your best friend. Create variations like a “Monarch” version using orange and black yarn, or a “Blue Morpho” with various shades of cyan and navy. Sharing these variations within your own Crochet Butterfly Keychain- Tutorial post helps engage your audience and encourages them to try different styles, increasing the time they spend on your page.
Photography is essential when showcasing your Crochet Butterfly Keychain- Tutorial. Use natural light and a clean, uncluttered background to make the colors of the yarn pop. Taking “process shots” of the magic ring, the first wing, and the final assembly helps your readers follow along more easily. High-quality images with alt-text containing the phrase Crochet Butterfly Keychain- Tutorial will also help your article rank better on Google Images and Pinterest.
When writing about your Crochet Butterfly Keychain- Tutorial, use a humanized and conversational tone. Share a story about why you chose these specific colors or who you made the first one for. People relate to the “why” behind a project just as much as the “how.” This approach keeps readers on the page longer, which is a positive signal for SEO ranking and helps build a community of loyal followers who trust your crafting advice.
To further optimize your Crochet Butterfly Keychain- Tutorial for search engines, make sure to use relevant keywords naturally throughout the text. Terms like “easy crochet patterns,” “handmade gift ideas,” and “yarn scrap projects” are all excellent additions. However, always prioritize the reader’s experience; the text should flow naturally and provide genuine value, as Google’s algorithms are now highly sophisticated at detecting helpful, high-quality content.
Another great way to expand on this Crochet Butterfly Keychain- Tutorial is to offer a printable PDF version. Many crafters prefer to have a physical copy next to them while they work so they don’t have to keep waking up their phone screen. You can offer this as a free download in exchange for a newsletter sign-up, which helps you build a direct line of communication with your fellow crochet enthusiasts.
Finally, encourage interaction by asking your readers to share photos of their finished projects from this Crochet Butterfly Keychain- Tutorial. You can create a specific hashtag for your brand or ask them to post their photos in a Facebook group. This user-generated content provides “social proof” that your tutorial is easy to follow and successful, which in turn attracts even more visitors to your Crochet Butterfly Keychain- Tutorial article.
FAQ – Frequently Asked Questions
1. How long does it take to finish one butterfly keychain?
Most experienced crocheters can finish one butterfly in about 15 to 20 minutes. If you are a beginner following this Crochet Butterfly Keychain- Tutorial for the first time, it might take you 30 to 45 minutes as you get used to the wing shaping and assembly.
2. What is the best yarn for a keychain that won’t get dirty easily?
Mercerized cotton is the gold standard for keychains. It is smooth, so it doesn’t trap dust as easily as wool or acrylic, and it can be wiped down with a damp cloth if it gets a bit of grime from your bag or hands.
3. Can I make this butterfly larger?
Yes! To make a larger version of the Crochet Butterfly Keychain- Tutorial, simply use a thicker yarn (like medium/worsted weight) and a larger hook (like 4.0mm or 5.0mm). The pattern steps remain exactly the same, but the resulting butterfly will be much bigger.
4. My wings are curling, what should I do?
Curling is often caused by tight tension or the nature of certain stitches. You can fix this by blocking the butterfly as mentioned in the tutorial, or by using a slightly larger hook to give the stitches more room to lay flat.
5. Is the magic ring mandatory for this tutorial?
While the Crochet Butterfly Keychain- Tutorial recommends a magic ring for the tightest center, you can definitely use the ch-4 join method if you find the magic ring frustrating. The center hole will just be slightly more visible.
6. Can I sell the butterflies I make using this tutorial?
Usually, yes! Most designers (including us) love to see you sell your handmade items at craft fairs or in your online shop. We only ask that you credit this Crochet Butterfly Keychain- Tutorial as the source of the pattern.
Conclusion
In this Crochet Butterfly Keychain- Tutorial, we have covered everything from selecting the most durable cotton yarns to mastering the magic ring and assembling the final piece with professional hardware. We learned that the secret to a beautiful butterfly lies in the symmetry of the wings and the precision of the double crochet stitches. By following these steps, you have created more than just a keychain; you have created a small piece of art that brings a touch of nature and handmade warmth to a functional object.
This project is a perfect example of how simple techniques can produce impressive results. Whether you are making these for yourself, as gifts, or to stock your small business, the skills gained in this Crochet Butterfly Keychain- Tutorial will serve you well in many future crochet endeavors. We hope you enjoyed this creative journey and feel inspired to experiment with even more colors and textures in your next project!