This Crochet Tulip Tiara- Tutorial is designed to help you create a whimsical and elegant accessory that perfectly captures the beauty of springtime in a wearable piece of art. Whether you are looking to craft a unique headpiece for a flower girl, a charming accessory for a photoshoot, or a festive crown for a garden party, this guide provides all the steps necessary to succeed. By following this Crochet Tulip Tiara- Tutorial, you will combine structural crochet techniques with delicate floral motifs, resulting in a durable yet soft tiara that stands out for its handmade charm and intricate detail.
Creating a floral crown often involves fresh flowers that wilt quickly, but with this Crochet Tulip Tiara- Tutorial, you can produce a timeless heirloom that remains vibrant and beautiful forever. The tulip motif is particularly special because of its three-dimensional shape, which adds depth and texture to the headband base, making it look much more sophisticated than a flat applique project. Throughout this Crochet Tulip Tiara- Tutorial, we will emphasize the importance of choosing the right materials to ensure the tiara is comfortable enough for a child or an adult to wear for several hours without irritation.
As we progress through the Crochet Tulip Tiara- Tutorial, we will explore how to build a sturdy foundation using a crochet-covered headband and how to master the popcorn stitch or puff stitch variants that give the tulips their iconic rounded appearance. This article is structured to be highly SEO-optimized while maintaining a humanized, encouraging tone that makes complex fiber arts feel approachable for everyone. Gather your soft cotton yarn, a smaller crochet hook, and your creative spirit as we begin the wonderful journey of crafting with this detailed Crochet Tulip Tiara- Tutorial.
1. Essential Materials for a Comfortable Crochet Tulip Tiara
The success of your project in this Crochet Tulip Tiara- Tutorial depends heavily on selecting a yarn that is both soft and holds its shape well. We highly recommend using 100% mercerized cotton yarn in a sport or DK weight, as it provides a clean stitch definition and a slight natural sheen that makes the tulips look realistic. Cotton is also hypoallergenic and breathable, which is a critical factor when creating an item that will rest directly against the hair and forehead for extended periods of time.
In this Crochet Tulip Tiara- Tutorial, the choice of the base is just as important as the yarn itself; you can choose to crochet a stiffened yarn band or use a plastic or metal headband base. If you use a pre-made base, you will need to crochet a sleeve to cover it, which ensures that the floral elements have a secure surface to be attached to. A metal base offers more stability for larger floral arrangements, while a purely crochet band with an elastic hair tie at the back provides a more flexible and adjustable fit for different head sizes.
Your crochet hook size should be slightly smaller than what is typically suggested on the yarn label to ensure your stitches are tight and firm. For this Crochet Tulip Tiara- Tutorial, a 2.5mm or 2.25mm hook is ideal for creating the small, dense petals needed for a miniature tulip. Tight stitches prevent the tiara from becoming “floppy” under the weight of the flowers and help the leaves maintain their pointed shape without the need for internal wires or excessive starching.
Color coordination is where your personality truly shines in this Crochet Tulip Tiara- Tutorial. Traditional tulips look stunning in shades of blush pink, golden yellow, or royal purple, paired with a rich leaf green for the base and foliage. If you are going for a more “boho-chic” aesthetic, consider using muted tones like cream, terracotta, and sage green. Using high-quality dye lots ensures that your colors remain consistent across the entire tiara, providing a professional and polished finish.
In addition to yarn and hooks, this Crochet Tulip Tiara- Tutorial requires a few specialized notions to achieve the best results. You will need a tapestry needle for weaving in ends and sewing the tulips onto the base, as well as some stitch markers to keep track of your increases and decreases. For a bit of extra sparkle, some crafters like to incorporate glass seed beads or small pearls into the center of the tulips, which adds a touch of “regal” flair to the finished tiara.
Finally, consider the structural integrity of your work by having some fabric stiffener or a mixture of water and white glue on hand. While not always necessary, lightly misting the finished leaves in this Crochet Tulip Tiara- Tutorial can help them stand upright and resist the effects of gravity or humidity. A well-prepared workspace with all these materials ready will make the assembly process much smoother and more enjoyable as you follow along with the Crochet Tulip Tiara- Tutorial steps.
2. Crafting the Perfect Tulip Motifs and Greenery
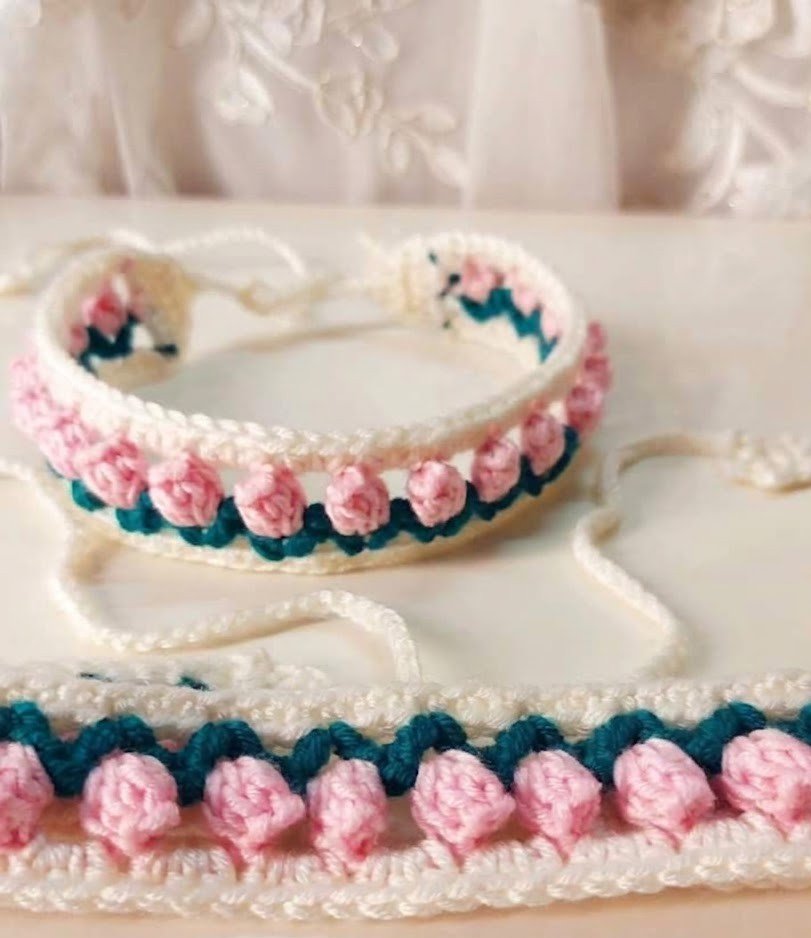
The centerpiece of our Crochet Tulip Tiara- Tutorial is the tulip bulb itself, which is typically worked in a small, continuous spiral or joined rounds. To create the 3D effect, we use a variation of the tulip stitch or a small cup-shaped motif that is cinched at the top. This technique allows the flower to have volume without requiring stuffing, keeping the tiara lightweight and easy to wear throughout a busy day or special event.
Mastering the popcorn stitch is a fantastic skill to apply within this Crochet Tulip Tiara- Tutorial. By working several double crochets into the same stitch and joining the first and last ones together, you create a “burst” of texture that perfectly mimics the folded petals of a real tulip. In this Crochet Tulip Tiara- Tutorial, we usually suggest making an odd number of tulips—perhaps five or seven—to create a visually balanced focal point at the center of the headband.
Leaves are the next essential component of the Crochet Tulip Tiara- Tutorial, providing the “frame” for your colorful flowers. We use a combination of chain stitches, single crochets, and half-double crochets to create a tapered, elongated leaf shape. By working on both sides of the initial foundation chain, you can create a symmetrical leaf that has a natural-looking central vein, adding to the botanical realism of your Crochet Tulip Tiara- Tutorial project.
In this Crochet Tulip Tiara- Tutorial, the transition between the flower and the stem is handled by creating a small green calyx. This small green cup sits at the base of the tulip and provides a sturdy “anchor” point for sewing the flower onto the headband. Paying attention to these small botanical details is what separates a simple craft project from a high-quality handmade tiara that can be sold in boutiques or gifted as a premium item.
Tension control is vital when working on the delicate parts of the Crochet Tulip Tiara- Tutorial. If your tension is too loose, the tulips may look wilted or lose their definition; if it is too tight, the fabric may become distorted and difficult to sew. Aim for a “firm but flexible” feel to the crochet fabric. As you repeat the pattern for each flower in this Crochet Tulip Tiara- Tutorial, you will find a rhythm that helps ensure all your tulips are uniform in size and shape.
Don’t be afraid to experiment with variegated yarns for the flowers in your Crochet Tulip Tiara- Tutorial. Yarns that transition from a light pink to a deep rose can mimic the natural color gradients found in real tulips. This adds a level of complexity to the design without requiring you to change yarn colors manually, making the Crochet Tulip Tiara- Tutorial process faster and the final result even more captivating to the eye.
3. Assembling the Tiara Base and Attaching Elements
Once you have finished your floral components, the next stage of the Crochet Tulip Tiara- Tutorial is preparing the base. If you are covering a plastic headband, you will crochet a long rectangular strip that is just wide enough to wrap around the circumference of the band. Using a slip stitch join or a tapestry needle to “lace” the edges together on the underside of the band ensures a snug fit that won’t slide around during use.
The layout phase is a crucial part of the Crochet Tulip Tiara- Tutorial because it determines the overall silhouette of the headpiece. Before sewing anything down, lay your tulips and leaves out on a flat surface in the order you want them. Most people prefer a symmetrical arrangement, with the largest tulip in the center and smaller ones or leaves tapering off toward the sides. This “dry run” prevents mistakes and allows you to visualize the final Crochet Tulip Tiara- Tutorial result.
In this Crochet Tulip Tiara- Tutorial, sewing the elements to the base requires a “hidden stitch” technique. Use the same color yarn as the base to sew through the calyx of the tulips, ensuring the needle goes through the crochet cover and, if possible, loops around the headband itself for maximum security. A secure attachment is vital, especially if the tiara is intended for an active child, as it prevents the flowers from “flopping” forward or backward.
Integrating the leaves into the Crochet Tulip Tiara- Tutorial assembly provides both aesthetic beauty and structural support. By sewing the leaves slightly behind and between the tulips, you create a “backdrop” that helps the flowers stand upright. You can also use a small amount of hot glue for extra reinforcement, but sewing is always preferred in a high-quality Crochet Tulip Tiara- Tutorial because it maintains the flexibility of the fabric and the “humanized” handmade feel.
The ends of the headband in this Crochet Tulip Tiara- Tutorial should be finished with care to avoid discomfort behind the ears. We recommend adding a small “cap” of crochet or a piece of soft felt at the tips of the headband. This prevents the metal or plastic from digging into the skin and provides a professional look that matches the rest of your beautiful Crochet Tulip Tiara- Tutorial creation.
As you finish the assembly in this Crochet Tulip Tiara- Tutorial, take a moment to “fluff” the petals and adjust the leaves. Since crochet is a flexible medium, you can gently shape the tulips with your fingers to make them look more open or closed. This final bit of hand-shaping is what gives your tiara its final personality and ensures it looks perfect from every angle, whether viewed from the front or the side.
4. Advanced Styling and Maintenance for Your Tiara
The versatility of this Crochet Tulip Tiara- Tutorial extends beyond just a simple headband. For a more dramatic “festival” look, you can continue the floral motif all the way around the band. For a more minimalist “everyday” look, you might only place three small tulips on one side of the head. This flexibility is why the Crochet Tulip Tiara- Tutorial is a favorite among versatile crafters who like to adapt patterns to suit different occasions.
When it comes to SEO-friendly blogging and sharing your work, the way you style the finished product from this Crochet Tulip Tiara- Tutorial is key. Use a mannequin head or a real model to show how the tiara sits on the hair. Close-up shots of the popcorn stitches and the leaf veins help your audience appreciate the technical skill involved in the Crochet Tulip Tiara- Tutorial, encouraging them to try the project themselves.
Maintenance of your Crochet Tulip Tiara- Tutorial piece is relatively simple, provided you used high-quality cotton. If the tiara gets dusty, a light “spot cleaning” with a damp cloth is usually enough. Avoid submerging the entire piece in water, especially if you used a metal headband base or fabric stiffener, as this can cause rust or loss of shape. Proper care ensures that your Crochet Tulip Tiara- Tutorial masterpiece lasts for years as a cherished keepsake.
If you are following this Crochet Tulip Tiara- Tutorial for a gift, consider creating a matching crochet tulip wand or a small matching wristlet. This creates a complete “set” that feels very special and high-end. Packaging the tiara in a sturdy box with tissue paper prevents the flowers from being crushed and adds to the “boutique” experience of receiving a handmade Crochet Tulip Tiara- Tutorial item.
For those looking to monetize their skills, this Crochet Tulip Tiara- Tutorial is a great candidate for custom orders. You can offer different color palettes to match specific wedding themes or school colors. Providing a high level of customization within the Crochet Tulip Tiara- Tutorial framework allows you to charge a premium for your time and artistry, turning your hobby into a profitable venture.
Lastly, remember that every Crochet Tulip Tiara- Tutorial result will be unique. Don’t worry if your first tulip isn’t “perfect”—nature is full of variations, and those slight differences are what make handmade items so much more valuable than mass-produced ones. Keep practicing the stitches and assembly techniques, and soon you will be able to create these beautiful tiaras with ease and confidence, sharing the joy of crochet with everyone who sees them.
FAQ – Frequently Asked Questions
1. Is this Crochet Tulip Tiara- Tutorial suitable for beginners?
This tutorial is best suited for “advanced beginners” or intermediate crocheters. You should be comfortable with working in the round and performing basic stitches like double crochet and increases/decreases. If you are new, take it slow and practice the tulip motif separately first!
2. How do I make the tiara adjustable?
Instead of using a hard headband, you can crochet a long band and attach ribbon ties or a soft elastic at the ends. This allows the Crochet Tulip Tiara- Tutorial design to fit infants, children, and adults alike.
3. What if I can’t find mercerized cotton?
Standard cotton yarn will work, but it may have a “fuzzier” look and might not be quite as stiff. Avoid using 100% acrylic for this specific Crochet Tulip Tiara- Tutorial, as it can be too stretchy and the flowers may sag over time.
4. How many tulips should I make for a standard head size?
A standard arrangement usually looks best with 3 to 5 tulips. However, if you want a “full crown” look, you may need between 10 and 12 tulips depending on the size of your hook and yarn.
5. Can I add other flowers to the tiara?
Absolutely! While this is a Crochet Tulip Tiara- Tutorial, you can easily incorporate small crochet daisies or roses to create a varied garden look. The assembly techniques remain the same regardless of the flower type.
6. My headband is showing through the crochet cover, what should I do?
This usually means your stitches are too loose. Try using a smaller hook or adding more rows to the cover so it wraps more tightly around the base. Choosing a headband base that is a similar color to your yarn also helps hide any small gaps.
Conclusion
In this Crochet Tulip Tiara- Tutorial, we have walked through the entire creative process, from selecting the finest mercerized cotton to mastering the popcorn stitch for 3D floral effects and securely assembling the final headpiece. We learned that the key to a professional-looking tiara lies in the details—the green calyx, the tapered leaves, and the careful layout of the elements. Whether you are crafting this for a wedding, a festival, or just for the joy of creating something beautiful, the skills you have practiced here represent the very best of the crochet tradition.
The Crochet Tulip Tiara- Tutorial is more than just a pattern; it is an invitation to experiment with color and form to create a piece that is uniquely yours. We hope this guide has provided you with the confidence and technical knowledge to finish your project with pride.