The Crochet scarf with a heart – Tutorial is a wonderful way to express your creativity while making a garment that is both functional and deeply symbolic of affection. Crafting a scarf that features heart motifs allows you to move beyond simple rows of stitches and explore the artistic side of fiber arts, creating a piece that feels personalized and high-end. Throughout this Crochet scarf with a heart – Tutorial, we will guide you through the process of selecting the right materials and mastering the specific techniques required to make these romantic shapes stand out beautifully against a soft, wearable background.
In this Crochet scarf with a heart – Tutorial, the focus is not just on the final product but on the meditative journey of rhythmic stitching that crochet provides for makers of all levels. Whether you are planning to gift this to a loved one for a special occasion or you want to add a touch of whimsy to your own winter wardrobe, this pattern offers a perfect balance of repetition and engagement. By following the steps in this Crochet scarf with a heart – Tutorial, you will learn how to integrate different colors and textures to ensure your hearts are crisp, defined, and structurally sound within the fabric of the scarf.
As a digital content creator, I know how important it is to have clear, humanized instructions that make complex projects feel achievable, which is exactly why this Crochet scarf with a heart – Tutorial was developed. We will prioritize SEO-optimized formatting and high-quality advice that adheres to the best practices for online crafting guides, ensuring you have a seamless experience from the first chain to the final weave-in. Grab your favorite soft acrylic or wool blend yarn, find a comfortable spot to sit, and let’s begin this comprehensive Crochet scarf with a heart – Tutorial that will surely become a staple in your crochet library.
1. Choosing Your Palette and Softest Yarns for the Scarf
The first step in our Crochet scarf with a heart – Tutorial is selecting a yarn that feels good against the skin while providing the necessary stitch definition for the heart shapes. For a winter accessory, a medium weight (4) aran or worsted yarn is often the best choice because it works up quickly and provides excellent warmth. If you want a more delicate look, a lightweight (3) DK yarn can also work, though it will require more rows to reach the desired length.
In this Crochet scarf with a heart – Tutorial, color choice is where your personality truly shines, as the contrast between the heart and the background is crucial. Most traditionalists prefer a classic red or pink heart on a neutral cream or grey background, but modern variations often use tonal colors for a more subtle, sophisticated effect. Using a merino wool blend can add a luxurious softness that makes the scarf a joy to wear during those biting cold morning commutes.
The crochet hook size you choose for this Crochet scarf with a heart – Tutorial should be matched to your yarn, typically ranging from a 5.0mm (H) to a 6.0mm (J). A slightly larger hook can give the scarf a more fluid drape, preventing it from feeling stiff or “board-like” around the neck. Always make a small gauge swatch before starting the full project to ensure the heart motif doesn’t look stretched or distorted by your unique tension.
When gathering supplies for this Crochet scarf with a heart – Tutorial, don’t forget the essential notions like a tapestry needle and sharp scissors. Because we are working with multiple colors to create the hearts, you will have more ends to weave in than a standard one-color project. High-quality metal or bamboo hooks can also reduce hand fatigue, which is a significant factor when you are working on a piece as long and detailed as a full-sized scarf.
Another important material consideration in this Crochet scarf with a heart – Tutorial is whether to use variegated yarn for the background. While beautiful in the skein, busy multi-colored yarns can sometimes “hide” the heart pattern, making the design look cluttered rather than intentional. If you do choose a variegated yarn, try to pair it with a solid, high-contrast color for the hearts themselves so the shape remains the undisputed star of the show.
Finally, think about the length and width you want for your finished Crochet scarf with a heart – Tutorial project. A standard adult scarf is usually about 15 cm to 20 cm wide and roughly 150 cm to 180 cm long. Knowing these measurements beforehand will help you estimate how many skeins of yarn you need to purchase, preventing that frustrating “yarn chicken” moment where you run out of material just before the final few rows.
2. Mastering the Heart Motif Techniques and Color Changes
The heart of this Crochet scarf with a heart – Tutorial lies in the technique used to create the icon, which can be done via Tapestry Crochet or Intarsia. Tapestry crochet involves carrying the non-working yarn inside the stitches, which makes for a thicker, reversible scarf with no messy floats on the back. This method is highly recommended for beginners because it keeps the tension consistent and ensures the heart pattern is visible on both sides.
As you follow the Crochet scarf with a heart – Tutorial, you will encounter the “mid-stitch color change,” which is the secret to clean lines. To do this, you start your double crochet with color A, but perform the very last pull-through with color B. This ensures the top loop of the stitch matches the next stitch’s color, creating a perfect geometric transition. Practice this a few times on a scrap piece of yarn before starting the actual scarf to get the rhythm down.
In this Crochet scarf with a heart – Tutorial, we often use the bobble stitch or popcorn stitch to give the hearts a 3D textured effect. These raised stitches literally “pop” off the surface of the scarf, adding a tactile element that children and adults alike find charming. If you prefer a flatter, more modern look, sticking to standard single or double crochet stitches in a grid-like pattern (graphghan style) will result in a sleek, professional finish.
Maintaining the shape of the heart requires careful attention to the stitch chart provided in the Crochet scarf with a heart – Tutorial. A heart is essentially a combination of a pointed base and two rounded humps at the top, which means you will be increasing and decreasing colors across several rows. Using stitch markers to denote the beginning of the heart section can save you from having to recount your stitches every single time you turn the work.
One common challenge in the Crochet scarf with a heart – Tutorial is managing the “tangling” of yarn when working with two different colors. A simple tip is to keep one ball of yarn on your left and the other on your right, never letting them cross over each other as you turn your rows. This keeps your workspace organized and prevents the frustration of having to stop and untwist your yarn every ten minutes, allowing you to stay in the creative flow.
If you find that the carried yarn is showing through (a phenomenon called “ghosting”), try to tighten your tension slightly when working over the unused strand. In this Crochet scarf with a heart – Tutorial, we recommend using colors that are somewhat similar in value if ghosting bothers you, or choosing a thicker yarn that naturally hides the inner strands better. A little bit of ghosting is normal in handmade items and often adds to the authentic, cozy charm of the piece.
3. Building the Scarf Body and Ensuring Symmetry
Once you have mastered the heart, the next phase of the Crochet scarf with a heart – Tutorial is planning the spacing of these motifs throughout the length of the garment. Some crafters prefer a single heart at each end of the scarf, while others love an all-over heart pattern that repeats every few inches. Deciding on your layout early on is essential for calculating the total number of rows and ensuring both ends of the scarf look symmetrical when worn.
To keep the edges of your Crochet scarf with a heart – Tutorial straight and neat, always count your stitches at the end of every row. It is very easy to accidentally drop a stitch at the turn, which leads to a “wavy” edge that can be difficult to fix later. If you are struggling with straight edges, try placing a stitch marker in the very first and very last stitch of each row so you always know exactly where to insert your hook.
The Crochet scarf with a heart – Tutorial also suggests using a foundation chain that is not too tight. If your starting chain is tighter than your working stitches, the scarf will “banana” or curve at the bottom. A great tip is to use a hook one size larger just for the foundation chain, then switch back to your regular hook for the rest of the project. This ensures the bottom edge is just as stretchy and flexible as the top edge.
As you progress through the Crochet scarf with a heart – Tutorial, you will notice that the “wrong side” of the scarf might look slightly different from the “right side” if you aren’t using tapestry techniques. To hide any imperfections, you can add a border of single crochet around the entire perimeter of the scarf once the length is finished. This frames the hearts beautifully and provides a clean, polished edge that hides any small inconsistencies in your turning rows.
Symmetry is a key focus of this Crochet scarf with a heart – Tutorial, especially if you want the hearts to face the same way when the scarf is draped over your neck. This usually means that on one half of the scarf, you will work the hearts from bottom to top, and on the other half, you will do the same. When you reach the middle, the change in direction ensures that both hanging ends of the scarf show the hearts in their “upright” position for anyone looking at you.
In this Crochet scarf with a heart – Tutorial, we also emphasize the importance of blocking your finished work. Because heart motifs involve different stitch densities and color changes, the fabric can sometimes pucker. Laying your finished scarf out on a blocking mat, pinning it to the correct dimensions, and lightly steaming it will “set” the stitches. This professional touch makes the hearts lay perfectly flat and gives the entire scarf a high-end, boutique-quality appearance.
4. Finishing Touches, Fringes, and SEO Blogging Advice
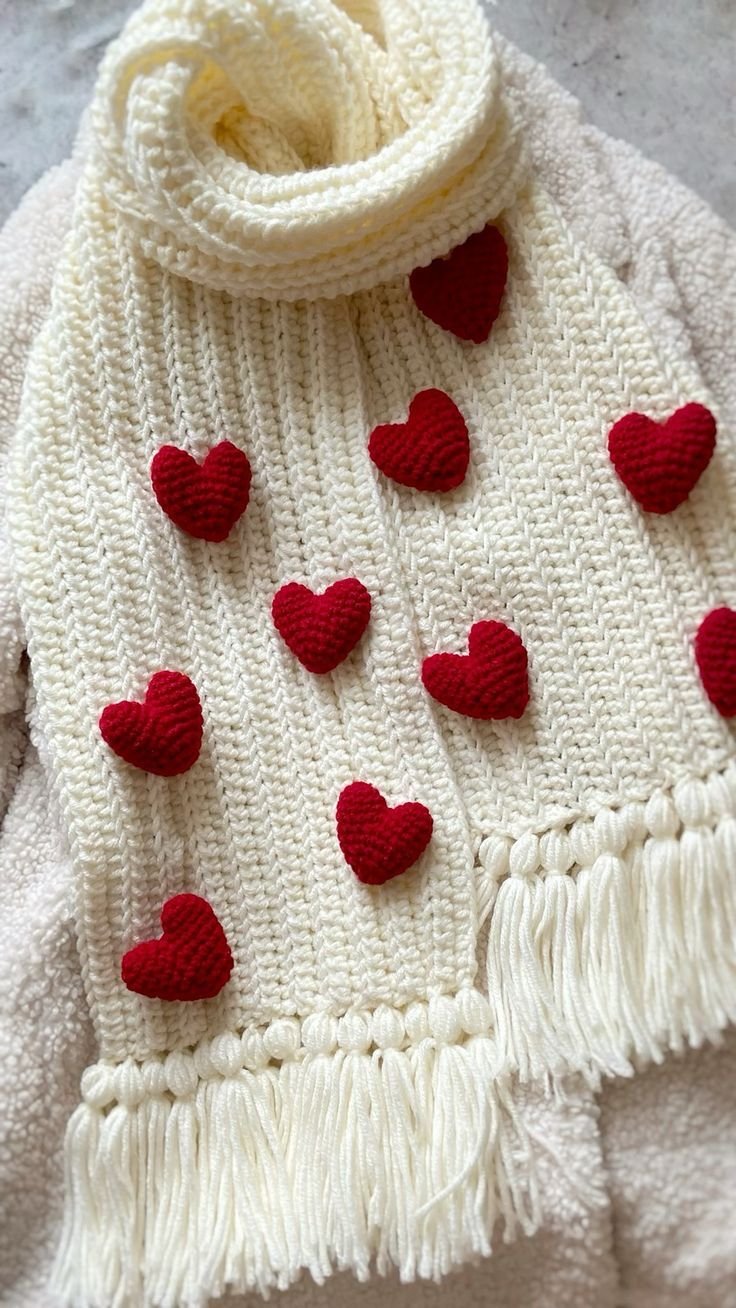
No Crochet scarf with a heart – Tutorial is truly complete without discussing the fringe or tassels, which add movement and a touch of boho-chic to the design. Adding tassels in the same color as the hearts can tie the whole look together and make the heart motif feel more integrated into the overall aesthetic. Simply cut lengths of yarn, fold them in half, and pull them through the edge of the scarf using your crochet hook to create a secure knot.
If you are sharing your progress from this Crochet scarf with a heart – Tutorial on social media or your own blog, remember that lighting is everything. Taking photos of the heart details in the “golden hour” of sunlight can highlight the texture of the stitches and the richness of the yarn colors. Providing a close-up shot of the heart section helps your followers see exactly how the stitches should look, making your tutorial much more helpful and shareable.
When writing your own posts based on this Crochet scarf with a heart – Tutorial, use keywords like “beginner crochet scarf,” “DIY gift ideas,” and “heart pattern tutorial” to reach a wider audience. However, keep your language humanized and encouraging. Remind your readers that crochet is a skill that takes practice and that every “mistake” is just a step toward becoming a better maker. Authentic storytelling helps build a community of loyal crafters who will return to your site.
For those looking to monetize their hobby, the Crochet scarf with a heart – Tutorial pattern is a fantastic candidate for a digital download. You can create a PDF version that includes the heart graph, a list of suggested yarn brands, and high-resolution photos. Offering a “printer-friendly” version is a great way to add value for your readers, as many people find it easier to follow a physical pattern while sitting on the couch away from their computer screens.
Another way to enhance your Crochet scarf with a heart – Tutorial content is to include a video demonstration of the color-changing technique. Some people are visual learners and find it much easier to understand how to carry the yarn when they see it in motion. A short, 60-second clip can drastically reduce the number of questions you get and increase the overall success rate of your readers, leading to better reviews and more traffic.
Finally, always encourage your audience to put their own spin on the Crochet scarf with a heart – Tutorial. Whether they use neon colors, add sequins, or make a matching hat, celebrating their creativity makes your tutorial a starting point for their own artistic expression. By fostering this interaction, you transform a simple set of instructions into a living, breathing project that inspires people all over the world to pick up a hook and start creating.
FAQ – Frequently Asked Questions
1. Is this Crochet scarf with a heart – Tutorial suitable for a total beginner?
If you know how to make a chain and a double crochet, you can do this! We recommend practicing the heart motif on a small swatch first. The Crochet scarf with a heart – Tutorial is designed to build your confidence as you go, making it a great “first challenge” project.
2. How many hours does it take to finish the scarf?
Depending on your speed and the length of the scarf, it typically takes between 8 to 12 hours. It’s a perfect project to work on over the course of a week while relaxing in the evenings.
3. Can I use a different stitch for the background?
Absolutely! While the Crochet scarf with a heart – Tutorial uses standard stitches, you could use a moss stitch or a waffle stitch for the background to add even more texture. Just ensure your heart motif stays in a simpler stitch so it remains clearly defined.
4. How do I wash my finished heart scarf?
If you used acrylic or superwash wool, you can usually machine wash it on a gentle cycle in a mesh bag. However, to keep your Crochet scarf with a heart – Tutorial project looking new for years, hand washing in cool water and laying flat to dry is always the safest bet.
5. What if my hearts look lopsided?
This usually happens if your tension changes mid-row. Don’t worry! Often, blocking the scarf at the end will fix minor symmetry issues. If it’s very noticeable, you may need to check your stitch count against the heart graph again.
6. Can I make this as a “Infinity Scarf”?
Yes! Simply follow the Crochet scarf with a heart – Tutorial to create a long rectangle, then sew the two short ends together using a slip stitch join or a tapestry needle. It looks beautiful looped twice around the neck!
Conclusion
In this Crochet scarf with a heart – Tutorial, we have journeyed through the entire process of creating a heartfelt accessory, from selecting the most comfortable cotton or wool yarns to mastering the intricacies of color changes and symmetrical design. We learned that a scarf is more than just a piece of clothing; it is a canvas for expressing love and personality through every loop and knot. By focusing on quality materials and patient technique, you have created a timeless piece that combines the warmth of the fiber with the warmth of the heart motif.
Whether you followed this Crochet scarf with a heart – Tutorial to make a gift for a “Mamãe,” a friend, or yourself, the skills you’ve practiced here—like carrying yarn and reading a stitch graph—will open up a whole new world of tapestry crochet projects for you. We hope this guide was helpful, clear, and inspiring for your crafting journey!