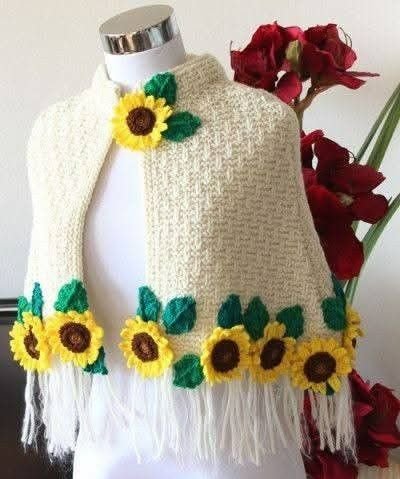
The Sunflower Crochet Shawl – Tutorial is one of the most rewarding projects for crafters looking to combine the timeless beauty of floral motifs with the cozy functionality of a handmade wrap. This specific pattern has gained immense popularity due to its vibrant visual appeal and the joyful atmosphere it brings to any wardrobe. In this guide, we will explore the intricate steps of creating a piece that feels like wearing a field of summer flowers, ensuring you have all the tools necessary to succeed.
To master the Sunflower Crochet Shawl – Tutorial, it is essential to understand the balance between the textured center of the flower and the delicate, bright petals that surround it. Choosing the right yarn is the first step in ensuring your shawl has the perfect drape and longevity. Whether you are an experienced stitcher or a dedicated beginner, the process of assembling these iconic motifs will enhance your technical skills and provide a stunning finished product that serves as a perfect gift or a personal treasure.
Creating a high-quality Sunflower Crochet Shawl – Tutorial requires attention to detail, particularly when joining the individual flower squares or hexagons. The beauty of this project lies in its modular nature, allowing you to customize the size and shape to your liking. Throughout this article, we will delve into the best practices for tension control, color selection, and finishing techniques that will make your crochet work stand out with a professional, polished look that captures the essence of a sunny day.
1. Essential Materials for Your Sunflower Crochet Shawl – Tutorial
Selecting the correct crochet hook size is the foundation of a successful project, as it determines the density of your stitches. For a project like the Sunflower Crochet Shawl – Tutorial, a 4.0mm (G) or 5.0mm (H) hook is often recommended to achieve a soft, flowing fabric that isn’t too stiff. Using a hook that is too small can result in a heavy shawl, while one that is too large may cause the flower centers to lose their definition.
The yarn weight plays a pivotal role in the final aesthetic and comfort of your wrap. Most enthusiasts prefer a medium weight (worsted) yarn or a DK weight cotton blend to ensure the sunflower motifs maintain their structural integrity. Cotton blends are particularly favored because they offer excellent stitch definition, making the “seeds” in the center of the sunflower pop visually while remaining breathable for spring and autumn wear.
Color palette selection is where the magic truly happens in this Sunflower Crochet Shawl – Tutorial. To achieve a classic look, you will need a deep chocolate brown for the flower centers, a vibrant golden yellow for the petals, and a soft cream or leaf green for the background and borders. High-quality acrylic yarns are also a great budget-friendly option that provides a wide range of shades to match your specific vision.
Don’t forget the importance of notions and tools, such as a sharp pair of yarn snips and a tapestry needle for weaving in ends. Since this shawl involves many color changes and individual motifs, you will have several yarn tails to manage. Having a comfortable, ergonomic needle will make the finishing process much faster and more enjoyable, ensuring that your sunflower motifs are securely fastened and won’t unravel over time.
Stitch markers are incredibly helpful when you are keeping track of your increases or marking the corners of your flower squares. In a Sunflower Crochet Shawl – Tutorial, precision is key to ensuring that every flower is the same size, which makes the final assembly much easier. Using markers can prevent the frustration of having to “frog” or rip out rows because of a missed stitch or an uneven count.
Lastly, consider using a blocking board once your motifs are finished. Blocking your crochet is the secret step that professional crafters use to ensure every square is perfectly uniform before joining them together. This process involves slightly wetting the fabric and pinning it to specific dimensions, which allows the sunflower petals to lay flat and look their absolute best before they become part of the larger shawl.
2. Mastering the Sunflower Motif Stitches
The core of the Sunflower Crochet Shawl – Tutorial begins with the Magic Ring (or Magic Circle) technique. This method allows you to start your flower center without a visible hole in the middle, creating a tight and professional look. Within this ring, you will typically work several double crochet (dc) stitches to form the dark, textured heart of the sunflower that mimics the appearance of real seeds.
To create the textured look of the seeds, many patterns utilize the Popcorn Stitch or the Puff Stitch. These stitches add a three-dimensional element to your Sunflower Crochet Shawl – Tutorial, making the center of the flower stand out from the flat petals. Mastering the puff stitch requires consistent tension so that each “seed” is the same height, providing a rhythmic and satisfying texture to the touch.
Transitioning to the petals involves using the Treble Crochet (tr) or Double Treble Crochet (dtr) to get that elongated, pointed leaf shape. In this Sunflower Crochet Shawl – Tutorial, the petals are often worked into the spaces between the stitches of the previous round. By using a brighter yellow yarn, the contrast against the brown center creates an immediate visual impact that is synonymous with the sunflower’s iconic beauty.
The Chain Space (ch-sp) technique is used to separate the petals and provide the “airiness” required for a shawl. Understanding how to manage your chains is vital for the drape of the garment. If your chains are too tight, the shawl will curl inward; if they are too loose, the flowers may look distorted. Finding that “sweet spot” in your tension is a major milestone in completing a high-quality Sunflower Crochet Shawl – Tutorial.
Joining new yarn colors is a skill you will use frequently during this project. Using a standing stitch to join your yellow yarn for the petals or your background color for the border creates a seamless transition. This technique eliminates the need for unsightly knots, making the back of your Sunflower Crochet Shawl – Tutorial look almost as beautiful as the front, which is a hallmark of expert craftsmanship.
Finally, you must learn the Slip Stitch (sl st) join or the invisible join for finishing each round of your motif. These small details are what separate a beginner project from a professional-grade accessory. By following the Sunflower Crochet Shawl – Tutorial closely and practicing these joins, you will ensure that the circular shape of the flower remains perfectly symmetrical throughout the entire construction process.
3. Assembling the Shawl and Joining Techniques
Once you have a collection of beautiful flowers, the next phase of the Sunflower Crochet Shawl – Tutorial is the Join-As-You-Go (JAYG) method. This is a favorite among many crocheters because it reduces the amount of sewing required at the end. By connecting the motifs during the final round of each square, you create a sturdy and flexible fabric that allows the sunflower pattern to flow naturally across the shoulders.
If you prefer a more traditional approach, the Whip Stitch or the Mattress Stitch can be used to sew the motifs together after they are all completed. This method gives you more control over the alignment of the flowers. In our Sunflower Crochet Shawl – Tutorial, we recommend using the background color yarn for sewing to ensure the seams remain hidden and do not distract from the vibrant yellow petals of your sunflowers.
The layout of your Sunflower Crochet Shawl – Tutorial can vary from a triangle shawl to a rectangular wrap. A triangle shape is classic and provides a bohemian flair, while a rectangle is more versatile for formal occasions. Planning your layout on a flat surface before you begin joining is a crucial step to visualize the final size and ensure that the color distribution of your sunflowers is balanced and pleasing.
Creating a crochet border is the penultimate step in finishing your work. A simple scalloped edge or a fringe can add extra personality to your Sunflower Crochet Shawl – Tutorial. The border serves to “frame” the floral motifs and gives the entire piece a sense of completion. Many designers suggest a dark green or neutral border to help the yellow and brown tones of the sunflowers truly shine.
Managing the weight of the shawl during assembly is an often-overlooked aspect of the Sunflower Crochet Shawl – Tutorial. As the piece grows, it can become quite heavy on your lap. It is helpful to work on a table to support the weight of the joined motifs, preventing the yarn from stretching unevenly. This ensures that the geometric integrity of your shawl remains intact from the first flower to the last.
Weaving in your ends securely is the most important part of the assembly for durability. Because a shawl is a functional item that will be washed and worn, you must weave the yarn tails in multiple directions. In this Sunflower Crochet Shawl – Tutorial, taking the time to hide your ends within the thickest parts of the stitches will ensure that your hard work doesn’t come apart, preserving your handmade heirloom for years to come.
4. Care and Maintenance for Handmade Crochet
Properly washing your finished Sunflower Crochet Shawl – Tutorial is vital to maintaining its shape and color. It is always recommended to hand wash handmade crochet items in cool water using a gentle wool wash or mild detergent. Avoid wringing or twisting the fabric, as this can damage the delicate crochet stitches and cause the sunflower motifs to lose their circular shape.
To dry your shawl, lay it flat on a clean, light-colored towel. Roll the towel up with the shawl inside to gently squeeze out excess water, then unroll and reshape the piece on a flat surface. This “air drying” method is a core recommendation in our Sunflower Crochet Shawl – Tutorial because it prevents the fibers from stretching out of proportion, which can happen if the garment is hung on a clothesline.
Storage solutions for your crochet items should involve folding rather than hanging. Hanging a heavy piece like the Sunflower Crochet Shawl – Tutorial can cause the shoulders to stretch significantly over time due to gravity. Store your shawl in a cool, dry place, ideally inside a breathable cotton bag to protect it from dust and pests while allowing the natural fibers to breathe.
If you used wool or high-quality natural fibers, you might encounter pilling over time. This is a natural occurrence where small balls of fiber form on the surface of the fabric. You can easily maintain the “new” look of your Sunflower Crochet Shawl – Tutorial by using a small battery-operated fabric shaver or a specialized yarn comb to gently remove these pills without damaging the underlying stitches.
Dealing with “color bleed” is a concern when using high-contrast colors like dark brown and bright yellow. To prevent the brown center from staining the yellow petals during the first wash, you can use a color catcher sheet in the water. This pro-tip in our Sunflower Crochet Shawl – Tutorial helps preserve the crisp, clean look of your floral design, ensuring the colors stay as vibrant as the day you finished the project.
Lastly, remember that a handmade crochet shawl is a work of art. Small imperfections are part of the charm of a non-industrial product. However, by following the care instructions provided in this Sunflower Crochet Shawl – Tutorial, you are investing in the longevity of your craft. Sharing your progress and your finished piece with the community is a great way to stay inspired and keep the tradition of crochet alive for future generations.
FAQ – Frequently Asked Questions
How many skeins of yarn do I need for a full-sized Sunflower Crochet Shawl? Typically, you will need approximately 4 to 6 skeins of the background color and 1 to 2 skeins each for the flower centers and petals, depending on the yardage of your chosen brand and the size of the shawl.
Is this project suitable for beginners? Yes! While it looks complex, the Sunflower Crochet Shawl – Tutorial is made of individual motifs. If you can make a granny square, you can make a sunflower. It’s a great way to practice color changes and textured stitches.
Can I use variegated yarn for the petals? Absolutely. Using variegated yarn in shades of orange and yellow can give your sunflowers a more “natural” and multi-toned appearance, adding a unique depth to your Sunflower Crochet Shawl – Tutorial.
How long does it take to finish the entire shawl? This depends on your speed, but most crafters find that they can finish one sunflower motif in about 20 to 30 minutes. A full shawl usually requires between 30 and 50 motifs, making it a wonderful long-term project.
What is the best way to join the flowers so the shawl is reversible? The flat slip stitch join or the invisible mattress stitch are the best options for a reversible finish. These methods ensure that both sides of the Sunflower Crochet Shawl – Tutorial look neat and professional.
Conclusion
In this Sunflower Crochet Shawl – Tutorial, we have covered everything from selecting the perfect yarn weight and hook size to mastering the puff stitches and joining techniques necessary for a beautiful finish.
We explored how to care for your garment to ensure it remains a staple in your collection for years. This project is more than just a piece of clothing; it is a labor of love that showcases your dedication to the art of crochet and handmade crafts.