Starting a Crochet Hood and Dripping Ice Cream Print – Tutorial is the perfect way to merge the cozy world of fiber arts with the bold, playful aesthetics of modern streetwear. In recent years, the “kidcore” and “maximalist” fashion trends have taken over social media, making unique, handmade pieces more desirable than ever. This specific project combines the structural warmth of a handcrafted crochet hood with the artistic flair of a dripping ice cream print, creating a visual contrast that is both whimsical and stylish. Whether you are looking to spice up your winter wardrobe or create a standout piece for a festival, this tutorial provides the blueprint for a garment that looks good enough to eat.
To master the Crochet Hood and Dripping Ice Cream Print – Tutorial, you don’t need to be a master couturier, but you do need a bit of patience and a love for custom apparel DIY. The beauty of this project lies in its dual nature: the tactile, rhythmic process of crocheting and the fluid, creative process of applying fabric prints or fabric paint. By the end of this guide, you will understand how to balance these two different mediums to ensure your crochet hood remains functional while the dripping ice cream design remains vibrant and durable. It’s all about selecting the right yarn weights, fabric inks, and tension techniques to achieve a professional finish.
The foundation of our Crochet Hood and Dripping Ice Cream Print – Tutorial rests on the quality of your materials and your attention to detail during the stitching process. High-quality acrylic or cotton yarn works best for the hood to ensure it holds its shape under the weight of the ice cream embellishments. For the dripping effect, we will explore how to use felt overlays, puff paint, or screen printing techniques to get that perfect “melting” look. This article will walk you through the essential steps, from the first slip knot to the final fabric setting, ensuring your DIY fashion project is a resounding success that reflects your personal creativity.
1. Choosing the Right Materials for Your Crochet Hood and Dripping Ice Cream Print – Tutorial
Selecting the perfect yarn is the first critical step in your journey. For a sturdy crochet hood, I recommend using a medium-weight (worsted) yarn. This provides enough structure to support the hood’s shape without being too heavy or bulky. Natural fibers like cotton are great for breathability, while acrylic blends offer a slight stretch and vibrant colors that won’t fade easily over time.
Your crochet hook size is equally important to the success of this Crochet Hood and Dripping Ice Cream Print – Tutorial. A 5.0mm (H) hook is usually the “sweet spot” for most worsted yarns, allowing for a tight enough stitch density to block out the wind while remaining soft against the skin. If your stitches are too loose, the dripping ice cream print may not sit flat on the surface, causing the design to distort.
When it comes to the dripping ice cream print, you have choices regarding the medium. Fabric paint is excellent for a “melting” look because it flows naturally, but felt fabric is better for a 3D, pop-art effect. If you choose paint, ensure it is a high-opacity textile ink so that the colors pop against the textured background of your crochet stitches.
Don’t forget the essential notions like stitch markers, a tapestry needle, and sharp fabric scissors. Stitch markers will help you keep track of your increases and decreases as you shape the hood. A tapestry needle is vital for weaving in those pesky ends, ensuring your hand-crocheted garment looks clean and professional from every angle.
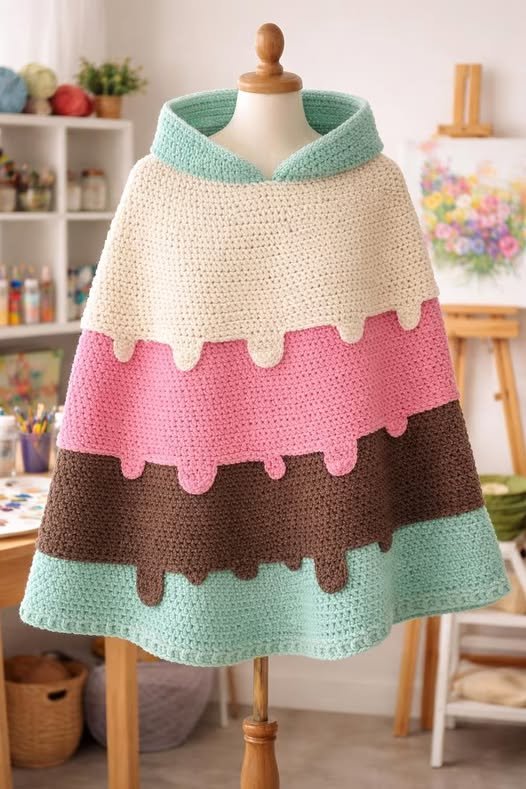
For the ice cream cone colors, think about your palette. Traditional “waffle” browns, creamy whites, and pastel pinks or mint greens create a classic look. However, the Crochet Hood and Dripping Ice Cream Print – Tutorial encourages experimentation. Why not try a “galactic” ice cream with deep purples and glitters, or a “monochrome” melt for a more sophisticated, avant-garde vibe?
Lastly, if you plan on using iron-on transfers for the ice cream print, make sure your yarn is heat-resistant. Many synthetic yarns can melt under high heat, so a wool or cotton base is safer for heat-press applications. Always check the yarn label for care instructions and heat tolerance before you begin applying any permanent graphic designs to your finished crochet work.
2. Master the Basics of Hooking Your Custom Crochet Hood
The construction of the crochet hood usually starts with a large rectangle or a worked-in-the-round tube, depending on your preferred fit. For this tutorial, we focus on a seamed rectangle method, which is the most beginner-friendly. You will start by chaining a length that reaches from one shoulder, over the head, to the other shoulder, ensuring a comfortable, oversized feel.
The Half Double Crochet (HDC) is our preferred stitch for this Crochet Hood and Dripping Ice Cream Print – Tutorial. The HDC provides a beautiful texture that is denser than a double crochet but more flexible than a single crochet. This balance is perfect for creating a canvas that can support the dripping ice cream embellishments without sagging or losing its structural integrity.
As you work your rows, consistency in tension is your best friend. If your tension varies, the hood will look lopsided. A good tip for SEO-friendly crochet projects is to use a gauge swatch before starting. This ensures your final product matches the intended dimensions, preventing a hood that is either too tight to wear or too loose to stay on.
Once your rectangle reaches the desired height—usually from the base of the neck to the top of the crown plus a few inches for “slouch”—it’s time to fold and seam. Using a slip stitch join or a mattress stitch, you will close the top of the rectangle. This creates the classic “pointed” or “rounded” hood shape that serves as the backdrop for our ice cream print.
Adding a ribbed border around the face opening gives the crochet hood a high-end, finished look. You can achieve this by working front post and back post double crochets around the edge. This ribbing not only adds aesthetic value but also helps the hood grip the head slightly better, providing a snug fit that frames the face beautifully.
The final step of the base hood involves blocking. Wet blocking your crochet piece allows the stitches to settle and the fabric to drape naturally. This creates a smoother surface, which is absolutely essential if you want your dripping ice cream print to look crisp and well-aligned rather than bumpy and uneven on the finished DIY accessory.
3. Applying the Dripping Ice Cream Print Design
Now comes the most creative part of the Crochet Hood and Dripping Ice Cream Print – Tutorial: the artwork! To create the dripping effect, you should first sketch your design on paper. Think of “U” shapes of varying lengths to mimic the look of melting cream. These “drips” should look organic and fluid, cascading down from the top or sides of the crochet hood.
If you are using felt, cut out your ice cream shapes and pin them onto the hood. Felt is an excellent choice for crochet embellishments because it doesn’t fray and provides a smooth contrast to the bumpy yarn texture. Use a running stitch or invisible thread to sew the felt drips onto the hood, ensuring you only catch the top loops of the yarn.
For those using fabric paint in this Crochet Hood and Dripping Ice Cream Print – Tutorial, preparation is key. Place a piece of cardboard inside the hood to prevent the paint from seeping through to the other side. Use a stiff-bristled brush to pounce the paint into the fibers of the yarn, ensuring the color saturates the crochet stitches for a bold, solid look.
To make the ice cream print look even more realistic, consider adding “sprinkles.” This can be done with small embroidery stitches (French knots work great!) or by sewing on colorful seed beads. These tiny details elevate the handmade hood from a simple craft project to a piece of wearable art that draws the eye and sparks conversation.
Safety and durability are important, so if you use paint, allow it to dry for at least 24 hours. Most textile paints require heat setting with an iron to become permanent and washable. Place a thin cloth over your dripping ice cream design and press firmly with a warm iron, being careful not to melt any synthetic yarn fibers in the process.
The “drip” placement should be strategic. Placing the longest melting drips near the jawline or over the shoulders creates a dynamic sense of movement. The Crochet Hood and Dripping Ice Cream Print – Tutorial is all about visual balance; you don’t want the design to be too cluttered, but you want enough “melt” to make the ice cream theme unmistakable.
4. Care and Styling Tips for Your Unique Crochet Piece
Once you have completed your Crochet Hood and Dripping Ice Cream Print – Tutorial, knowing how to care for it is vital. Because of the mixed media nature—yarn combined with paint or felt—you should always hand wash your hood in cool water with a gentle detergent. Avoid wringing the fabric, as this can crack the ice cream print or stretch the crochet stitches.
To dry your masterpiece, lay it flat on a clean towel in its original shape. Never hang a crochet hood while it is wet, as the weight of the water will pull the stitches and permanently deform the garment. Air drying is the safest method to preserve the vibrant colors of your dripping ice cream design and the soft texture of the yarn.
Styling your new accessory is where the fun really begins! This crochet hood looks incredible when paired with an oversized denim jacket or a simple monochrome hoodie. The dripping ice cream print acts as a “statement piece,” so keeping the rest of your outfit neutral allows the DIY artwork to be the center of attention.
If you want to go for a full “maximalist” look, consider making matching crochet fingerless gloves with smaller ice cream drips. The Crochet Hood and Dripping Ice Cream Print – Tutorial is just the starting point; the techniques you’ve learned here can be applied to sweaters, bags, or even scarves to create a cohesive, hand-crafted wardrobe.
For those who sell their crafts, this design is a high-value item. Custom crochet work with unique graphic prints fetches a premium price on platforms like Etsy or at local craft fairs. Make sure to highlight the “handmade” and “one-of-a-kind” nature of the dripping ice cream design in your product descriptions to attract buyers looking for bespoke fashion.
Finally, don’t be afraid to iterate on this tutorial. Maybe next time you try a “mint chocolate chip” colorway or a “sundae” version with a cherry on top of the hood. The Crochet Hood and Dripping Ice Cream Print – Tutorial is a flexible framework designed to unlock your imagination and help you produce something truly spectacular and fashion-forward.
FAQ – Frequently Asked Questions
1. Can a beginner complete this Crochet Hood and Dripping Ice Cream Print – Tutorial?
Yes! The hood uses basic stitches like the Half Double Crochet, which is easy to learn. The printing part requires some care, but using felt cut-outs is a very beginner-friendly way to achieve the dripping ice cream look without needing advanced painting skills.
2. What is the best yarn for a crochet hood?
A worsted weight (Level 4) yarn is generally best. It provides a good balance of warmth and structure. Look for cotton-acrylic blends if you want the hood to hold the ice cream print well while remaining soft and durable.
3. Is the dripping ice cream print washable?
If you use high-quality fabric paint and heat-set it correctly, or if you securely sew on felt appliqués, the design will be washable. However, hand washing is always recommended for handmade crochet items to prevent pilling and maintain the shape of the hood.
4. How long does it take to finish this project?
For an intermediate crocheter, the hood can be finished in a weekend (about 6-8 hours). Applying the dripping ice cream print and letting it dry/set adds another 24 hours to the process. It’s a perfect weekend DIY project.
5. Can I use this tutorial to make a hood for kids?
Absolutely! Just adjust your initial chain length and the number of rows to fit a smaller head. The dripping ice cream theme is particularly popular for children’s clothing because it is fun, colorful, and playful.
Conclusion
In this Crochet Hood and Dripping Ice Cream Print – Tutorial, we have explored everything from selecting the right yarn and hooks to the artistic application of a melting ice cream design.
We learned that the foundation of a great hand-stitched hood lies in consistent tension and quality materials, while the “wow factor” comes from the creative use of fabric paints or felt. By combining these two worlds, you’ve created more than just a piece of clothing; you’ve created a wearable piece of art that showcases your personality and technical skill.