Fabric Chair Cover – Tutorial is the perfect way to breathe new life into your home decor while protecting your furniture from daily wear and tear. Whether you are looking to update a dining room set for a special occasion or simply want to hide a few stains on an old kitchen seat, learning how to create your own custom chair covers is a rewarding project. This DIY sewing project allows you to express your personal style through various fabric patterns and textures, ensuring that your home feels unique and curated.
The beauty of a Fabric Chair Cover – Tutorial lies in its versatility and cost-effectiveness compared to buying brand-new furniture. By choosing high-quality upholstery fabric or durable cotton blends, you can transform a mismatched set of chairs into a cohesive and elegant arrangement. Many homeowners find that slipcovers are much easier to maintain than fixed upholstery because they can be removed and tossed into the washing machine whenever needed.
In this comprehensive guide, we will walk you through every step of the process, from measuring your furniture to the final stitching. This step-by-step sewing guide is designed for both beginners and experienced crafters who want to achieve a professional-looking result. By focusing on SEO-friendly crafting techniques and precise measurements, you will ensure that your finished fabric chair cover fits snugly and looks like it was made by a high-end interior designer.
1. Selecting the Right Materials for Your Fabric Chair Cover
Choosing the best materials is the foundational step of any Fabric Chair Cover – Tutorial. You want a fabric that is thick enough to provide structure but flexible enough to sew easily on a standard machine. Popular choices include heavy-weight cotton, linen blends, and duck cloth, as these materials offer excellent durability and a timeless aesthetic for home textile projects.
Before purchasing your yardage, consider the environment where the chair will be used. For a high-traffic dining area, look for stain-resistant fabrics or outdoor-rated materials that can withstand spills and frequent cleaning. The color and print of your decorative fabric should also complement your existing room palette, whether you prefer modern minimalist solids or vibrant floral patchwork designs.
In addition to the main fabric, you will need high-quality polyester thread that matches your textile choice. Using a strong thread is vital for furniture covers because the seams will experience tension every time someone sits down. You might also want to pick up some interfacing or piping cord if you plan to add decorative edges or extra reinforcement to the seat corners.
Do not forget the essential sewing tools required for this task. A sharp pair of fabric shears, a rotary cutter, a measuring tape, and plenty of quilting pins are non-negotiable. Having a clear workspace and a well-maintained sewing machine will make the assembly of your custom slipcover much smoother and more enjoyable throughout the creative process.
Pre-washing your fabric is a professional tip that shouldn’t be skipped in a Fabric Chair Cover – Tutorial. Most natural fibers shrink during their first wash, and you don’t want your perfectly fitted cover to become too small after the first cleaning. Drying and ironing the material before you begin cutting ensures that your fabric measurements remain accurate and your seams stay crisp.
Lastly, consider the “hand” or feel of the fabric. Since people will be sitting on these handmade chair protectors, the texture should be comfortable against the skin. Avoid overly scratchy synthetic materials and opt for breathable textiles that add a layer of warmth and comfort to your seating, enhancing the overall living experience in your home.
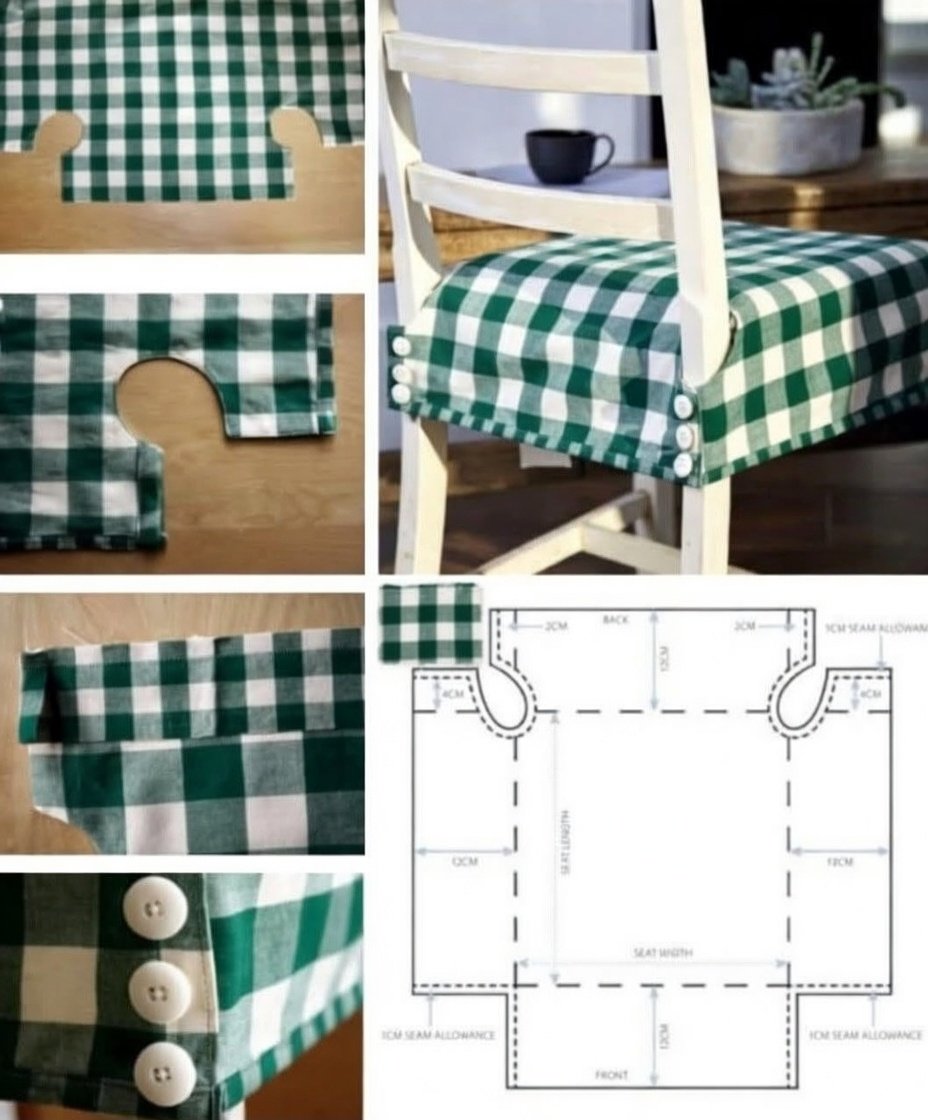
2. Taking Accurate Measurements for a Perfect Fit
The secret to a successful Fabric Chair Cover – Tutorial is precision in the measuring phase. You must treat your chair like a mannequin, taking dimensions for the backrest height, the seat width, and the depth of the chair. Always record your chair dimensions in a notebook, adding at least one inch for seam allowances on every side to avoid a fit that is too tight.
Start by measuring the highest point of the backrest down to the seat, and then from the seat down to the floor if you want a full-length skirted chair cover. For the seat itself, measure the widest part and the deepest part. Accurate textile measuring prevents wasted fabric and ensures that your DIY home decor looks polished and intentional rather than baggy or lumpy.
If your chair has a curved back or unusual arms, you may need to create a paper pattern first. Tracing the shape of the chair onto butcher paper or specialized pattern paper allows you to visualize how the pieces will fit together. This technique is especially helpful for complex upholstery projects where the angles of the furniture are not standard 90-degree corners.
Remember to account for the “give” of the fabric. If you are using a slightly stretchy knit fabric, you might need a smaller seam allowance, but for woven upholstery fabrics, precision is key. Label each piece of your pattern clearly, such as “Back Front,” “Back Rear,” and “Seat Top,” to keep your workflow organized during the cutting and sewing stages.
Many experts in this Fabric Chair Cover – Tutorial suggest measuring twice and cutting once. It is much easier to trim away excess material than it is to add a patch because a piece was cut too short. Use a fabric marker or tailor’s chalk to draw your cutting lines directly onto the reverse side of the fabric, ensuring that you follow the grainline for the best drape.
Finally, consider the height of the legs. If you want the legs of the chair to be visible, your fabric cover should end just below the seat frame. If you prefer a hidden look, calculate the length for a box pleat skirt or a simple straight hem that grazes the floor. This choice significantly impacts the formal or casual “vibe” of your finished sewing craft.
3. Cutting and Pinning Your Fabric Pieces
Once your measurements are ready, it is time to lay out your material on a flat surface. In this part of the Fabric Chair Cover – Tutorial, you will place your pattern pieces onto the wrong side of the fabric. If your fabric has a directional print, such as stripes or a specific motif, ensure all pieces are facing the same way so the pattern alignment is consistent across the chair.
Using sharp fabric scissors is essential to prevent fraying and jagged edges. Follow your chalk lines carefully, keeping the fabric as flat as possible. For those making multiple matching chair covers, stacking layers of fabric can save time, but be careful to pin them securely so the bottom layers don’t shift during the cutting process.
Pinning is the stage where your slipcover starts to take its three-dimensional shape. Drape the cut pieces over the chair inside out (right sides facing each other) and pin along the seams. This “pin-to-fit” method is a staple of any Fabric Chair Cover – Tutorial because it allows you to adjust the contours specifically to your individual piece of furniture.
Pay close attention to the corners of the seat. You want the pins to follow the curve of the chair tightly. Using heavy-duty glass head pins is recommended here, as they are easy to see and won’t melt if you need to do a quick press with an iron while the cover is still pinned. Proper pinning techniques result in a much cleaner finish once you move to the machine.
Check for symmetry during this stage. Step back and look at the chair from a distance to ensure the fabric drape is even and the seams aren’t pulling in one direction. It is much easier to unpin and readjust now than to use a seam ripper later. This attention to detail distinguishes a basic craft project from a professional furniture restoration.
If you are adding ties or ribbons to keep the cover in place, pin them into the seams now. Positioning fabric ties at the back corners of the seat ensures that the cover won’t slide around when people sit and move. This functional addition is a popular feature in many shabby chic decor styles and adds a charming, handmade touch to your tutorial project.
4. Sewing and Finishing Your Custom Cover
The final assembly in our Fabric Chair Cover – Tutorial happens at the sewing machine. Use a straight stitch for the main seams, reinforcing the start and end of each line with a backstitch. If your fabric is prone to fraying, consider using a zigzag stitch or a serger on the raw edges to ensure the longevity of your washable slipcover.
As you sew, remove the pins just before they reach the needle to avoid breaking your machine’s timing. Maintain a consistent seam allowance (usually 5/8 of an inch) to ensure the fit remains exactly as you planned during the pinning phase. For high-stress areas like the top corners, you may want to sew a double seam for extra strength and durability.
Once the main body of the fabric chair cover is assembled, it is time to hem the bottom. A simple double-fold hem provides a clean, professional edge that prevents the fabric from unraveling. If you are feeling adventurous, you could add fringe, pom-poms, or a contrast border to the hem to give your chair a unique personality.
Turn the cover right side out and give it a thorough pressing with a steam iron. Pressing the seams flat is a vital step in any Fabric Chair Cover – Tutorial because it settles the stitches into the fabric and removes any puckering. A well-pressed cover will lay smoothly against the chair, mimicking the look of professional upholstery.
Slide the cover onto your chair for the final fitting. If there are any loose areas, you can turn it inside out again and “take in” the seams slightly. The goal of a custom-made fabric cover is to have a snug fit that doesn’t shift, providing both aesthetic beauty and functional protection for your home furnishings.
To maintain your new creation, always check the fabric care instructions. Most cotton-based handmade covers can be washed on a gentle cycle and air-dried to prevent shrinkage. By following this Fabric Chair Cover – Tutorial, you have not only saved money but also gained a valuable skill in textile arts and interior styling that you can use for years to come.
FAQ: Common Questions About Fabric Chair Covers
What is the best fabric for a chair cover?
The best fabrics are usually medium to heavy-weight textiles like cotton duck, canvas, linen, or twill. These materials are durable enough to handle the friction of sitting while being easy to wash.
How much fabric do I need for a standard dining chair?
Generally, you will need between 1.5 to 3 yards of upholstery-grade fabric per chair, depending on whether you want a full-length skirt or just a seat and backrest cover. Always buy a little extra for pattern matching.
Can I make a chair cover without a sewing machine?
While a machine is faster and provides stronger seams, you can hand-sew a fabric chair cover using a backstitch. Alternatively, “no-sew” methods using fabric glue or hem tape are available for simpler, decorative-only designs.
How do I stop the cover from sliding off the chair?
The most effective way is to sew fabric ties or velcro straps to the inside seams that can be fastened around the chair legs. Using a non-slip fabric liner underneath the cover can also help keep it in place.
Are slipcovers better than reupholstering?
Slipcovers are generally better for households with pets or children because they are removable and washable. Reupholstering is a more permanent, “built-in” look but is much harder to clean and more expensive to execute.
Conclusion
In this Fabric Chair Cover – Tutorial, we have explored the entire journey of transforming a basic piece of furniture into a customized decor element. From the initial selection of durable textiles to the precise art of measuring and sewing, you now have the knowledge to create beautiful, functional slipcovers for any room in your house.
This project is a fantastic way to practice your sewing skills while practicing sustainable “upcycling” by refreshing the furniture you already own.