Crochet Flower Coaster – Tutorial is the perfect project for anyone looking to add a touch of handmade charm to their home decor while practicing essential stitching techniques. Creating a Crochet Flower Coaster is not only a functional endeavor to protect your furniture from water rings, but it also serves as a delightful way to use up colorful yarn scraps from your stash. This Tutorial is designed to guide you through every loop and pull, ensuring that even if you are relatively new to the craft, you can produce a professional-looking set of flower-themed coasters that will impress your guests and brighten up your coffee table.
When you dive into a Crochet Flower Coaster – Tutorial, you are engaging in a mindful practice that combines geometry with artistry. The circular nature of a coaster requires careful attention to stitch increases to ensure the piece remains flat and functional. By following this Tutorial, you will learn how to transition from a simple center ring into delicate floral petals, using a variety of heights in your stitches to create that iconic organic shape. It is a rewarding experience to watch a simple strand of cotton transform into a vibrant crochet flower in just a few short rounds.
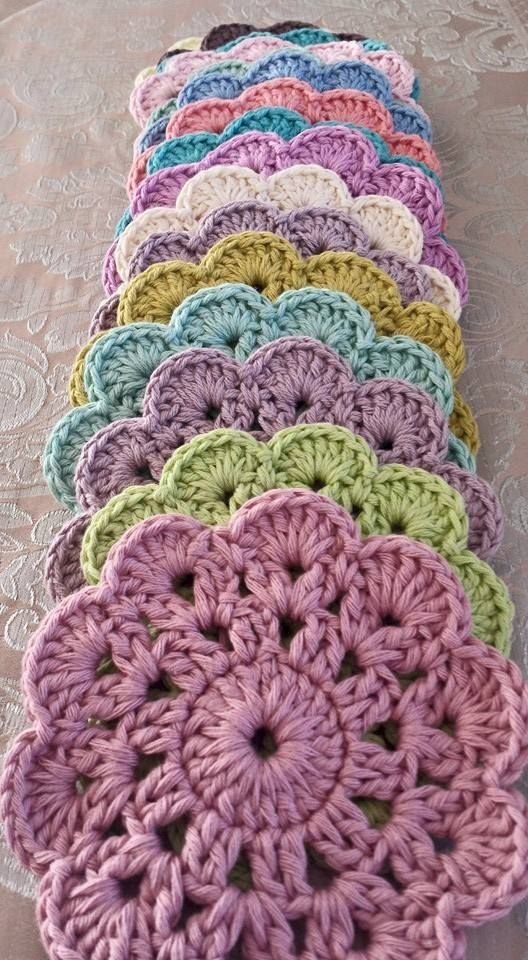
The beauty of specializing in a Crochet Flower Coaster project lies in its versatility and the speed at which you can finish a single piece. Unlike larger projects like blankets or sweaters, this Tutorial offers instant gratification, allowing you to complete a full set of flower coasters in a single afternoon. Whether you prefer muted pastels for a vintage aesthetic or bold, neon shades for a modern kitchen, the Crochet Flower Coaster – Tutorial provides the foundational framework you need to customize your creations. Let’s explore the essential steps and techniques required to master this beautiful floral crochet pattern.
1. Choosing the Best Materials for Your Crochet Flower Coaster – Tutorial
Selecting the right yarn is the first step in ensuring your Crochet Flower Coaster is durable and absorbent. For this Tutorial, high-quality mercerized cotton is highly recommended because it holds its shape well and handles moisture better than acrylic fibers. Cotton yarn also provides excellent stitch definition, which is vital for making the floral petals pop.
The hook size you choose will directly impact the tension and final diameter of your Crochet Flower Coaster. Most tutorials suggest a 3.5mm or 4.0mm hook for medium-weight cotton to achieve a tight, sturdy fabric. If your stitches are too loose, the coaster may feel floppy; if they are too tight, the edges might curl upward instead of laying flat.
In addition to yarn and hooks, you will need a few basic notions to complete this Crochet Flower Coaster – Tutorial. A sharp pair of embroidery scissors and a tapestry needle are essential for weaving in your ends securely. Since coasters are handled frequently and washed often, ensuring those yarn tails are hidden and locked in place is a key part of the process.
Color coordination is where your creativity truly shines during this Crochet Flower Coaster – Tutorial. You can choose a contrasting color for the center of the flower to mimic a real daisy or sunflower. Using variegated yarn can also create a beautiful multi-tonal effect on the petals without the need for frequent color changes, making the crochet process even smoother.
Before starting the actual stitches of the Tutorial, it is helpful to prepare your workspace with good lighting and a comfortable chair. Because this Crochet Flower Coaster involves repetitive counting in rounds, minimizing distractions will help you maintain the correct stitch count. A stitch marker can also be a lifesaver for marking the beginning of each new floral round.
Finally, consider the finished size you want to achieve for your Crochet Flower Coaster. Most standard mugs require a coaster that is at least 4 inches in diameter. This Tutorial is structured to help you reach that ideal size, but you can always adjust your hook size if you find your personal tension results in a piece that is slightly too small or too large.
2. Essential Stitches and Techniques for the Crochet Flower Coaster
The foundation of our Crochet Flower Coaster – Tutorial begins with the magic ring or a small chain loop. The magic ring is preferred by many crafters for floral designs because it allows you to pull the center tight, leaving no visible hole in the middle of your flower. This creates a clean, professional look for the center of your Crochet Flower Coaster.
Once the center is established, the Tutorial moves into the first round of stitches, typically using single crochet or half-double crochet. These stitches provide the sturdy base from which the flower petals will grow. Precision in this round is vital, as the number of stitches here determines how many petals your Crochet Flower Coaster will eventually have.
To create the “petal” effect, this Crochet Flower Coaster – Tutorial utilizes a technique called “shell stitches” or “clusters.” By working multiple double or triple crochet stitches into a single space, the fabric naturally fans out. This creates the rounded or pointed shapes that define the floral aesthetic of the coaster, giving it a three-dimensional appearance.
Increases are a fundamental part of any circular Crochet Flower Coaster project. Without proper increases, the work will begin to bowl or “ruffle” excessively. This Tutorial explains exactly where to place your stitches to ensure the coaster expands at a consistent rate, maintaining a perfectly flat surface for your drinks.
Slip stitches play a silent but important role in the Crochet Flower Coaster – Tutorial. They are used to join rounds seamlessly and to travel across the work to the next starting point without adding bulk. Learning how to execute an invisible join at the end of your flower coaster will elevate the quality of your finished handmade items.
As you progress through the Tutorial, you will learn how to change colors between the “pollen” center and the “petal” outer edge. This technique is a staple in floral crochet, allowing you to create high-contrast designs. Securely carrying the yarn or joining new strands is a skill you will use long after you finish your first Crochet Flower Coaster.
3. Step-by-Step Assembly and Shaping Your Floral Petals
The actual construction phase of the Crochet Flower Coaster – Tutorial is where the magic happens. You start by working into the center ring, building a dense circle that acts as the support for the rest of the flower. Each round should be checked against a flat surface to ensure the Crochet Flower Coaster isn’t beginning to warp or wave.
In the middle rounds of this Tutorial, you will begin defining the “valleys” between the petals. This is often achieved by alternating tall stitches with shorter ones, such as slip stitches or single crochets. This contrast in stitch height is what gives the Crochet Flower Coaster its recognizable flower shape, separating it from a standard circular mat.
When working the final round of the Crochet Flower Coaster – Tutorial, you might add a decorative edging. A simple picot stitch or a crab stitch (reverse single crochet) can add a delicate texture to the tips of your petals. This final touch makes the flower coaster look more intricate and provides a nice “grip” for the edge of the piece.
Blocking is a secret step often skipped by beginners, but highly recommended in this Crochet Flower Coaster – Tutorial. By lightly steaming or wetting your finished flower coaster and pinning it into a perfect circle, you set the stitches in place. This ensures that every Crochet Flower Coaster in your set is identical in size and shape.
During the assembly, you must be mindful of your tension when working into the “chain spaces.” These gaps are often used in flower patterns to create a lacey, airy feel. However, for a Crochet Flower Coaster, we want to keep them small enough that a glass remains stable and doesn’t tip into a hole in the floral design.
The last part of the physical creation in this Tutorial involves weaving in the ends. Use your tapestry needle to weave the yarn through the back of the floral petals, following the natural direction of the stitches. This hidden reinforcement ensures that your Crochet Flower Coaster can survive the washing machine and daily use without unraveling.
4. Customizing and Decorating Your Finished Crochet Flower Coaster
Once you have mastered the basic Crochet Flower Coaster – Tutorial, the possibilities for customization are endless. You can experiment with “layering” by crocheting a smaller flower and sewing it onto a larger circular base. This creates a 3D flower coaster that adds a sophisticated, sculptural element to your table setting.
Another fun way to adapt this Tutorial is by using different yarn textures. While cotton is standard, adding a strand of metallic thread alongside your yarn can give your Crochet Flower Coaster a festive, shimmering look for holiday parties. These small adjustments transform a simple tutorial into a unique piece of art.
You can also turn these flower coasters into a larger project by joining multiple units together. By following the Crochet Flower Coaster – Tutorial and then connecting the petals of several pieces, you can create a beautiful floral table runner or a decorative placemat. It’s a great way to scale up the skills you’ve learned here.
Embellishments like small beads or embroidery can be added to the center of your Crochet Flower Coaster. If you are using the coaster strictly for decoration, a bead can represent the center of the flower beautifully. However, if you plan to use it for drinks, keep the surface flat by using contrasting yarn colors for the center instead of physical objects.
Seasonal variations are easy to implement with this Crochet Flower Coaster – Tutorial. Think of bright yellows and whites for spring daisies, deep reds for holiday poinsettias, or oranges and browns for autumn sunflowers. The flower pattern remains the same, but the color palette completely changes the vibe of the coaster.
Finally, consider making a set of these to give as gifts. A bundle of four or six Crochet Flower Coasters tied with a simple twine ribbon makes a thoughtful, handmade present for housewarmings or birthdays. Sharing the results of your Tutorial progress is one of the most rewarding aspects of the crochet community.
FAQ – Frequently Asked Questions
1. What is the best yarn for a Crochet Flower Coaster?
The best yarn for any Crochet Flower Coaster is 100% cotton. Cotton is absorbent, which is essential for catching condensation from cold drinks, and it is heat-resistant, making it safe for hot coffee mugs. It also holds the floral shape better than wool or acrylic.
2. Is this Tutorial suitable for absolute beginners?
Yes! This Crochet Flower Coaster – Tutorial is very beginner-friendly. It uses basic stitches like the chain, single crochet, and double crochet. Because the project is small, it is an excellent way to practice working in the round and learning how to shape petals without feeling overwhelmed.
3. How long does it take to finish one flower coaster?
Depending on your speed, a single Crochet Flower Coaster can take anywhere from 20 to 45 minutes. It is a perfect “quick-win” project. Once you memorize the Tutorial steps, you will likely find yourself getting faster with each subsequent flower you create.
4. Can I wash my handmade Crochet Flower Coaster?
Absolutely. If you used cotton yarn as suggested in this Tutorial, you can wash them. It is best to hand wash them in cool water and lay them flat to dry (re-blocking them if necessary) to maintain the integrity of the floral petals and the circular shape.
5. Why is my coaster curling at the edges?
Curling usually happens if your tension is too tight or if there aren’t enough increases in the early rounds of the Tutorial. Try using a larger hook or ensuring that you are not pulling the yarn too tight when forming the petals of your Crochet Flower Coaster.
Conclusion
In this Crochet Flower Coaster – Tutorial, we have covered everything from selecting the right cotton yarn to mastering the shell stitches that form beautiful floral petals. We explored the importance of tension, the benefits of blocking, and how to customize your flower coasters for any season or decor style.
By following these steps, you now have the skills to create a functional and aesthetic set of handmade coasters that add a personal touch to your living space.