Creating a Crochet flower and leaves- Tutorial is one of the most rewarding ways to dive into the world of fiber arts, offering a perfect blend of relaxation and creative expression. Whether you are looking to embellish a cozy blanket, add a touch of nature to a denim jacket, or create a permanent bouquet for your home, mastering the art of handmade crochet decor allows you to bring a personalized flare to every project. This guide is designed to take you through the delicate process of crafting intricate petals and vibrant greenery, ensuring that your final pieces look professional and polished.
As you begin this Crochet flower and leaves- Tutorial, it is essential to understand that tension and yarn choice play a massive role in the final outcome. Using a mercurized cotton yarn will give your flowers a beautiful sheen and structural integrity, while a softer wool blend might create a more rustic, bohemian feel. Before we dive into the stitches, make sure you have your ergonomic crochet hook and a sharp pair of scissors ready, as we will be switching colors and weaving in ends to create a seamless, nature-inspired look that mimics the beauty of a real garden.
The beauty of following a Crochet flower and leaves- Tutorial lies in its versatility; once you learn the basic construction of a five-petal crochet flower and a pointed crochet leaf, you can scale the patterns up or down by simply changing your hook size. This tutorial focuses on clear, step-by-step instructions that cater to both beginners and those looking to refine their technique. By the end of this article, you will not only have a completed set of flora but also the confidence to experiment with different crochet stitches and color palettes to suit any season or style.
1. Preparing Your Materials for the Crochet flower and leaves- Tutorial
To start your journey with this Crochet flower and leaves- Tutorial, selecting the right crochet supplies is the foundation of a successful project. You will need a size 3.5mm (E) crochet hook for standard worsted weight yarn, or a smaller 2.5mm hook if you prefer delicate, lace-like results. Having a variety of colors, specifically vibrant yellows for the centers and earthy greens for the foliage, helps in achieving a realistic floral crochet design.
Beyond the yarn and hook, don’t forget the small but vital tools like stitch markers and a tapestry needle. These items ensure that you don’t lose your place during complex rounds and help you hide the yarn tails professionally. A good yarn threader can also save you time when finishing off your crochet flower patterns, making the assembly process much smoother and more enjoyable for crafters of all levels.
When we talk about the Crochet flower and leaves- Tutorial, the yarn fiber matters significantly for the “drape” of the leaves. A stiff cotton yarn helps the leaves hold their shape without drooping, which is ideal if you are making crochet jewelry or hair accessories. On the other hand, an acrylic yarn might be better for items that need to be washed frequently, such as appliqués on children’s clothing or decorative pillows.
The environment where you work also impacts your crochet productivity and tension. Ensure you have adequate lighting, preferably natural light, so you can clearly see the definition of your crochet loops and stitches. Working in a comfortable chair with good back support will allow you to focus on the intricate details of the flower petals without feeling fatigued during longer crafting sessions.
Understanding the terminology used in this Crochet flower and leaves- Tutorial is a crucial step before making your first slip knot. Familiarize yourself with standard US crochet terms such as Single Crochet (sc), Double Crochet (dc), and the Treble Crochet (tr). Knowing these abbreviations by heart will allow you to read the pattern fluidly, preventing mistakes that could lead to having to unravel your hard work later on.
Lastly, consider the “blocking” phase as part of your preparation. Blocking crochet involves pinning your finished pieces to a foam board and lightly steaming them to set the shape. While not always mandatory, it is highly recommended in this Crochet flower and leaves- Tutorial to ensure your leaves are perfectly flat and your flowers are symmetrical, giving your DIY crochet project a high-end, boutique-quality finish.
2. Crafting the Perfect Petals: A Step-by-Step Guide
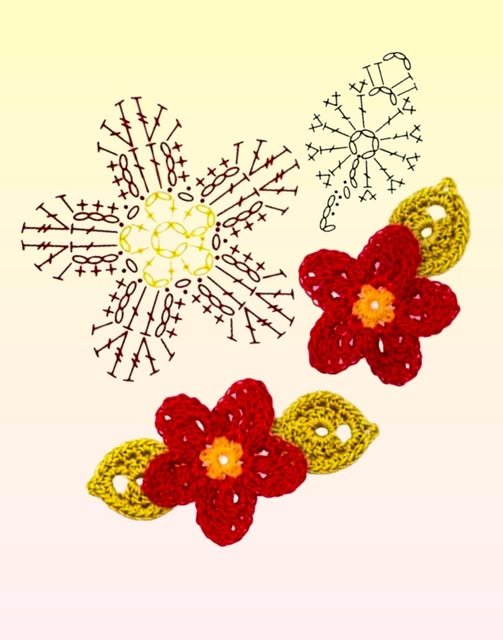
The core of any Crochet flower and leaves- Tutorial is the construction of the flower itself, which usually begins with a magic ring or a small chain loop. The magic circle technique is preferred because it allows you to pull the center tight, leaving no visible hole in the middle of your flower. Inside this ring, you will typically work a series of single crochet stitches to create a sturdy base for the petals to grow from.
Once your base is ready, the transformation into a bloom happens by working multiple stitches into a single space. To create rounded petals, this Crochet flower and leaves- Tutorial suggests a sequence of half-double crochet, double crochet, and half-double crochet all in the same stitch. This variation in height creates the natural curve of a spring crochet blossom, making it look more organic and less mechanical.
Color changes are where your crochet flower truly comes to life. In this Crochet flower and leaves- Tutorial, we recommend changing to a contrasting yarn color for the final round of the petals. Using a slip stitch join for the new color keeps the transition clean. You can even use variegated yarn to mimic the natural gradients found in real wildflowers, adding depth and visual interest to your work.
Texture is another element that can elevate your crochet floral art. By working in the back loops only (BLO), you create a ribbed effect that adds a 3D dimension to the center of the flower. This advanced crochet technique is simple to execute but provides a professional look that distinguishes your work from basic patterns, making your handmade gifts stand out to anyone who sees them.
As you progress through the Crochet flower and leaves- Tutorial, pay close attention to your stitch count. Missing even one double crochet can make the flower look lopsided. It is helpful to count your stitches after every petal is completed. This habit of stitch counting ensures that every flower you produce is consistent in size, which is especially important if you plan to join them together for a crochet garland.
Finalizing the flower involves a technique called the invisible finish. Instead of a standard knot, you use a tapestry needle to mimic the path of a stitch, creating a seamless edge. This is a vital skill highlighted in our Crochet flower and leaves- Tutorial because it ensures that there is no “ugly side” to your flower, allowing it to be beautiful from every angle when attached to your crochet projects.
3. Mastering the Greenery: How to Crochet Realistic Leaves
No flower is complete without its foliage, and this section of the Crochet flower and leaves- Tutorial focuses on creating the perfect leaf. Most crochet leaf patterns start with a foundation chain, and the shape is built by working down one side of the chain and then back up the other. This “mirroring” technique allows you to create a symmetrical leaf that tapers at both ends, just like in nature.
To achieve the pointed tip often found in rose leaves or ivy leaves, the picot stitch is your best friend. In this Crochet flower and leaves- Tutorial, we teach you how to chain two and slip stitch into the first chain at the very peak of your leaf. This small detail creates a sharp, defined point that adds realism to your crochet greenery and prevents the tips from looking rounded or blunt.
The “veins” of the leaf can be added using a surface slip stitch technique. Once the main body of the leaf is finished, you can use a slightly darker shade of green yarn to “draw” a line down the center. This surface crochet technique adds a layer of sophistication to the Crochet flower and leaves- Tutorial, making the leaves look structured and botanically accurate rather than just flat shapes.
Varying the size of your leaves adds a sense of realism to a crochet bouquet. You can easily achieve this by increasing the number of stitches in your foundation chain. For a small leaf, start with 6 chains; for a larger leaf, try 10 or 12. This Crochet flower and leaves- Tutorial encourages experimentation with scale to create a more dynamic and interesting floral arrangement that catches the eye.
Tension is particularly important when working on crochet leaves. If you crochet too loosely, the leaf will be floppy and won’t hold its shape. In this Crochet flower and leaves- Tutorial, we suggest using a hook that is half a millimeter smaller than what the yarn label recommends. This “tight stitching” approach ensures your crochet leaves have enough “body” to stand out when tucked behind a heavy flower.
Attaching the leaves to the flower is the final structural step. You can either crochet them directly onto the back of the flower or sew them on using a whip stitch. This Crochet flower and leaves- Tutorial recommends sewing them if you want more control over the angle of the leaves. Positioning two leaves at a 45-degree angle behind the flower usually creates the most aesthetically pleasing and balanced crochet appliqué.
4. Creative Ways to Use Your Finished Crochet Projects
Now that you have completed the Crochet flower and leaves- Tutorial, it’s time to think about application. One of the most popular uses for these items is as crochet hair accessories. By simply gluing or sewing your flower onto a metal clip or an elastic band, you create a unique, boho-chic headpiece that is perfect for weddings, festivals, or everyday wear for children and adults alike.
Another fantastic way to utilize the skills from this Crochet flower and leaves- Tutorial is through home decor upcycling. You can sew several flowers onto a plain throw pillow or a set of curtains to instantly refresh a room. This sustainable decorating method allows you to customize your living space with colors that match your interior design perfectly, all while showcasing your crochet craftsmanship.
For those who love fashion, crochet embellishments are a massive trend. You can use the flowers and leaves from this Crochet flower and leaves- Tutorial to hide a small hole in a sweater or simply to add flair to a denim jacket. This “visible mending” not only saves your clothes from the landfill but also turns a flaw into a beautiful, hand-stitched feature that is entirely unique to you.
Seasonal gifting becomes much easier once you’ve mastered this Crochet flower and leaves- Tutorial. A crochet brooch made from a single flower and two leaves makes a thoughtful and lasting gift for Mother’s Day or a teacher’s appreciation token. Unlike real flowers, these everlasting crochet blooms will never wilt, serving as a permanent reminder of your kindness and your skill as a fiber artist.
You can also scale up the production to create crochet bunting or festive garlands. By stringing together the components made in this Crochet flower and leaves- Tutorial with a long chain of yarn, you create a beautiful decoration for nurseries or garden parties. Handmade party decor adds a level of warmth and effort that store-bought plastic decorations simply cannot match, making every celebration feel more special.
Finally, consider the world of crochet jewelry. Using embroidery floss and a tiny hook, the techniques in this Crochet flower and leaves- Tutorial can be used to make stunning earrings or delicate necklaces. Adding a few glass beads to the center of the flowers adds a touch of sparkle. The possibilities are truly endless once you have the basic building blocks of floral crochet under your belt.
FAQ – Frequently Asked Questions
What is the best yarn for a Crochet flower and leaves- Tutorial?
For the best results, mercerized cotton is highly recommended. It provides excellent stitch definition, which is crucial for showing off the intricate petals and leaf veins. It also has a slight shine that makes the colors pop.
Can a beginner finish this Crochet flower and leaves- Tutorial?
Absolutely! This project is beginner-friendly because it uses basic stitches like the slip stitch, single crochet, and double crochet. As long as you can maintain consistent tension, you will find these patterns very manageable.
How long does it take to make one flower and leaf?
Once you are familiar with the pattern, a single flower takes about 10 to 15 minutes, and a leaf takes about 5 minutes. It is a perfect “palette cleanser” project between larger works like sweaters or blankets.
How do I make my crochet flowers look more realistic?
Using a variety of yarn shades (tonal colors) and ensuring you “block” your finished pieces will make a huge difference. Adding a small bead or a different colored French knot in the center also adds a realistic botanical touch.
Do I need to starch my crochet leaves?
If you want the leaves to stay very stiff—for example, if they are being used as a bookmark or a wall hanging—you can use a fabric stiffener spray or a mixture of water and white glue. For clothing appliqués, starching is usually not necessary.
Conclusion
In this Crochet flower and leaves- Tutorial, we have explored everything from selecting the right ergonomic tools to the final assembly of beautiful, handmade floral motifs.
We covered the importance of stitch variety, the benefits of blocking your work, and how to choose the perfect yarn fibers to ensure your creations are both durable and stunning. By mastering these small but impactful components, you’ve unlocked the ability to customize your wardrobe, decorate your home, and create meaningful, hand-crafted gifts for your loved ones.