In this comprehensive Decorative Crochet Basket and Box – Tutorial, we are exploring the intersection of practical storage and artistic home styling. There is something deeply satisfying about transforming a simple skein of yarn into a sturdy, functional container that can hold anything from jewelry to craft supplies. By mastering the techniques required for a crochet storage set, you can eliminate clutter in your home while adding a soft, textured aesthetic that plastic bins simply cannot replicate.
Creating a Decorative Crochet Basket and Box – Tutorial is an excellent way for intermediate crafters to experiment with stiffening techniques and structural integrity. Many people assume that crochet is only for soft items like blankets or scarves, but with the right choice of t-shirt yarn or cotton cord, you can create walls that stand tall and corners that are perfectly sharp. This guide is designed to help you navigate the nuances of shaping crochet, ensuring that your finished products are as durable as they are beautiful.
Throughout this Decorative Crochet Basket and Box – Tutorial, we will delve into the specific stitches that provide the best “grip” and density for organizational items. Whether you are looking to create a boho-style nursery basket or a sophisticated rectangular crochet box for your office, the principles of construction remain the same. We will focus on achieving a professional finish, including seamless transitions and invisible joins, so your handmade crochet decor looks like a premium boutique find.
1. Choosing the Right Materials for Structural Success
The foundation of a high-quality Decorative Crochet Basket and Box – Tutorial begins with the selection of your yarn. For baskets that need to hold their shape without collapsing, T-shirt yarn (also known as Trapilho) is the gold standard. It is bulky, slightly elastic, and creates thick stitches that act like a solid wall. If you prefer a more natural or rustic look, braided cotton cord or jute are fantastic alternatives that offer incredible stiffness and a timeless appeal.
Your choice of crochet hook must complement the thickness of your material to ensure a tight gauge. For this Decorative Crochet Basket and Box – Tutorial, we recommend using a hook that is one or two sizes smaller than what is suggested on the yarn label. This “tight-stitch” method prevents gaps between the stitches, which is essential for a crochet box that needs to hold its structure. A 6.0mm to 8.0mm hook is common when working with heavy-duty fibers.
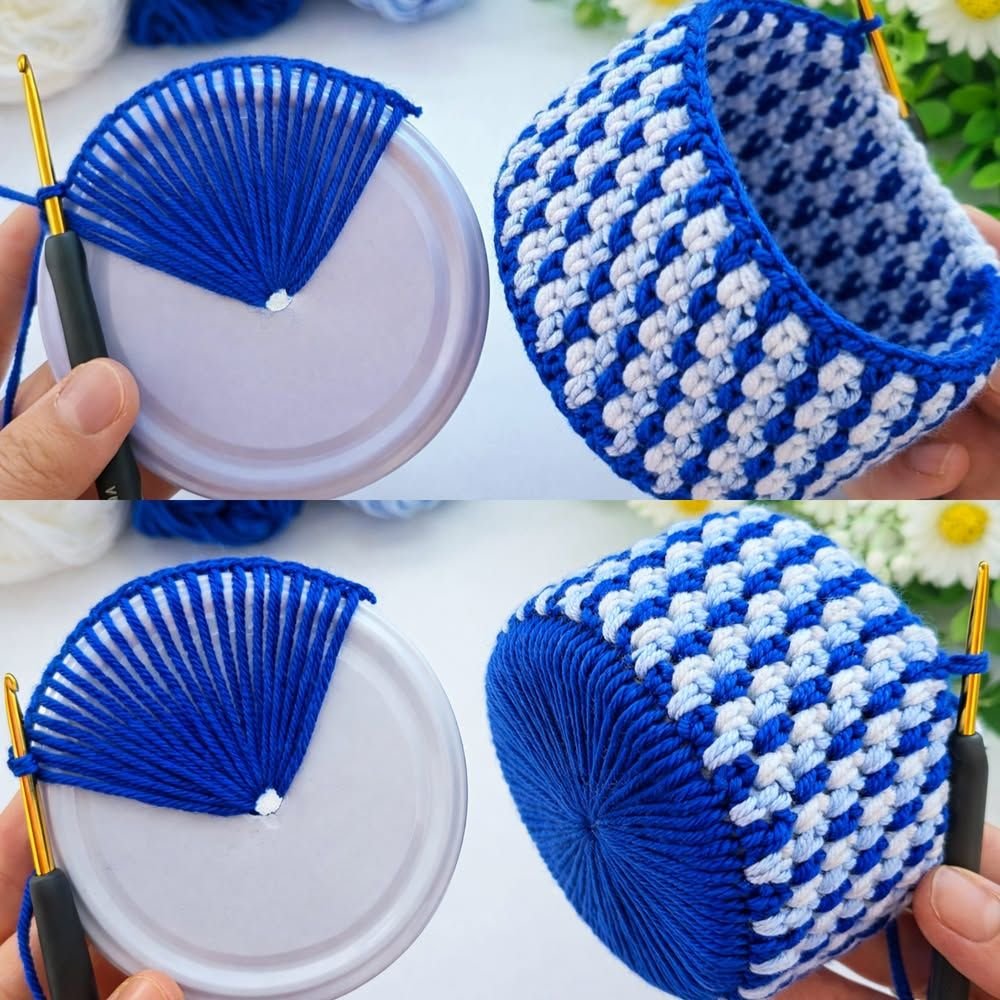
To make your Decorative Crochet Basket and Box – Tutorial stand out, consider using a wooden base. Many modern patterns utilize laser-cut plywood bases with pre-drilled holes, which provide a perfectly flat bottom and significant stability. If you choose to crochet the base, you will need to master the magic ring and consistent increases to ensure the bottom stays flat and does not “bowl” upward before you start the walls.
Structural reinforcements are the “secret ingredient” in a professional crochet storage tutorial. For larger boxes, you might want to incorporate plastic canvas or wire frames into the sides as you crochet. However, if your tension is tight enough and your yarn is thick, the crochet itself should be sufficient. Using a mercerized cotton held double can also provide a surprising amount of rigidity for smaller, more delicate decorative boxes.
Don’t overlook the importance of stitch markers and a heavy-duty yarn needle. Because you will be working with thick materials, a standard plastic needle might snap; a metal needle with a large eye is much better for weaving in ends of cotton cord. Markers are vital for tracking the start of your rounds, especially when working in a continuous spiral, which is the preferred method for a seamless crochet basket.
Finally, think about the finishing touches that will make your Decorative Crochet Basket and Box – Tutorial unique. Leather handles, wooden buttons, or even a simple fabric lining can elevate the piece from a simple craft to a luxury home accessory. These details not only add a “humanized” touch to the project but also increase the functional lifespan of the crochet container, protecting the yarn from excessive wear and tear.
2. Mastering the Base and Round-to-Wall Transition
Every successful Decorative Crochet Basket and Box – Tutorial starts from the ground up, literally. If you are making a circular basket, the goal is to create a flat circle using the waistcoat stitch (also known as the knit stitch) or standard single crochet. The key is to increase at regular intervals; if you don’t increase enough, the base will curl, and if you increase too much, it will ripple. A perfectly flat base is the only way to ensure the walls go up straight.
Once your base reaches the desired diameter, the transition round is the most critical part of this Decorative Crochet Basket and Box – Tutorial. To create a sharp “edge” where the bottom meets the wall, you should work one round in the back loop only (BLO). This creates a natural fold line that encourages the stitches to sit vertically. Some crafters also like to add a round of slip stitches before starting the walls to provide an extra layer of reinforcement.
For a Decorative Crochet Basket and Box – Tutorial that focuses on a square or rectangular shape, the corner increases are your best friend. You must work three stitches into each corner to maintain the 90-degree angle. As the walls grow, you will stop increasing and simply work one stitch into every stitch from the previous row. This transition from a flat plane to a 3D structure is where the magic happens, turning your flat circle into a functional crochet box.
Density is your priority during the wall-building phase. In this Decorative Crochet Basket and Box – Tutorial, we suggest using the waistcoat stitch because it stacks the stitches directly on top of each other, similar to bricks in a wall. This creates a very stiff, non-stretchy fabric that is perfect for crochet organization. It takes a bit more effort to pull the hook through the center of the stitch, but the structural result is worth the extra muscle.
Keep a close eye on your tension as the walls get higher. It is a common mistake for crocheters to loosen their grip as they progress, which causes the basket to flare outward like a bowl. To keep the sides of your crochet basket perfectly vertical, try to maintain a slightly tighter tension than usual. If you notice flaring, you may need to go down another hook size for the final few rounds to “cinch” the opening slightly.
To finish the transition in this Decorative Crochet Basket and Box – Tutorial, consider the height-to-width ratio. A basket that is too tall without enough base width will likely tip over or sag. A good rule of thumb is to keep the height no more than 1.5 times the diameter of the base unless you are using a very stiff macramé cord. Finding this balance ensures your handmade storage box is as practical as it is pretty.
3. Advanced Stitch Patterns for Texture and Durability
While basic stitches are great, this Decorative Crochet Basket and Box – Tutorial encourages you to experiment with textures that add “heft” to your work. The bubble stitch or bobble stitch can be used to create a 3D effect on the outside of the basket, making it a statement piece in a living room. These stitches use more yarn, which naturally makes the walls thicker and more resistant to collapsing under the weight of items stored inside.
Another fantastic technique for a Decorative Crochet Basket and Box – Tutorial is the crossed double crochet. This creates a sturdy, latticed look that is reminiscent of traditional woven wicker baskets. When combined with a neutral-colored cotton yarn, this stitch pattern gives your crochet box an expensive, high-end look that fits perfectly with Scandinavian or Minimalist interior design styles.
If you are following this Decorative Crochet Basket and Box – Tutorial to create a lid for your box, the fit must be precise. A lid should be exactly one round larger than the base of the box so that it can slide over the top comfortably. You can use a contrasting color for the lid or add a crochet flower or a simple loop handle to make it easier to open. A lidded crochet box is perfect for hiding away remote controls or bathroom toiletries.
Color-work is another way to enhance your Decorative Crochet Basket and Box – Tutorial. Using the tapestry crochet technique, you can incorporate geometric patterns, zig-zags, or even words into the walls of your basket. Since tapestry crochet involves carrying a second strand of yarn inside the stitches, it inherently makes the walls twice as thick and significantly more rigid, which is a huge benefit for heavy-duty crochet storage.
For those who want a softer look without sacrificing strength, the herringbone half-double crochet is a beautiful option. It creates a tilted, woven texture that looks very sophisticated on a decorative crochet basket. This stitch is particularly effective when working with variegated yarns, as it breaks up the color pooling and creates a more organic, blended appearance that feels very “humanized” and artisanal.
The final round of your walls in this Decorative Crochet Basket and Box – Tutorial should always be a round of slip stitches or the crab stitch (reverse single crochet). This creates a “rim” that acts like a structural beam, holding the entire opening in a perfect circle or square. It prevents the top of the crochet container from stretching out over time with frequent use, ensuring it maintains its shape for years to come.
4. Shaping, Stiffening, and Professional Finishing
The final chapter of our Decorative Crochet Basket and Box – Tutorial focuses on the finishing touches that separate amateur projects from professional-grade decor. Even with the best yarn, your basket might benefit from a stiffening spray or a mixture of water and fabric glue. Lightly spraying the walls and stuffing the basket with towels to hold its shape while it dries can turn a “slouchy” basket into a rock-solid storage box.
If you’ve used T-shirt yarn for this Decorative Crochet Basket and Box – Tutorial, you might find that the yarn ends are quite bulky. Instead of just weaving them in, try splitting the yarn tail into thinner strands and weaving those in separately. This prevents a “lump” from forming on the inside of your basket, keeping the interior as smooth and clean as the exterior—a sign of true crochet craftsmanship.
Adding a fabric lining is a wonderful way to upgrade your Decorative Crochet Basket and Box – Tutorial. Not only does a cotton lining hide the back of your stitches, but it also prevents smaller items (like pins or earrings) from slipping through any potential gaps. You can sew a simple fabric cylinder and hand-stitch it to the inside rim of the basket using a hidden ladder stitch for a seamless look.
Handles are the final functional element in our Decorative Crochet Basket and Box – Tutorial. While you can crochet handles directly into the walls using chain spaces, adding leather straps with rivets provides a beautiful contrast between the soft yarn and the rugged leather. This “mixed media” approach is very popular in modern crochet trends and adds a high-value aesthetic to your handmade home organization pieces.
Don’t forget the importance of a final steam. Using a garment steamer or a steam iron (without touching the yarn directly) helps “set” the stitches and relax any minor tension issues. Steaming is particularly effective for cotton crochet boxes, as it helps the fibers expand and lock into place, giving the box a crisp, store-bought appearance while retaining its handmade charm.
Congratulations! You have completed the Decorative Crochet Basket and Box – Tutorial. You now possess the skills to create an entire collection of customized storage solutions for your home. From tiny desk organizers to large laundry hampers, the possibilities are endless. Remember that crochet is a journey of patience and creativity, and each basket you make will be a unique reflection of your personal style and dedication to the craft.
FAQ – Frequently Asked Questions
1. What is the best yarn for making a sturdy crochet basket?
The best yarn is T-shirt yarn or bulky cotton cord. These materials are thick and have very little stretch, which is essential for creating walls that stand up on their own without needing internal support.
2. How do I keep my crochet basket from collapsing?
To prevent collapsing, use a smaller hook to create a very tight gauge and choose a dense stitch like the waistcoat stitch. Additionally, applying a fabric stiffener or a diluted glue solution can provide extra rigidity.
3. Can I wash my decorative crochet basket?
Yes, most cotton or T-shirt yarn baskets are machine washable on a gentle cycle. However, if you have added leather handles or wooden bases, you should only spot-clean the fabric to avoid damaging the non-yarn components.
4. Why is my crochet basket base rippling?
Rippling occurs when you have too many increases in a single round. Ensure you are following a standard circle increase pattern (6, 12, 18, 24, etc.). If it ripples, you may need to “frog” a few rows and reduce the frequency of your increases.
5. How do I make a square crochet box have sharp corners?
To get sharp corners, you must work three stitches into every corner and use the back loop only (BLO) technique for the first round of the walls. This creates a distinct “seam” that forces the fabric to turn at a sharp angle.
6. How long does it take to finish this Decorative Crochet Basket and Box – Tutorial?
A medium-sized basket usually takes between 3 to 5 hours of active crochet time. Because the yarn is bulky, the project grows quite quickly, making it a very satisfying weekend craft.
Conclusion
In this Decorative Crochet Basket and Box – Tutorial, we have journeyed through the essential steps of creating high-quality, durable, and stylish home storage. We covered the importance of yarn selection, the technical nuances of base-to-wall transitions, and the advanced stitches that provide both texture and strength.
By focusing on tight tension and professional finishing touches like leather handles and blocking, you can create pieces that are both functional and decorative. Crochet is a wonderful way to bring “humanized” warmth into a modern home, and these baskets are a perfect testament to that art.