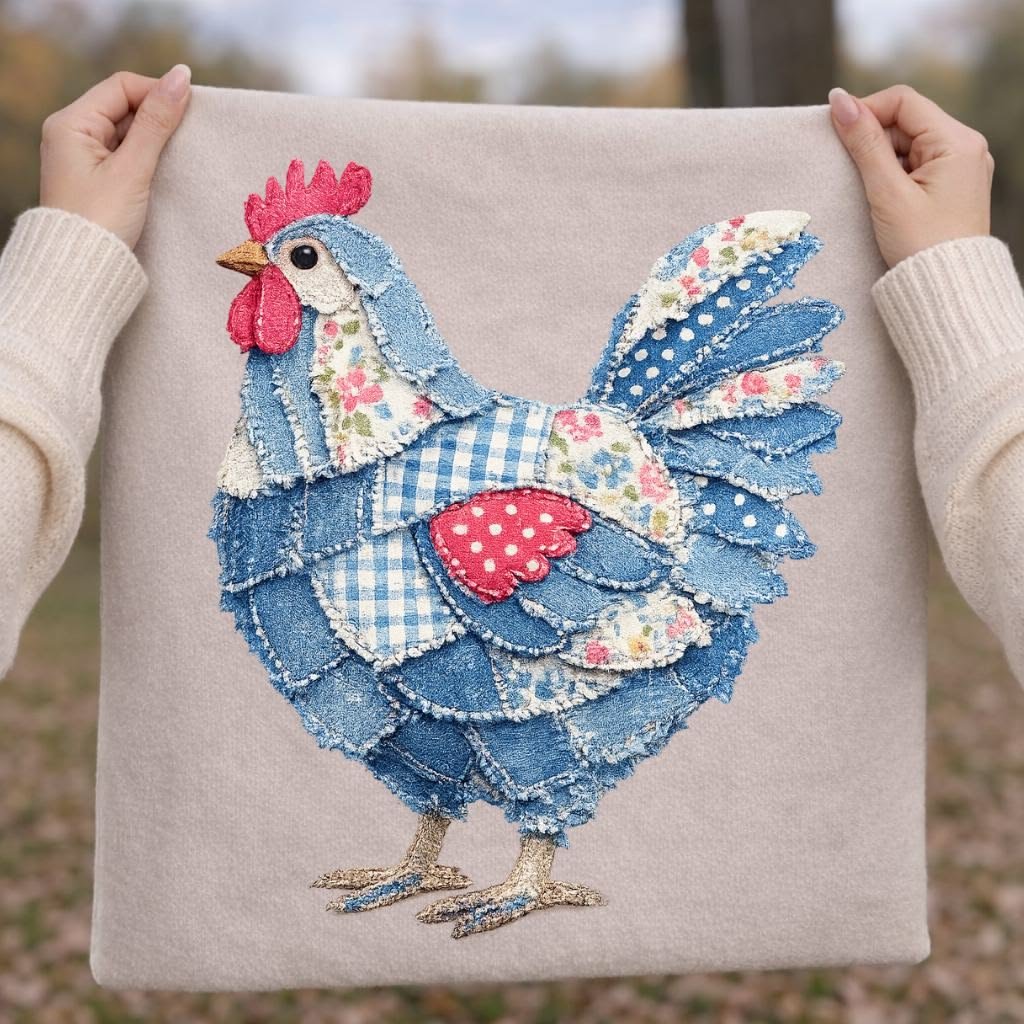
Patchwork Denim Rooster Art – Tutorial is an incredible way to breathe new life into old materials while creating a stunning piece of rustic decor. This project combines the rugged texture of recycled jeans with the whimsical charm of a classic farmhouse motif, allowing you to master the art of textile collage. By following this comprehensive guide, you will learn how to select the right shades of blue, prepare your fabric, and assemble a vibrant Patchwork Denim Rooster Art – Tutorial that stands out in any room.
Engaging in upcycling projects like this is not just about crafting; it is a sustainable lifestyle choice that reduces waste and celebrates creativity. Working with denim scraps offers a unique challenge because the fabric varies in weight, stretch, and wash, providing a built-in color palette ranging from deep indigo to bleached white. This Patchwork Denim Rooster Art – Tutorial is designed for both beginners and experienced quilters who want to experiment with raw-edge appliqué and mixed-media techniques.
As you dive into this creative journey, remember that the beauty of a Patchwork Denim Rooster Art – Tutorial lies in its imperfections and the stories told by the weathered fabric. Each seam and frayed edge adds character to the final composition, making your handmade rooster a one-of-a-kind masterpiece. In the following sections, we will break down the materials needed, the preparation of your patterns, and the step-by-step assembly required to bring your denim bird to life.
1. Essential Materials for Patchwork Denim Rooster Art
To begin your Patchwork Denim Rooster Art – Tutorial, you first need to gather a variety of old jeans in different washes. Look for a mix of light, medium, and dark indigo tones to ensure your textile art has depth and dimension. Using high-contrast denim is the secret to making the rooster’s feathers look realistic and vibrant.
Beyond the fabric, you will need a sharp pair of fabric shears or a rotary cutter to handle the thick denim seams. A heavy-duty sewing machine needle, specifically designed for denim, is crucial to prevent breakage when stitching through multiple layers of patchwork. Having a variety of thread colors, including gold or orange for the beak and red for the comb, will add necessary pops of color.
You will also require a sturdy backing fabric, such as canvas or a heavy linen, to act as the “canvas” for your denim collage. This base provides the stability needed to support the weight of the denim pieces. Many artists also use fusible web or fabric glue to temporarily hold the small pieces of the rooster in place before the final stitching begins.
Don’t forget the importance of a good rooster template or stencil. You can draw your own or find a silhouette online to guide your cuts. Having a clear outline allows you to focus on the creative placement of the denim patches rather than worrying about the overall proportions of the bird.
Small details make a big difference in a Patchwork Denim Rooster Art – Tutorial. Consider saving the copper rivets, buttons, or even the leather brand tags from your old jeans. These hardware elements can be used as a creative eye for the rooster or as decorative accents in the corners of your finished wall art.
Lastly, ensure you have a large, flat workspace where you can lay out all your fabric scraps. Organizing your denim by color and texture before you start cutting will make the assembly process much smoother. Preparation is the foundation of any successful fiber art project, especially one involving the sturdy nature of reclaimed denim.
2. Preparing and Cutting Your Denim Patches
The first active step in this Patchwork Denim Rooster Art – Tutorial is deconstructing your denim garments. Cut along the seams of old pants and jackets to maximize the amount of usable flat fabric. Pay attention to areas with “distressed” patterns or “whiskering,” as these sections can mimic the natural highlights found on a rooster’s feathers.
Once your fabric is ready, transfer your rooster pattern onto the denim. It is best to cut the rooster in sections: the tail feathers, the body, the wings, the neck, and the head. By treating these as separate patchwork pieces, you can vary the grain of the denim to create a sense of movement and texture throughout the piece.
For the tail feathers, use long, thin strips of the darkest denim available. This provides a strong visual anchor for the Patchwork Denim Rooster Art – Tutorial. Angle the strips slightly outward to give the impression of a full, proud tail. You can even leave the edges raw to allow for a bit of decorative fraying over time.
The body of the rooster is where you can play with medium washes. Use curved shapes that overlap like shingles. This overlapping technique is a hallmark of high-quality patchwork denim design. It creates a 3D effect that makes the rooster appear to pop off the background, adding a professional touch to your DIY tutorial.
When cutting the comb and the wattle, you might choose to use the “wrong” side of certain denim pieces if they have a reddish or purplish tint, or simply use a red fabric scrap. However, to stay true to the Patchwork Denim Rooster Art – Tutorial theme, many crafters prefer to use denim and then enhance the color with fabric paint or dense embroidery stitching.
After all your pieces are cut, lay them out on your backing fabric without glue or thread. This “dry fit” stage is vital for checking the balance of colors. If the rooster looks too dark, swap a few pieces for a lighter wash. Adjusting the layout now is much easier than ripping out stitches later in the creative process.
3. Assembling the Rooster Using Appliqué Techniques
Now that your pieces are ready, it is time to start the assembly phase of the Patchwork Denim Rooster Art – Tutorial. Begin by securing the base layer of the rooster’s body to the background fabric. If you are using fusible web, iron the pieces down according to the manufacturer’s instructions to ensure they stay perfectly aligned during sewing.
For the stitching, a zig-zag stitch or a blanket stitch works best for raw-edge denim. This not only secures the fabric but also adds a beautiful decorative border around each piece of your denim art. Using a contrasting thread, like a bright white or a traditional denim gold, highlights the intricate shapes of the patchwork.
Work from the background to the foreground. In this Patchwork Denim Rooster Art – Tutorial, that means starting with the tail feathers that sit “behind” the body, then moving to the main torso, and finally adding the wing on top. This layering creates a realistic perspective that is essential for high-quality textile collage.
As you stitch the feathers, don’t be afraid to change your thread colors. Using different shades of blue and grey thread can simulate the iridescent quality of real feathers. This level of detail is what elevates a simple craft project into a piece of fine fiber art that you would be proud to display or sell.
The head and beak require a steady hand and a slower machine speed. Because the pieces are smaller, the risk of fabric shifting is higher. If your sewing machine has a “needle down” function, use it here to help you pivot around the tight curves of the rooster’s comb. This ensures your Patchwork Denim Rooster Art – Tutorial maintains its sharp silhouette.
Once the main bird is attached, consider adding “ground” elements like denim grass or pebbles. Using the thick seams of the jeans as “branches” or “fencing” is a clever way to use every part of the recycled material. The goal is to create a complete scene that highlights the versatility of your repurposed denim.
4. Final Touches and Framing Your Denim Masterpiece
The final stage of the Patchwork Denim Rooster Art – Tutorial involves refining the details and preparing the piece for display. Check the entire surface for loose threads and trim them carefully. If you prefer a more rustic look, you can gently agitate the edges of the denim with a small brush to encourage a soft, frayed texture.
Adding an eye is a crucial step in giving your rooster personality. A small black button, a large bead, or even a tight circle of satin stitching can bring the bird to life. In a Patchwork Denim Rooster Art – Tutorial, the placement of the eye determines whether the rooster looks proud, curious, or whimsical.
To protect your hard work, you should consider how to frame the piece. A deep shadow box frame is ideal for denim art because it accommodates the thickness of the fabric layers without squishing the texture. Alternatively, you can stretch the backing fabric over a wooden canvas frame for a more contemporary, frameless look.
If you want to add more color, you can use fabric markers or acrylic paints to add subtle highlights to the denim. A touch of yellow on the beak or a bit of white on the tips of the tail feathers can make the Patchwork Denim Rooster Art – Tutorial shine. Just remember to heat-set any paint according to the product instructions.
Before you finish, take a step back and look at the composition as a whole. Sometimes adding a few “flying” feathers or a small denim sun in the corner can balance the visual weight of the rooster. This is your chance to add your personal signature to the handcrafted artwork.
Finally, sign your work! You can use a fine-tip fabric pen to sign the corner of the backing fabric or sew a small fabric label onto the back. Completing this Patchwork Denim Rooster Art – Tutorial is a significant achievement, and your work deserves to be recognized as a professional-grade piece of sustainable art.
FAQ – Frequently Asked Questions
1. What is the best type of denim to use for this project?
The best denim for a Patchwork Denim Rooster Art – Tutorial is non-stretch, 100% cotton denim. It holds its shape better during cutting and stitching than “skinny jean” material which contains spandex. However, you can use any scraps you have as long as you stabilize them first.
2. Do I need a special sewing machine for denim patchwork?
Most domestic sewing machines can handle denim if you use the correct needle (Size 100/16 or 110/18). If you are stitching through very thick layers, you may need to use a walking foot or go slowly to avoid skipped stitches.
3. Can I make this tutorial if I don’t know how to sew?
Yes! You can create a “no-sew” version of the Patchwork Denim Rooster Art – Tutorial by using high-quality fabric glue or heavy-duty iron-on adhesive. The look will be slightly different, but the artistic impact remains the same.
4. How do I prevent the denim from fraying too much?
While some fraying adds character, you can control it by using a tight zig-zag stitch around the edges or applying a liquid fray-check solution to the cut borders of your denim patches.
5. Is it necessary to wash the jeans before starting?
Absolutely. Washing and drying the jeans beforehand ensures that the fabric won’t shrink or bleed color after your Patchwork Denim Rooster Art – Tutorial is finished. It also makes the fabric softer and easier to manipulate.
Conclusion
In this Patchwork Denim Rooster Art – Tutorial, we have explored the entire process of transforming old, discarded jeans into a vibrant and professional piece of home decor.
We covered the selection of various denim washes, the strategic cutting of feather shapes, the intricate layering of the bird’s body, and the final assembly using professional appliqué techniques. This project is a perfect example of how sustainable crafting and SEO-optimized creative designs can come together to produce something truly beautiful. By mastering these steps, you now have the skills to create a wide range of denim-based textile art.