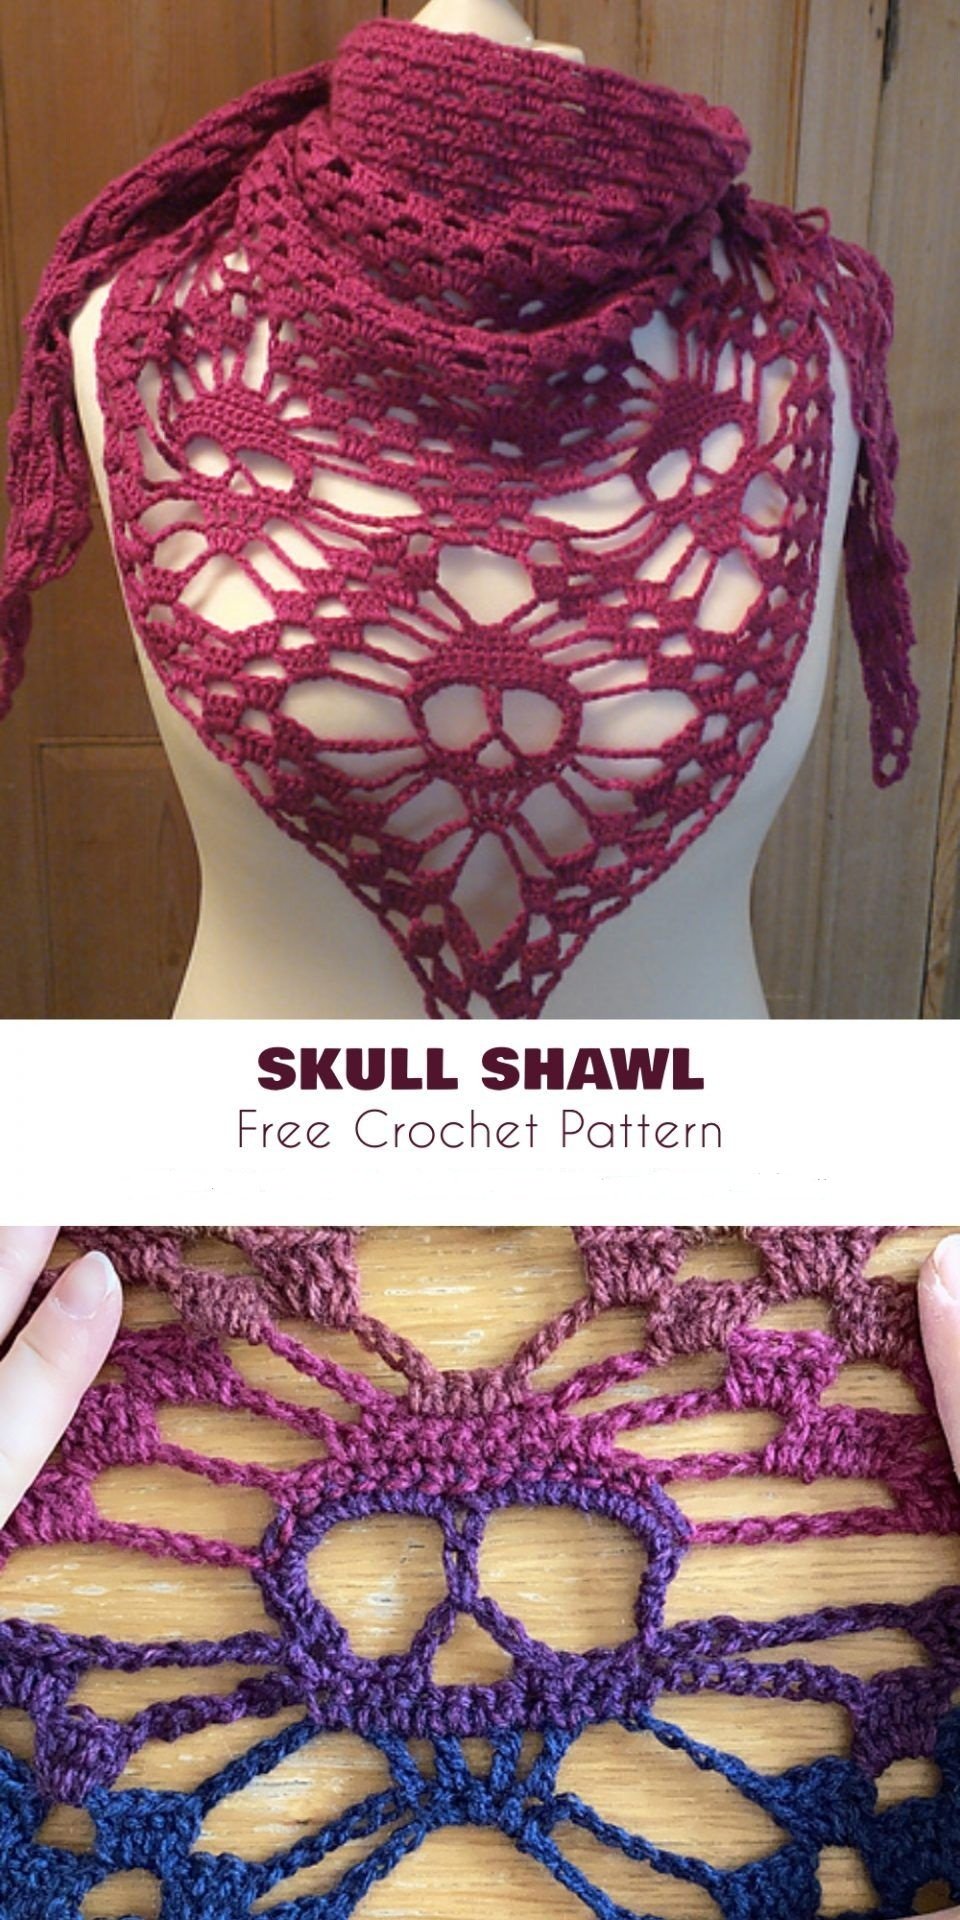
Crochet Skull Shawl – Tutorial is the perfect way to blend edgy aesthetics with traditional craftsmanship, creating a garment that is both hauntingly beautiful and incredibly versatile. Whether you are gearing up for the spooky season or you simply love the gothic-chic look year-round, this project offers a unique rhythmic pattern that is as engaging to make as it is to wear. In this guide, we will dive deep into the world of crochet skull patterns, exploring the techniques needed to master the intricate eyelets and shapes that form these iconic skeletal motifs.
Embarking on a Crochet Skull Shawl – Tutorial journey requires a bit of patience and a love for “lost and found” spaces within your fabric. Unlike solid stitch designs, the skull shawl relies heavily on negative space—the “holes” in the work—to define the jawline, eyes, and cranium of the skulls. This style of work is often categorized as filet crochet or a variation of it, where chains and double crochets work together to “paint” a picture with yarn. If you’ve been looking for a project that challenges your counting skills while rewarding you with a stunning visual result, you’ve found it.
Before we pick up the hook for this Crochet Skull Shawl – Tutorial, it is essential to consider the drape and texture of your finished piece. Selecting the right yarn weight and hook size is the difference between a stiff, heavy garment and a flowy, elegant wrap that catches the light. Most enthusiasts prefer a fingering weight yarn or a light DK weight to ensure the skulls don’t look bulky or distorted. Throughout this article, we will break down the essential steps, from the foundation chain to the final border, ensuring your handmade creation looks professional and high-end.
1. Choosing the Right Materials for Your Crochet Skull Shawl – Tutorial
Selecting the perfect yarn is the most critical first step when starting your Crochet Skull Shawl – Tutorial. Since the skull motif is delicate, a yarn that is too “fuzzy” or variegated might hide the details of the skull design. Opt for solid or long-gradient colors in cotton blends or acrylic microfiber to ensure every stitch is crisp and visible.
The hook size you choose should generally be slightly larger than what the yarn label recommends. This technique helps create a “looser” drape, which is vital for a crochet shawl meant to hang gracefully over the shoulders. For a standard size 3 or 4 yarn, a 5.0mm (H) hook is often a safe and effective choice for this specific pattern.
Don’t forget the importance of stitch markers and a reliable measuring tape. Because this pattern repeats in sets, losing track of your place can lead to lopsided skulls. Placing a marker at the start of each pattern repeat will save you hours of “frogging” (ripping out) your work later on when you realize a count is off.
When we talk about the Crochet Skull Shawl – Tutorial key terms, “drape” is a word you will hear often. Drape refers to how the fabric hangs under its own weight. A shawl with good drape will mold to your body, whereas a stiff one will stand out awkwardly. Using natural fibers like bamboo or silk blends can significantly enhance this quality.
Preparation also involves understanding the gauge. While gauge isn’t as strictly necessary for a shawl as it is for a fitted sweater, it still matters. If your tension is too tight, the eyelets that form the skull’s eyes will be too small, and the gothic effect will be lost. Take ten minutes to crochet a small sample square first.
Lastly, make sure you have a yarn needle and sharp scissors ready for the finishing touches. A Crochet Skull Shawl – Tutorial isn’t truly finished until all those ends are woven in securely. Since the shawl has many open spaces, you’ll need to be clever about hiding your yarn tails within the denser parts of the skull’s cranium.
2. Mastering the Foundation and the First Skull Motif
Every great Crochet Skull Shawl – Tutorial begins with a solid foundation, usually starting from the bottom tip and working upwards in a triangle shape. This is often referred to as a top-down or bottom-up triangle shawl. Most skull patterns start with a magic ring or a small circle of chains to create the initial point of the “V” shape.
The first few rows of your Crochet Skull Shawl – Tutorial will establish the “mesh” that sits between the skulls. This is typically a combination of double crochet (dc) and chain stitches (ch). These rows are the easiest, but they set the stage for the first skull’s jawline, so accuracy in your stitch count is paramount.
To create the “teeth” and “jaw” of the skull, you will utilize skipped stitches. By skipping a specific number of stitches and chaining over them, you create the negative space required. In this Crochet Skull Shawl – Tutorial, we focus on the 3-chain gap as the standard measurement for creating these small, intentional holes in the fabric.
As you move into the middle of the skull, you will work the “eyes.” This is the most rewarding part of the Crochet Skull Shawl – Tutorial. You will typically work two large openings side-by-side. Seeing the face of the skull emerge from a simple skein of yarn is where the magic of this project truly lies for many crafters.
The top of the skull, or the “cranium,” is usually made of several rows of solid double crochet to give the head its rounded, solid look. This contrast between the solid top and the hollow eyes is what makes the skull motif pop. Learning how to transition from open mesh to solid blocks is a core skill in this tutorial.
Remember to keep your tension consistent throughout this process. If you tighten up during the solid sections and loosen up during the mesh sections, your Crochet Skull Shawl – Tutorial will end up with wavy edges. Try to maintain a relaxed but firm grip on your hook to ensure the triangle expands evenly on both sides.
3. Expanding the Pattern and Increasing the Rows
Once the first skull is complete, the Crochet Skull Shawl – Tutorial moves into the expansion phase. To make the shawl grow into a large triangle, you must perform increases at the beginning and end of every row. Usually, this involves working multiple stitches into the very first and very last stitch of the previous row.
As the shawl grows wider, you will begin to work multiple skulls in a single row. This is where the Crochet Skull Shawl – Tutorial gets interesting, as you’ll be managing the “offset” of the motifs. Usually, skulls are staggered—meaning a new skull starts in the space between the two skulls in the row below it.
Managing the yarn tension across a wide row is a skill that comes with practice. When your shawl reaches a width of over 50 inches, each row takes significantly longer to complete. It’s helpful to view the Crochet Skull Shawl – Tutorial as a series of small victories, focusing on finishing one “skull row” at a time.
A common mistake in the Crochet Skull Shawl – Tutorial expansion is forgetting the center increase. Many patterns require a center spine (usually a chain-2 space) where you add stitches to keep the point of the triangle sharp. Keeping this center line straight is vital for the overall symmetry of your handmade shawl.
While expanding, keep an eye on your yarn consumption. The skull rows use more yarn than the mesh rows because they are denser. If you are using a limited amount of hand-dyed yarn, plan your rows carefully so you don’t run out of material right before the final decorative border of your shawl.
If you find that your edges are curling, don’t panic. This is common in crochet projects that use a lot of tall stitches. A good blocking session at the end (wetting the shawl and pinning it to shape) will fix most curling issues and make the skull motifs look much sharper and more defined.
4. Finishing Touches and Blocking Your Masterpiece
The final stage of the Crochet Skull Shawl – Tutorial involves the edging. You can leave the edges plain for a minimalist look, or you can add tassels, fringe, or a picot border. Adding fringe to the bottom “V” edges of the shawl can give it a more bohemian or “witchy” vibe that complements the skulls perfectly.
Weaving in the ends is the task most crocheters dread, but it is vital for the longevity of your Crochet Skull Shawl – Tutorial project. Use a tapestry needle to weave the yarn tails back and forth through the solid “cranium” sections. This ensures that the ends won’t pop out when the shawl is washed or worn.
Blocking is the “secret sauce” of professional crochet. For a skull shawl, blocking is non-negotiable. By soaking the shawl in lukewarm water with a bit of wool wash and pinning it out into a perfect triangle on foam mats, you open up the skull’s eyes and jaw, making the pattern truly “scream.”
In this Crochet Skull Shawl – Tutorial, we emphasize that blocking also helps to set the stitches. Once the yarn dries in its pinned position, it “remembers” that shape. This is especially important for lace-style crochet, as it prevents the garment from shrinking back into a crumpled-looking mess after all your hard work.
After blocking, check the symmetry of your work. The skulls should look uniform across the entire surface of the fabric. If one area looks a bit wonky, you can usually gently steam it with an iron (don’t touch the iron to the yarn!) to encourage the fibers to relax into the correct position.
Finally, take some high-quality photos of your finished Crochet Skull Shawl – Tutorial! Whether you intend to sell the piece, give it as a gift, or keep it for your own wardrobe, documenting your progress and the final result is a great way to join the crochet community online and inspire other makers.
FAQ – Frequently Asked Questions
1. Is the Crochet Skull Shawl – Tutorial suitable for beginners?
It is best suited for “adventurous beginners” or intermediate crocheters. You should already be comfortable with the double crochet, chain stitch, and slip stitch. The most challenging part is keeping track of the count to ensure the skulls are shaped correctly.
2. How much yarn do I need for a full-sized shawl?
Typically, you will need between 800 to 1,200 yards of yarn, depending on the weight. A fingering weight yarn will require more yardage but result in a lighter shawl, while a DK weight will be faster to crochet but use fewer yards for a thicker result.
3. Can I use variegated or “cake” yarn for this pattern?
Yes, but be careful! If the color changes are too frequent or “busy,” they can “break up” the visual outline of the skulls. Long-gradient cakes (where colors transition slowly) work beautifully and add a professional look to the Crochet Skull Shawl – Tutorial.
4. What is the best way to wash my skull shawl?
Hand-washing in cold water with a gentle detergent is always the safest bet for handmade crochet items. Lay it flat to dry on a towel to maintain its shape. Avoid the dryer, as the heat and agitation can cause the yarn to pill or the shawl to lose its blocked shape.
5. How do I make the shawl larger?
The beauty of the Crochet Skull Shawl – Tutorial is that it is infinitely repeatable. You simply keep adding rows of skulls following the established increase pattern until the shawl reaches your desired wingspan. Most adults prefer a wingspan of about 60-70 inches.
6. Do I have to block the shawl?
While not “mandatory,” it is highly recommended. Blocking transforms the look of the project from a “clumpy” piece of fabric into a professional, lace-like garment. It is the step that truly brings the skull motifs to life.
Conclusion
Creating a Crochet Skull Shawl – Tutorial is a rewarding experience that combines the macabre with the elegant.
Throughout this article, we have explored the importance of selecting the right materials, mastering the foundation of the skull motif, expanding the pattern symmetrically, and the transformative power of blocking. By following these steps, you turn a simple ball of yarn into a statement piece that showcases your technical skill and unique style.