Crochet Tulip-shaped cup Holder – Tutorial is the perfect project for anyone looking to combine functionality with a touch of floral elegance in their daily life. Whether you are a seasoned crafter or just starting your journey into the world of yarn, creating a Crochet Tulip-shaped cup Holder – Tutorial offers a rewarding experience that results in a beautiful, handmade accessory. These charming holders not only protect your hands from hot or cold beverages but also add a personalized, whimsical aesthetic to your favorite mug or reusable cup, making every sip feel like a special occasion.
When you dive into a Crochet Tulip-shaped cup Holder – Tutorial, you are exploring a versatile craft that emphasizes both texture and color play. The tulip design is particularly popular because it utilizes the “puff stitch” or “V-stitch” to mimic the delicate petals of a spring flower, providing a 3D effect that stands out from flatter patterns. By following a structured Crochet Tulip-shaped cup Holder – Tutorial, you ensure that your tension remains consistent and your stitches align perfectly to create that iconic bell-shape that snugly fits various cup sizes.
In this comprehensive Crochet Tulip-shaped cup Holder – Tutorial, we will explore the essential materials, the step-by-step construction of the floral motifs, and the finishing techniques that make your work look professional. Handmade items like these make incredible gifts and are highly sought after in craft fairs due to their unique “cottagecore” appeal. Let’s get our hooks ready and prepare to transform some simple cotton yarn into a stunning piece of functional art that celebrates the timeless beauty of the tulip.
1. Essential Materials and Preparation for Your Crochet Tulip-shaped cup Holder – Tutorial
The first step in any successful Crochet Tulip-shaped cup Holder – Tutorial is gathering the right supplies to ensure your project is durable and heat-resistant. For a cup holder, 100% cotton yarn is highly recommended because it handles moisture well and doesn’t stretch out of shape as much as acrylic. You will need at least three colors: green for the stems/leaves, a vibrant color for the petals, and a neutral base color.
Selecting the correct crochet hook size is vital for maintaining the structure of the holder. Most Crochet Tulip-shaped cup Holder – Tutorial guides suggest a 3.5mm or 4.0mm hook to create a tight, sturdy fabric. If your stitches are too loose, the holder might slip off the cup, so keeping a firm tension is one of the most important SEO-friendly crochet tips for beginners.
Before you begin the actual stitching, make sure you have stitch markers, a tapestry needle, and sharp scissors nearby. These tools help you keep track of your rounds, especially when transitioning between the base and the decorative tulip rows. Organization is a key component of a high-quality Crochet Tulip-shaped cup Holder – Tutorial because it prevents frustrating mistakes halfway through the project.
Understanding the stitch terminology used in this Crochet Tulip-shaped cup Holder – Tutorial will save you time and effort. We will primarily use the magic ring, single crochet (sc), double crochet (dc), and the popcorn stitch to create the floral texture. Knowing these basics allows you to follow the pattern flow without constantly stopping to look up definitions.
Prepare your workspace with good lighting so you can see the definition of your yarn fibers. Since the tulip pattern involves intricate placements of “petals,” being able to see exactly where your hook enters the “V” of the stitch is crucial. A well-prepared crafter is a successful crafter, and this Crochet Tulip-shaped cup Holder – Tutorial aims to make the process as smooth as possible.
Lastly, consider the size of the cup you intend to use. Most Crochet Tulip-shaped cup Holder – Tutorial patterns are designed for a standard 12oz to 16oz cup, but you can easily adjust the circumference by adding or subtracting rows in the base section. Measuring your cup beforehand ensures a “glove-like” fit that looks amazing and functions perfectly.
2. Crafting the Base and Stem Rows of the Crochet Tulip-shaped cup Holder – Tutorial
Every great Crochet Tulip-shaped cup Holder – Tutorial starts with a solid foundation, usually beginning with a magic ring to ensure there is no hole at the bottom. You will work in continuous rounds, increasing your stitches gradually until the diameter matches the bottom of your cup. This flat circle acts as the “floor” of your holder, providing stability for your drink.
Once the base reaches the desired width, you will transition to working in the back loops only (BLO) for one round. This technique, a staple in any Crochet Tulip-shaped cup Holder – Tutorial, creates a sharp ridge that allows the crochet work to turn upward, forming the walls of the holder. It is a simple move that gives the project a clean, professional “store-bought” silhouette.
After the base is established, you will work several rows of solid stitches (like double crochet) before introducing the green yarn. In this part of the Crochet Tulip-shaped cup Holder – Tutorial, the green yarn is used to create the “V-stitches” that represent the leaves and stems. This row is the framework upon which your colorful tulip petals will eventually sit.
The V-stitch is created by working a double crochet, a chain, and another double crochet all into the same stitch. This creates a “nest” for the flowers. Precision here is key; if the V-stitches are spaced too far apart, the tulips will look sparse, but if they are too close, the Crochet Tulip-shaped cup Holder – Tutorial result will look cluttered and bulky.
While working with multiple colors, this Crochet Tulip-shaped cup Holder – Tutorial encourages you to “carry” the yarn or use a seamless color change technique. This keeps the inside of the cup holder neat and prevents loose threads from snagging on the cup. A clean interior is a sign of a high-quality handcrafted crochet accessory.
Repeat the stem rows according to how many tiers of flowers you want. Most people prefer one or two bands of tulips around the center of the holder. By mastering the spacing in this Crochet Tulip-shaped cup Holder – Tutorial, you gain the skills to apply this beautiful floral pattern to other items like blankets, hats, or even market bags.
3. Creating the Tulip Petals and Textured Details
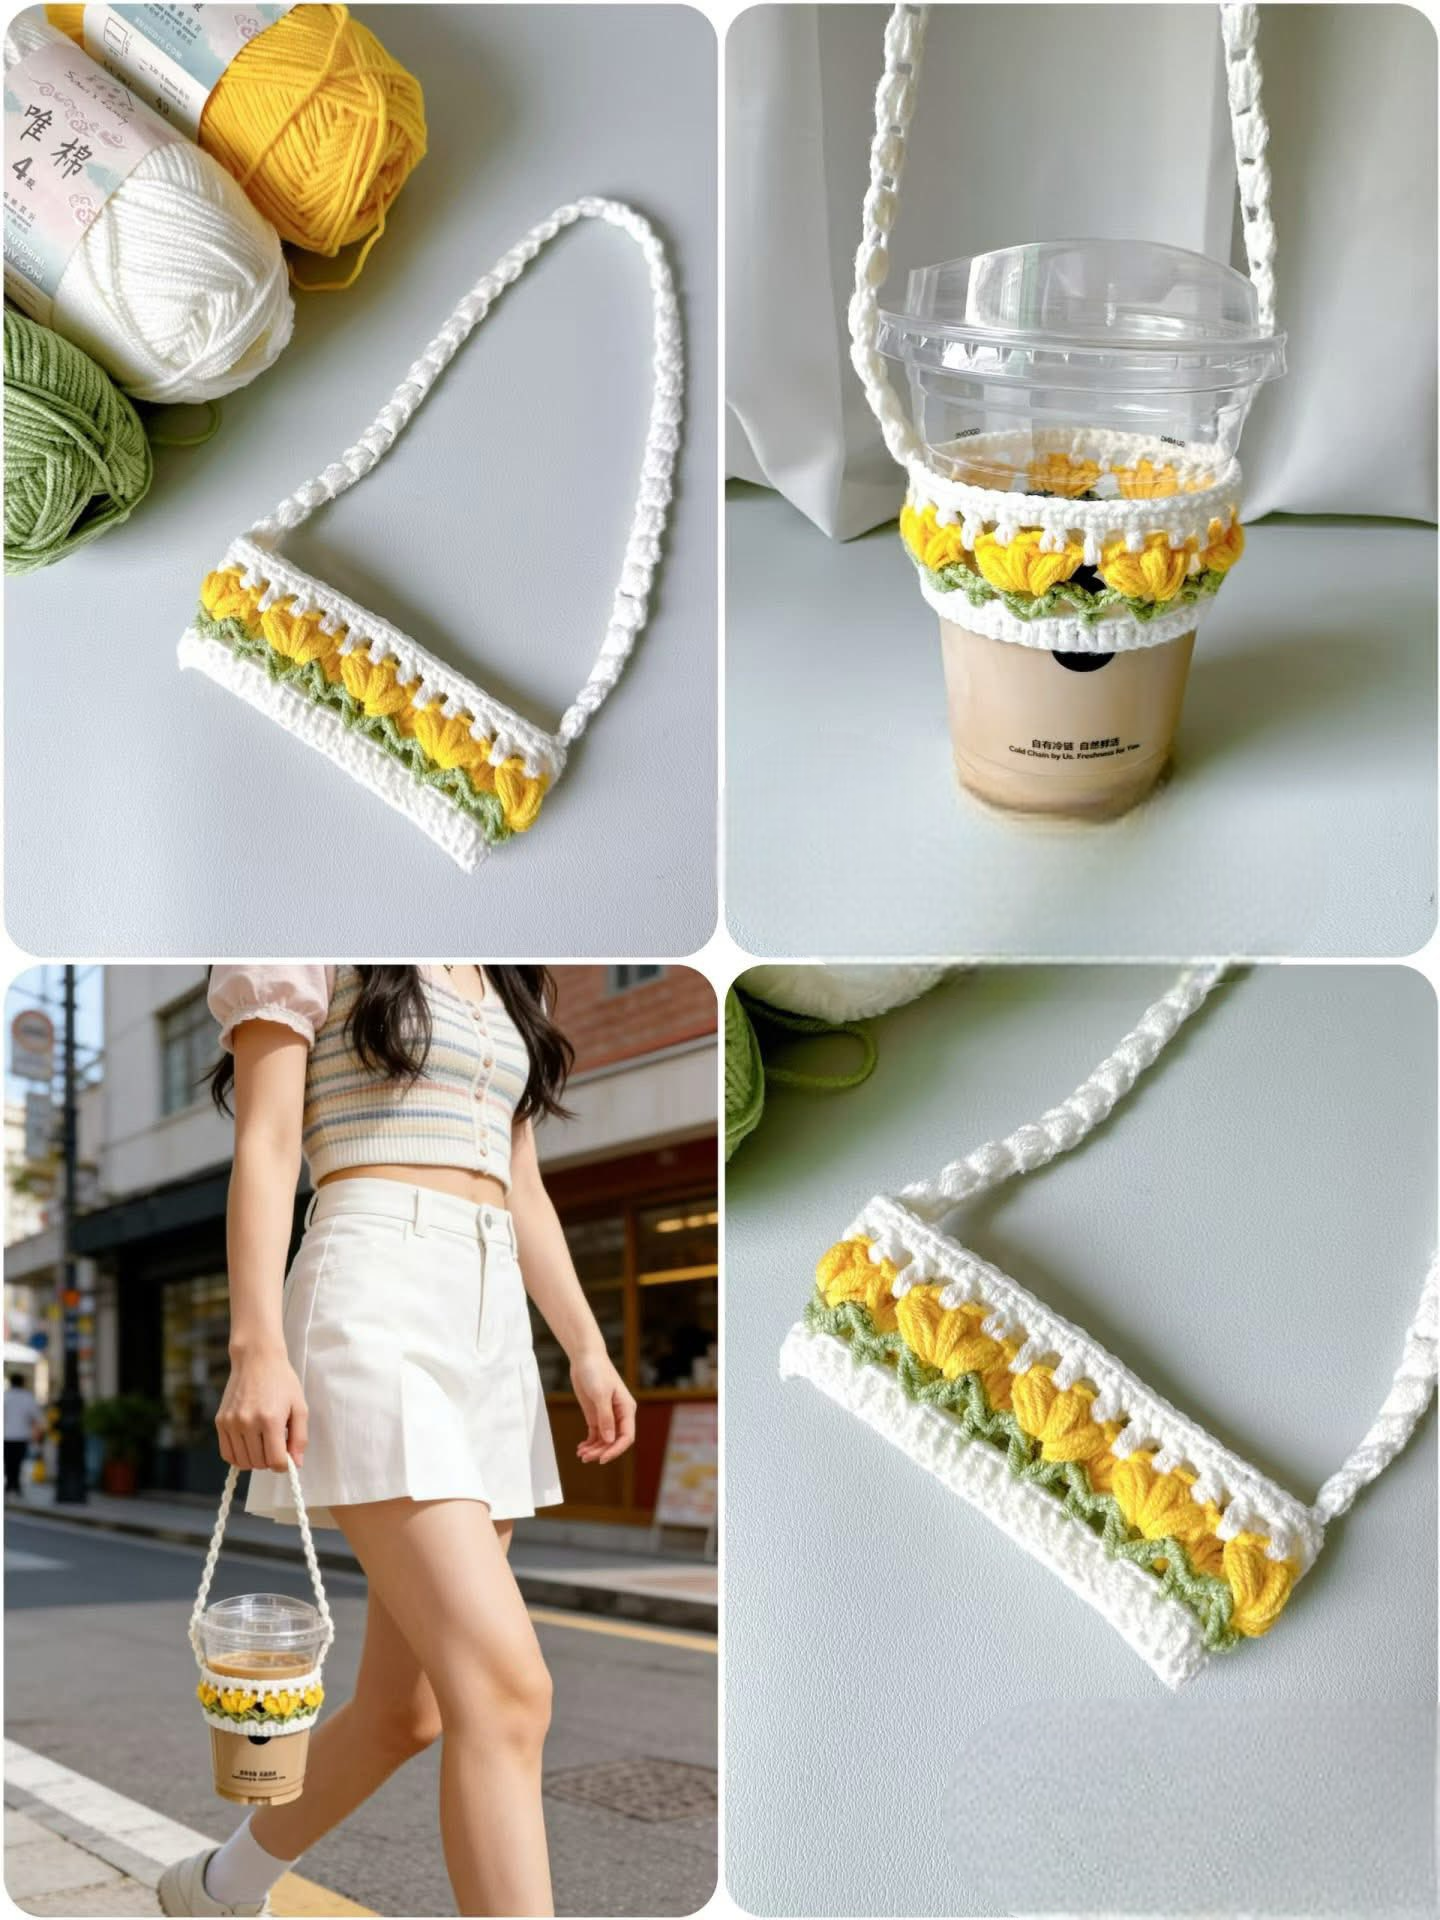
The most exciting part of the Crochet Tulip-shaped cup Holder – Tutorial is finally adding the “pop” of color with the flower petals. To do this, you will join your floral-colored yarn to the center of the green V-stitches. The popcorn stitch or puff stitch is the secret ingredient here, giving the petals their rounded, 3D appearance.
To execute the petal in this Crochet Tulip-shaped cup Holder – Tutorial, you will typically work 4 or 5 double crochets into the “V” space, then drop the loop from your hook. Re-insert the hook into the first double crochet and pull the dropped loop through. This “bunches” the stitches together, perfectly mimicking the look of a budding crochet tulip.
As you move across the row, the contrast between the green stems and the bright petals will bring your Crochet Tulip-shaped cup Holder – Tutorial to life. It is important to chain a few stitches between each tulip to maintain the elasticity of the holder. If you chain too tightly, the holder won’t stretch over the wider top of a tapered cup.
Once the petal row is complete, you will switch back to your main background color. This “locks” the tulips in place and provides a neutral border that makes the colors stand out. This layering technique is a highlight of the Crochet Tulip-shaped cup Holder – Tutorial, as it creates depth and visual interest that flat patterns simply cannot match.
Don’t be afraid to experiment with variegated yarn for the petals. Using a yarn that changes shades of pink, red, or yellow can give your Crochet Tulip-shaped cup Holder – Tutorial a more natural, garden-like appearance. Every flower in nature is slightly different, and your crochet project can reflect that organic beauty through your choice of materials.
The final rows of the Crochet Tulip-shaped cup Holder – Tutorial usually involve a decorative edging, such as the crab stitch or a simple scalloped border. This adds a bit of “flair” to the top rim and ensures the edge doesn’t roll inward. A well-finished top edge is what separates a beginner project from a professional-grade crochet masterpiece.
4. Finishing Touches and Customizing Your Crochet Tulip-shaped cup Holder – Tutorial
The final stage of the Crochet Tulip-shaped cup Holder – Tutorial involves weaving in all those loose ends. Because this project uses multiple colors, you will have several “tails” of yarn. Use your tapestry needle to weave them securely into the back of stitches of the same color, ensuring they are invisible from the front and won’t come undone during washing.
Blocking your finished piece is an optional but highly recommended step in this Crochet Tulip-shaped cup Holder – Tutorial. By lightly steaming the cotton or wetting it and letting it dry over a cup, you “set” the stitches. This ensures the tulips look plump and the cup holder maintains its perfect cylindrical shape even after heavy use.
One way to customize your Crochet Tulip-shaped cup Holder – Tutorial is by adding a handle. A simple chain and single crochet strap can be attached to the sides, turning the holder into a “cup carrier.” This is incredibly useful for people on the go or for those who want to hang their favorite mug on a hook in the kitchen.
You can also add embellishments like small wooden buttons or a “Handmade” leather tag to the bottom edge. These small details increase the “perceived value” of your work, which is great if you are using this Crochet Tulip-shaped cup Holder – Tutorial to create products for an online shop or a local boutique.
Maintenance is an important part of the Crochet Tulip-shaped cup Holder – Tutorial experience. Since cotton is machine washable, you can tell your gift recipients that their holder is easy to clean. We recommend air-drying to keep the vibrancy of the dyes and the integrity of the tulip shapes intact for years to come.
In conclusion, completing a Crochet Tulip-shaped cup Holder – Tutorial is a wonderful way to practice color work and texture. You now have a functional, stylish, and eco-friendly accessory that reduces the need for disposable cardboard sleeves. Share your progress on social media using crochet hashtags to connect with a community of makers who love this floral aesthetic as much as you do!
FAQ – Frequently Asked Questions
1. What is the best yarn for a Crochet Tulip-shaped cup Holder – Tutorial?
The best choice is 100% cotton yarn or a cotton-linen blend. Cotton is heat-resistant, absorbent (great for cold drink condensation), and holds the shape of the textured tulip stitches much better than wool or acrylic.
2. Can a beginner complete this Crochet Tulip-shaped cup Holder – Tutorial?
Yes! While the tulip petals use a specialized stitch (the popcorn stitch), the rest of the project relies on basic stitches like the single crochet and double crochet. It is a great “intermediate-beginner” project to level up your skills.
3. How long does it take to make a Crochet Tulip-shaped cup Holder?
For most crafters, this project takes between 1 to 2 hours. It is a perfect “one-sitting” project that provides instant gratification and makes it easy to produce multiple items for gifts.
4. Will this holder fit different sizes of cups?
Cotton has a slight natural stretch, so it will fit most standard coffee shop cups. However, if you are using a very large “venti” cup or a wide mason jar, you may need to add an extra round of increases to the base in your Crochet Tulip-shaped cup Holder – Tutorial.
5. How do I wash my crochet cup holder?
You can hand wash it in cool water with mild detergent or place it in a mesh laundry bag on a delicate cycle. Reshape it while damp and lay it flat to dry to ensure the tulip petals stay defined.
Conclusion
This Crochet Tulip-shaped cup Holder – Tutorial has guided you through the entire process of creating a beautiful and practical accessory, from selecting the right cotton yarn to mastering the popcorn stitch for those gorgeous petals.
By combining structural base rows with decorative floral bands, you have learned how to create a piece that is as sturdy as it is stylish. We have covered essential SEO-friendly crochet techniques like working in the back loops and managing color changes seamlessly. We hope this project brings a bit of spring-time joy to your coffee breaks!