Disappearing Nine Patch – Tutorial is one of the most rewarding techniques for any quilter looking to create intricate-looking designs without the stress of complex piecing. While the finished quilt top looks like a sophisticated puzzle of small squares and rectangles, the magic lies in how you slice and rearrange a basic block. This Disappearing Nine Patch – Tutorial will guide you through the process of turning simple fabric squares into a stunning masterpiece that will impress your fellow crafters.
The beauty of the Disappearing Nine Patch – Tutorial is its versatility and accessibility for beginners and experts alike. By focusing on a few key steps, you can achieve a modern quilt design that utilizes your fabric scraps or coordinated charm packs effectively. Whether you are aiming for a scrappy quilt look or a clean, geometric pattern, mastering this method is a fundamental skill in contemporary patchwork.
In this guide, we explore the step-by-step mechanics of the Disappearing Nine Patch – Tutorial, ensuring your seams are crisp and your quilt blocks align perfectly. We will cover everything from fabric selection and rotary cutting to the final quilt assembly. Let’s dive into the details of this classic technique and discover why it remains a favorite in the quilting community worldwide.
1. Selecting the Perfect Fabrics for Your Disappearing Nine Patch – Tutorial
The foundation of a successful Disappearing Nine Patch – Tutorial starts with choosing the right colors and high-quality quilting cotton. Contrast is the secret ingredient here, as it defines the “disappearing” effect once the blocks are cut. You want a mix of dark, medium, and light values to ensure that the internal patterns pop after the rearrangement of the pieces.
Using a charm pack or pre-cut 5-inch squares is a fantastic way to jumpstart your project. These pre-cuts ensure that your initial nine-patch block starts with perfectly uniform dimensions, which is vital for the accuracy of the finished project. If you prefer a more curated look, choosing a specific color palette like blues and creams can create a sophisticated home decor piece.
Don’t forget the importance of the center square in your nine-patch. In many variations of the Disappearing Nine Patch – Tutorial, the center fabric becomes the “focal point” of the new, smaller units. Selecting a focal print or a bright, solid color for the middle can lead to surprising and beautiful results once the quilting ruler comes out for the main cuts.
Before you begin sewing, it is highly recommended to starch your fabric. Since this technique involves cutting through existing seams, the fabric needs extra stability to prevent stretching or warping. Fabric starch or a best press spray helps keep your weave tight and your straight-line cutting precise throughout the entire construction process.
Lay out your squares in a 3×3 grid to visualize the color placement before you hit the sewing machine. This allows you to check for “clashing” patterns and ensures a balanced distribution of prints and solids. Taking a quick photo of your layout with a phone can serve as a helpful reference as you move pieces to the ironing board.
Finally, consider the thread choice for your Disappearing Nine Patch – Tutorial. A neutral, high-quality 50wt cotton thread in grey or tan usually blends seamlessly with most fabrics. Because you will be sewing multiple seam allowances, using a thin but strong thread prevents bulkiness at the intersections, making your quilt top lie flat and professional.
2. Sewing the Initial Nine-Patch Block with Precision
The first construction phase of the Disappearing Nine Patch – Tutorial is the assembly of the standard 3×3 grid. Consistency is the most important factor at this stage, particularly maintaining a strict 1/4 inch seam allowance. If your initial block is wonky, the “disappearing” cuts will only highlight those errors, so take your time with pinning and alignment.
Start by sewing your squares into three rows of three, then join those rows together. Many quilters prefer chain piecing to speed up the process and save thread. This efficient sewing technique involves feeding pairs of squares through the machine one after another without cutting the thread in between, which is a staple in high-volume quilting projects.
Pressing is the next critical step in your Disappearing Nine Patch – Tutorial. To reduce bulk where the corners meet, press your seams in opposite directions for each row. This technique, known as nesting seams, allows the fabric to lock together perfectly, resulting in sharp corners and a much smoother quilting surface for later.
Once your nine-patch is fully assembled, give it a final press with a hot iron. Avoid sliding the iron back and forth, as this can distort the square shape; instead, use a pressing motion (lifting and lowering the iron). Check that your block is perfectly square using a large quilting square ruler, as this is the “canvas” for your next set of cuts.
Measuring the total width of your finished nine-patch is a great habit to form. For example, if you used 5-inch squares, your finished block (with seams) should measure roughly 14 inches. Knowing the exact size helps you calculate the exact midpoint for the “disappearing” cuts, which is the core mechanic of the Disappearing Nine Patch – Tutorial.
If you notice your block is slightly off, you can trim the edges slightly to square it up, but be careful not to remove too much. The goal is to have a balanced grid where each of the nine squares looks identical in size. This preparation ensures that when you move to the cutting mat, your rotary blade will glide through a perfectly prepared textile unit.
3. Mastering the Slicing and Rearrangement Process
Now comes the “magic” part of the Disappearing Nine Patch – Tutorial: the transformation. Place your pressed nine-patch block on a self-healing cutting mat. You will need to make two cuts: one vertical and one horizontal, both passing exactly through the center square. This effectively turns your one large block into four identical quadrants.
Precision is paramount here, so use a non-slip quilting ruler and a sharp rotary cutter. Find the center point of your block—if your block is 14 inches, you will cut at the 7-inch mark. These cuts must be perfectly perpendicular to ensure the resulting rectangular units are uniform and ready for the next stage of designing the quilt.
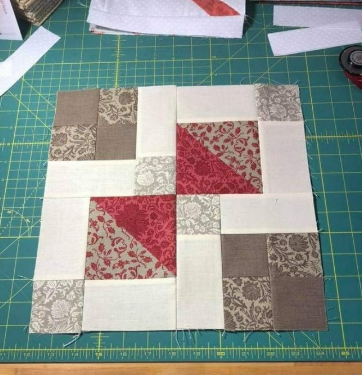
After cutting, you will have four smaller blocks, each containing one full small square, two rectangles, and one-quarter of the original center square. The fun begins when you start rotating the blocks. By turning each quadrant 90 or 180 degrees, you create entirely different geometric patterns that look far more complex than a simple grid.
Experiment with different layouts on your design wall. You can arrange the blocks so the original center pieces meet in the middle, or flip them so they point toward the outer corners. This creative flexibility is why the Disappearing Nine Patch – Tutorial is so popular among modern quilters who enjoy “playing” with their fabric before final assembly.
Once you have settled on a layout you love, it’s time to sew the four quadrants back together. Just like before, use a quarter-inch seam and nest your seams where the new edges meet. This second round of sewing completes the transformation, giving you a brand-new quilt block that looks like a complex arrangement of small-scale patchwork.
The “disappearing” effect works best when you repeat this process with multiple nine-patch blocks and then join the finished units together. The way the colors interact at the borders of these units creates secondary patterns, such as lattice effects or starbursts, making your DIY quilt project look like a professional work of art.
4. Finishing Your Quilt and Professional Tips
To finish your Disappearing Nine Patch – Tutorial project, you will need to assemble the quilt sandwich. This consists of your completed quilt top, a layer of batting (cotton or polyester), and a backing fabric. Baste the layers together using safety pins or temporary spray adhesive to prevent shifting during the final quilting process.
When it comes to the actual quilting, straight-line quilting or “walking foot” quilting works beautifully with the geometric nature of this pattern. You can quilt in the ditch (sewing directly over the seams) to emphasize the block structure, or create a diagonal grid to add movement and texture to the fabric surface.
If you want a more organic look, try free-motion quilting. Patterns like stippling or meandering loops provide a soft contrast to the sharp lines of the Disappearing Nine Patch – Tutorial. This adds a “human touch” to the piece, making it feel cozy and handcrafted, which is the ultimate goal of any fiber arts project.
Once the quilting is done, square up the edges of your quilt and apply the binding. Choosing a binding fabric that matches one of the colors in your blocks can frame the piece nicely. Use double-fold bias tape or handmade binding for a durable finish that will withstand years of use and washing.
Don’t forget to add a quilt label to the back! Include your name, the date, and the fact that you followed a Disappearing Nine Patch – Tutorial. This turns your creation into a family heirloom and documents your journey as a maker. It’s a small detail that adds immense value to your handmade gift.
Finally, take a step back and admire your work. The Disappearing Nine Patch – Tutorial is a journey of transformation that teaches patience, accuracy, and creativity. Whether you’ve made a table runner, a baby quilt, or a king-sized bedspread, you’ve mastered a technique that bridges the gap between traditional quilting and modern design.
FAQ – Frequently Asked Questions
What size squares should I start with for a Disappearing Nine Patch?
You can use any size, but 5-inch squares (charm packs) or 10-inch squares (layer cakes) are the most common. The larger the starting square, the larger your final block will be.
Do I have to use a nine-patch to start?
Yes, the specific “disappearing” math for this tutorial relies on a 3×3 grid. However, there are “disappearing” versions of four-patch and sixteen-patch blocks as well!
How do I make sure my center cuts are even?
Always measure your finished nine-patch block before cutting. Divide the total width by two to find your cutting line. Using a rotary cutter and a long acrylic ruler is the most accurate method.
Can I use scraps for this tutorial?
Absolutely! This is a legendary scrap-buster. Just make sure your scraps are trimmed to the same square size before you begin the initial assembly.
What is the best way to press the seams?
Press to the dark side whenever possible. For the nine-patch rows, press row 1 to the right, row 2 to the left, and row 3 to the right so the seams “nest” together.
Conclusion
This Disappearing Nine Patch – Tutorial has shown you how to take a very basic quilting block and turn it into something intricate and visually stunning.
We have covered everything from the importance of fabric contrast and precise sewing to the exciting moment of the disappearing cut and final quilt finishing. By following these steps, you can create a professional-grade quilt top that looks far more difficult to make than it actually is. This technique is perfect for building confidence in patchwork while producing beautiful results every time.