Crochet Cable Organizers – Tutorial is the perfect weekend project for anyone looking to declutter their workspace while adding a touch of handmade charm to their tech accessories. In today’s digital age, we are constantly surrounded by charging cables, headphone wires, and USB leads that often turn into a tangled mess at the bottom of our bags or behind our desks. Learning how to create your own custom cord wraps through this comprehensive crochet guide allows you to combine utility with the relaxing art of needlework.
Managing your electronics doesn’t have to involve plastic zip ties or expensive store-bought solutions when you can utilize a Crochet Cable Organizers – Tutorial to craft something beautiful. These small but mighty accessories are excellent for using up scrap yarn and practicing basic crochet stitches like the single crochet and half-double crochet. By the end of this journey, you will have a collection of stylish cable tidies that make fantastic gifts for friends, family, or even as a clever addition to your own craft room organization.
This Crochet Cable Organizers – Tutorial focuses on creating durable, flexible, and adjustable wraps that accommodate everything from thin phone chargers to thick laptop power bricks. We will explore the best yarn weights for craft organizers, the essential tools you need to get started, and the step-by-step logic behind a successful crochet pattern for beginners. Let’s dive into the technical details and creative flourishes that will help you master the art of keeping your digital life neatly coiled and tangle-free.
1. Essential Materials for Your Crochet Cable Organizers – Tutorial
To begin this Crochet Cable Organizers – Tutorial, you first need to select the right yarn fiber. Cotton yarn is highly recommended because it is inelastic and holds its shape well over time, ensuring your cable holders don’t stretch out after repeated use. A medium weight (worsted) yarn is generally the best choice for achieving a sturdy texture.
Next, choose a crochet hook size that is slightly smaller than what the yarn label recommends. Using a 3.5mm or 4.0mm hook with worsted yarn creates a dense crochet fabric, which is vital for preventing the cord from slipping through the stitches. This tension control is a key secret to professional-looking handmade tech accessories.
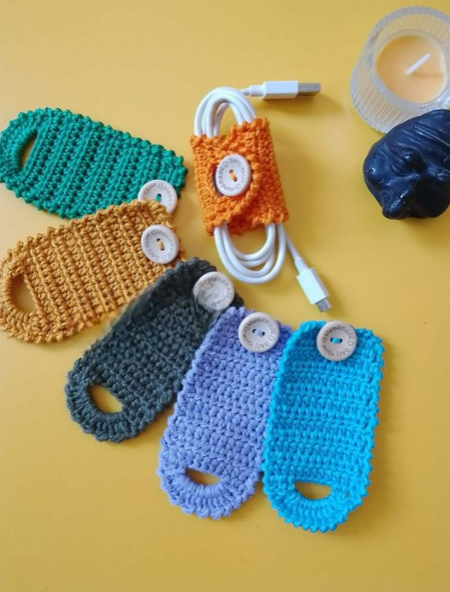
Fasteners are the next critical component in our DIY cord management project. You can use vintage buttons, colorful plastic snaps, or even hook-and-loop tape (Velcro) to secure your organizers. Many crafters prefer buttons because they allow for a decorative element that complements the crochet stitch patterns used in the body of the wrap.
Don’t forget the small tools that make the finishing process much smoother. A tapestry needle is essential for weaving in your ends securely, ensuring the crochet cable wraps can withstand being tossed in and out of backpacks. You will also need sharp scissors and perhaps some stitch markers if you plan on working in continuous rounds for circular designs.
If you are following this Crochet Cable Organizers – Tutorial to create gifts, consider buying multi-packs of buttons to keep your costs low. Upcycling materials from old garments is another fantastic way to stay eco-friendly while personalizing your projects. Having a variety of button sizes allows you to adjust the “loop” size for different cable thicknesses.
Finally, keep a measuring tape handy throughout the process. Since cables come in various lengths and diameters, being able to customize the length of your crochet strap is the biggest advantage of a handmade solution. Measuring your specific chargers beforehand ensures a snug fit every time you use your new crochet cable tidies.
2. Understanding the Core Crochet Terms and Techniques
The heart of any Crochet Cable Organizers – Tutorial lies in the terminology used to describe the movements. The Slip Knot is your starting point, creating the first loop on your hook before you begin your foundation chain. Understanding how to maintain consistent loops here will prevent the base of your organizer from curling or looking uneven.
The Foundation Chain (ch) determines the length of your cable wrap. In this tutorial, we often suggest a chain of 15 to 20 stitches for a standard phone charger. This base chain serves as the skeleton of your work, and learning to count these stitches accurately is a fundamental skill for any crochet enthusiast looking to scale their projects.
The Single Crochet (sc) is the most common stitch used in this Crochet Cable Organizers – Tutorial. It creates a tight, sturdy stitch that provides the necessary grip for the cord management tool. Mastering the “insert, yarn over, pull through” rhythm of the single crochet ensures your wraps are durable enough for daily use in high-traffic areas like office desks.
For those who want a bit more texture, the Half Double Crochet (hdc) offers a slightly taller and softer finish. This stitch is excellent if you want your crochet cable keepers to have a bit of cushion. It’s a great intermediate step between the basic single and the more decorative double crochet stitches often found in advanced textile patterns.
A Stitch Increase (inc) or Decrease (dec) might be necessary if you are designing a leaf-shaped or tapered cable organizer. While most wraps are simple rectangles, knowing how to manipulate the shape of your fabric adds a level of artisan quality to your work. This shaping technique allows you to transition from a functional tool to a decorative piece of crochet art.
Lastly, the Slip Stitch (sl st) is used to join rounds or finish off the edges of your crochet project. It creates a clean, flat border that prevents fraying. In our Crochet Cable Organizers – Tutorial, the slip stitch is also used to create the button loop, providing a secure closure that won’t easily snap under the pressure of a tightly coiled wire.
3. Step-by-Step Construction of the Cable Wrap
To start the practical phase of this Crochet Cable Organizers – Tutorial, create a slip knot and chain 16. This length is ideal for most USB-C or Lightning cables. Turn your work and single crochet in the second chain from the hook and in each chain across. You should have 15 stitches, which forms the sturdy base of the organizer.
For the subsequent rows, chain one and turn your work, then single crochet in each stitch across. Repeat this process for 4 to 6 rows depending on how wide you want your cable wrap to be. Consistency in your stitch count is vital here; if you lose or gain stitches, your crochet accessory will look lopsided rather than professional.
The “Button Hole Row” is where the Crochet Cable Organizers – Tutorial gets interesting. On your final row, crochet halfway across the width, then chain 2 or 3 (depending on your button size), skip two stitches, and single crochet in the remaining stitches. This creates a functional gap that serves as a built-in fastening system for your wrap.
If you prefer not to make a hole in the middle, you can add a chain loop to the very end of your piece. Simply chain 5 at the corner and slip stitch back into the same space. This creates a hanging loop that can be hooked over a button sewn onto the opposite end of the crochet fabric, offering a more flexible fit for bulky cords.
After finishing the crochet portion, it is time for the finishing touches. Cut your yarn, leaving a 6-inch tail, and pull it through the final loop to secure. Use your tapestry needle to weave the ends through the stitches so they are invisible. This neat finishing is what separates a beginner project from a high-quality handmade product.
The final step in this Crochet Cable Organizers – Tutorial is sewing on the button. Position the button on the opposite side of the loop or hole you created. Use a matching thread or a strand of the same yarn to sew it firmly. Once attached, wrap your new crochet organizer around a messy cable and admire the instant organization you’ve achieved!
4. Customizing and Decorating Your Crochet Organizers
Once you have mastered the basic shape in this Crochet Cable Organizers – Tutorial, you can start experimenting with color pooling and stripes. Using variegated yarn can give your organizers a complex, multi-colored look without the hassle of changing yarn mid-project. This is a simple way to make your tech gear reflect your personal style.
You can also explore different stitch textures like the Moss Stitch or Waffle Stitch to give your organizers a more tactile feel. These textures not only look sophisticated but also provide extra “grip” on the cables. Adapting various crochet techniques to small-scale projects is a great way to test new patterns before committing to a full-sized blanket.
For those who love amigurumi, you can add small embellishments to the top of your wraps. Imagine a tiny crochet flower, a heart, or even a small animal head sitting atop your cable holder. This decorative crochet approach turns a simple functional item into a conversation piece that brightens up any workspace or charging station.
Don’t limit yourself to just one size; use this Crochet Cable Organizers – Tutorial to create a matched set. Make extra-long wraps for thick HDMI cables and tiny, narrow ones for earbud wires. Having a coordinated set of organizers in a single color scheme creates a visually pleasing and organized environment that boosts productivity and reduces stress.
Consider the functionality of materials beyond just yarn. You can incorporate metallic threads for a bit of sparkle or use reflective yarn if you plan on using these organizers for outdoor gear or bags used at night. This innovative crochet mindset allows you to solve specific problems while maintaining your creative hobby.
Finally, think about adding labels or tags to your finished pieces. A small “Handmade” leather tag or a wooden bead can add a professional boutique finish to your work. This Crochet Cable Organizers – Tutorial is just the beginning; the way you choose to personalize these items is what makes your hand-hooked creations truly unique and special.
FAQ – Frequently Asked Questions
What is the best yarn for a Crochet Cable Organizers – Tutorial?
The best yarn is 100% cotton in a worsted weight. Cotton is durable, heat-resistant (important for chargers that might get warm), and doesn’t stretch as much as acrylic or wool, ensuring the cord wrap stays tight over time.
How long does it take to finish one cable organizer?
For a beginner, a single crochet cable wrap usually takes about 20 to 30 minutes. Once you are familiar with the tutorial steps, you can easily produce one in under 15 minutes, making them perfect for batch crafting.
Can I wash my crochet cable organizers?
Yes! If you use cotton yarn, these handmade organizers are machine washable. It is recommended to place them in a small mesh laundry bag so the buttons don’t snag on other clothes. This makes them very hygienic and long-lasting.
What size hook should I use for this project?
Typically, a 3.5mm (E) or 4.0mm (G) hook works best with worsted yarn for this project. The goal is to create a tight stitch tension so the organizer is firm and functional rather than loose and floppy.
How do I adjust the size for thicker power cables?
To adjust for thicker cords, simply increase the length of your starting chain. Instead of 16 chains, try 25 or 30. You can also increase the number of rows to make the wrap wider, providing more coverage for heavy-duty electronic wires.
Conclusion
In this Crochet Cable Organizers – Tutorial, we have covered everything from selecting the right cotton yarn to mastering the single crochet stitch and adding functional buttons. We explored how these small DIY projects can significantly impact your daily organization, turning a chaotic mess of wires into a tidy, color-coded system. By following the step-by-step instructions, you’ve learned how to create a durable, washable, and highly customizable accessory that bridges the gap between traditional craft and modern technology.
These handmade cable wraps are more than just utility items; they are a testament to how upcycling and hand-hooking can provide sustainable solutions to common household problems. Whether you are making them for yourself or as thoughtful gifts, the skills practiced here—like maintaining tension and creating button loops—will serve you well in all your future crochet endeavors. We hope this guide has inspired you to look at your scrap yarn pile with new eyes and a plan for organization.