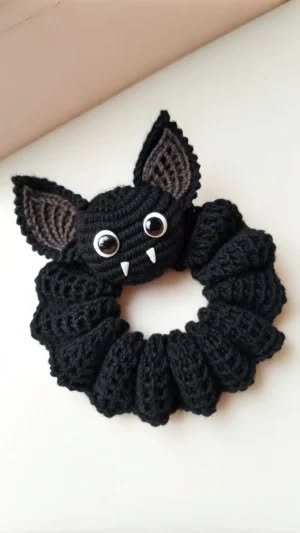
Creating a Crochet Bat Hair Tie – Tutorial is the perfect way to combine spooky aesthetics with practical everyday accessories. Whether you are gearing up for the Halloween season or you simply embrace a gothic style year-round, these adorable bat-themed hair ties add a whimsical touch to any ponytail or braid. In this comprehensive guide, we will walk you through every step required to craft your own handmade accessory, ensuring that your final piece is both durable and stylish.
Working on a Crochet Bat Hair Tie – Tutorial allows crafters of all skill levels to practice shaping and assembly in a small-scale project. These little bats are incredibly versatile; they can be attached to standard elastic bands, used as festive decorations, or even given as unique gifts to friends who love “spooky-cute” items. Because they require very little yarn, they are also an excellent way to use up those leftover scraps of black, purple, or grey cotton you have lying around in your stash.
Before we dive into the technical details of this Crochet Bat Hair Tie – Tutorial, it is important to focus on the materials and the “human” element of crafting. Making something by hand is about more than just the finished product—it is about the relaxation of the stitches and the joy of creating something unique. By following this structured guide, you will be able to produce a professional-looking hair accessory that rivals anything found in a boutique, all while enjoying the therapeutic process of fiber arts.
1. Materials and Preparation for Your Crochet Bat Hair Tie
To begin your Crochet Bat Hair Tie – Tutorial, you will first need to gather the right supplies to ensure a high-quality finish. The most important component is the yarn; a medium-weight cotton yarn is highly recommended because it provides excellent stitch definition and holds its shape better than acrylic. You will also need a crochet hook—typically a 3.5mm (E) hook works best for this weight—to keep your stitches tight enough so the stuffing (if used) doesn’t show through.
In addition to your yarn and hook, you will need a sturdy elastic hair tie. It is best to choose one without metal joiners to prevent snagging your hair or the yarn. You will also need a small amount of polyester fiberfill to give the bat’s body a plush, 3D effect. Don’t forget a pair of sharp scissors and a tapestry needle for weaving in your ends and sewing the wings to the body securely.
For the aesthetic details of the Crochet Bat Hair Tie – Tutorial, consider picking up some safety eyes or small beads. If you are making this for a small child, it is safer to embroider the eyes using a small amount of white or red embroidery floss. Having all these materials organized on your workspace before you start will make the crafting process much smoother and more enjoyable.
Preparation also involves understanding the basic crochet stitches involved in the pattern. Most of this project uses the single crochet (sc), half double crochet (hdc), and double crochet (dc). If you are a beginner, taking a few minutes to practice a magic ring (also known as a magic circle) will be incredibly helpful, as this is the standard way to start the bat’s body without leaving a hole in the center.
Safety and comfort are key when creating handmade hair accessories. Ensure that the yarn you choose is colorfast so that it doesn’t bleed if it gets wet or sweaty while being worn. Furthermore, checking the tension of your crochet stitches is vital; if the stitches are too loose, the hair tie might stretch out the fabric of the bat, causing it to lose its shape over time.
Finally, set the mood for your crafting session. Since this Crochet Bat Hair Tie – Tutorial has a slightly dark and festive theme, maybe put on a themed playlist or your favorite podcast. Creating a comfortable environment helps you maintain a steady crochet tension, which leads to a more uniform and professional appearance for your finished bat project.
2. Crafting the Bat Body and Head
The core of this Crochet Bat Hair Tie – Tutorial starts with the body, which usually doubles as the head in this simplified, “chubby” bat design. You will start by creating a magic ring and working six single crochet stitches into it. This technique ensures the base is tight and secure, which is where the hair elastic will eventually be attached or crocheted around.
As you move into the second and third rounds, you will perform increases (inc) by placing two stitches into each stitch from the previous row. This expands the circle into a sphere. The goal is to create a small, firm ball that serves as the “heart” of your crochet bat. Remember to use a stitch marker at the beginning of each round so you don’t lose your place in the pattern.
Once you have reached the desired width, you will work several rounds of even stitches (one sc in each stitch) to build the height of the body. This is the stage where the Crochet Bat Hair Tie – Tutorial really starts to take form. It is also the perfect time to insert your safety eyes if you are using them, usually placing them between rounds four and five, about three stitches apart.
After the eyes are in place, you will begin the decrease (dec) rounds. This involves joining two stitches together to gradually close the sphere. Before the opening gets too small, firmly stuff the body with your fiberfill. Be careful not to overstuff, as you don’t want the crochet fabric to stretch and reveal the white stuffing underneath, which can ruin the look of your black bat.
The final step for the body is to close the remaining hole. Using your tapestry needle, thread the yarn tail through the front loops of the last few stitches and pull tight. This creates a clean finish. You now have a solid base for your Crochet Bat Hair Tie – Tutorial, ready for the ears and the signature wings that give the character its identity.
To attach the hair tie itself, you can either sew it directly to the back of the finished body or, for a more secure fit, crochet the first round of the body directly around the elastic band. Many crafters prefer sewing it at the end using a strong upholstery thread or the same yarn used for the body to ensure it stays in place even with heavy use.
3. Creating the Signature Bat Wings and Ears
No Crochet Bat Hair Tie – Tutorial is complete without the iconic wings. These are worked separately and then sewn onto the sides of the body. To make the wings, you will start with a foundation chain. The wings are usually shaped using a variety of stitch heights—starting with a slip stitch, moving to a single crochet, then a double crochet, and back down again to create that “scalloped” edge.
The ears are much simpler but just as important for the silhouette. In this Crochet Bat Hair Tie – Tutorial, the ears are usually small triangles worked directly onto the head or sewn on afterward. You can make them by chaining three and working a few decreasing stitches to a point. Pointy ears give the bat a classic, alert look that is instantly recognizable.
When working on the wings, pay close attention to symmetry. You want both wings to be identical in size and shape. It helps to count your stitches carefully for the first wing and write down any slight adjustments you make so you can replicate them for the second one. This level of detail is what makes a DIY crochet project look high-end and professional.
Once your wings are finished, leave a long yarn tail for sewing. Positioning is everything; place the wings on the sides of the body, usually centered with the eyes. Use sewing pins to hold them in place before you start stitching. This allows you to check the alignment and make sure your crochet bat doesn’t look lopsided.
Using a whip stitch or a mattress stitch, attach the wings firmly to the body. You want them to be secure enough to withstand the tension of a hair tie being pulled and twisted. In this Crochet Bat Hair Tie – Tutorial, we recommend going over the attachment point twice for extra durability, especially if the accessory will be worn by children or used frequently.
The final touch for the wings is to “block” them if the yarn is curling too much. You can lightly steam them or dampen them and pin them flat to dry. This ensures that when the bat hair tie is in your hair, the wings stand out proudly rather than folding inward. This small extra step elevates the quality of your hand-stitched accessory.
4. Finishing Touches and Customization Tips
The beauty of following a Crochet Bat Hair Tie – Tutorial is that you can easily customize the design to suit your personality. While traditional black is always a favorite, don’t be afraid to try variegated yarn or bright colors like neon green or vivid purple. You could even add a tiny bit of pink yarn to the ears or give the bat a small fanged mouth using white thread for extra character.
Another great way to customize your handmade hair tie is by adding embellishments. Small sequins, glitter yarn, or even a tiny bow made of ribbon can make your bat stand out. If you are making these for a party, you could create a whole colony of bats in different colors, making each Crochet Bat Hair Tie – Tutorial a unique piece of art.
Durability is a major factor for items that involve elastic bands. Over time, elastics can snap or lose their stretch. To make your accessory “renewable,” you could sew a small button to the back of the bat and loop the hair tie around the button. This way, if the tie breaks, you can simply replace the elastic without having to redo the entire crochet project.
For those who plan on selling these items at craft fairs or on platforms like Etsy, branding is key. You can attach a small handmade label to the back. Since this Crochet Bat Hair Tie – Tutorial is a quick project, you can produce them in bulk. Presentation matters, so consider pinning them to a card with a “Happy Halloween” or “Stay Spooky” message to catch the eye of potential buyers.
Cleaning your crochet accessories is also something to keep in mind. Since hair ties can get dirty from hair products or oils, using a washable yarn is a smart choice. We recommend hand-washing your finished bat in cool water with a mild detergent and letting it air dry. This prevents the fiberfill from clumping and keeps the stitches looking fresh and crisp.
Lastly, don’t forget to share your work! The crochet community is vast and supportive. Taking a high-quality photo of your finished piece from this Crochet Bat Hair Tie – Tutorial and posting it on social media is a great way to connect with other makers. Use hashtags like #crochettutorial, #batcrochet, and #handmadehairtie to help others find your beautiful creation.
FAQ: Frequently Asked Questions
How long does it take to complete this Crochet Bat Hair Tie – Tutorial?
For an intermediate crocheter, this project usually takes between 30 to 45 minutes. Beginners may take about an hour as they navigate the shaping of the wings and the assembly process.
Can I use acrylic yarn instead of cotton?
Yes, you can use acrylic yarn, but keep in mind that it might be “fuzzier” and slightly less sturdy than cotton. Cotton is generally preferred for hair accessories because it handles moisture better and has a cleaner look.
What is the best way to attach the bat to the hair tie?
The most secure method is to crochet the first round of the bat’s body directly around the elastic band. However, sewing it on afterward with several passes of strong yarn is also very effective and easier for beginners.
Is this project suitable for children?
Absolutely! Just ensure that if you are using safety eyes, they are secured properly. For very young children, it is always better to embroider the eyes with yarn to eliminate any choking hazards.
Can I turn this bat into something else?
Yes! If you don’t want a hair tie, you can attach a keychain ring, a brooch pin, or even string several together to make a spooky bat garland for home decor.
Conclusion
In this Crochet Bat Hair Tie – Tutorial, we have covered everything from selecting the best cotton yarn to the final assembly of the wings and ears.
We learned how to create a sturdy, stuffed body, how to shape wings for a perfect silhouette, and how to securely attach a hair elastic for a functional accessory. This project is a fantastic blend of creativity and utility, allowing you to express your style through the art of hand-crocheted items.