Crochet Stitch in a Box – Tutorial is a fascinating technique that every enthusiast should add to their creative repertoire, as it offers a unique architectural texture that stands out in any project. Whether you are a seasoned crafter or a curious beginner, understanding the mechanics of this geometric pattern allows you to create structured, visually striking pieces ranging from cozy blankets to modern home decor. This Crochet Stitch in a Box – Tutorial is designed to simplify the complex appearance of the stitch, breaking it down into manageable steps that emphasize rhythm and consistency.
The beauty of the Crochet Stitch in a Box – Tutorial lies in its versatility and the way it plays with light and shadow across the fabric. By using a combination of foundational stitches and clever placement, you create a “boxed” effect that mimics a woven grid or a series of tiny frames. In this Crochet Stitch in a Box – Tutorial, we will explore how to maintain perfect tension and choose the right yarn to ensure that every “box” is crisp and well-defined, making your final project look professionally finished and high-end.
Mastering a new pattern requires patience, but the Crochet Stitch in a Box – Tutorial provides a rhythmic experience that many find incredibly meditative. As you progress through the rows, the logic of the stitch becomes clear, allowing you to settle into a flow that is both productive and relaxing. This comprehensive Crochet Stitch in a Box – Tutorial will guide you through the essential materials, the technical execution of the rows, and the best practices for finishing your work to ensure durability and aesthetic appeal for years to come.
1. Understanding the Foundation of Crochet Stitch in a Box – Tutorial
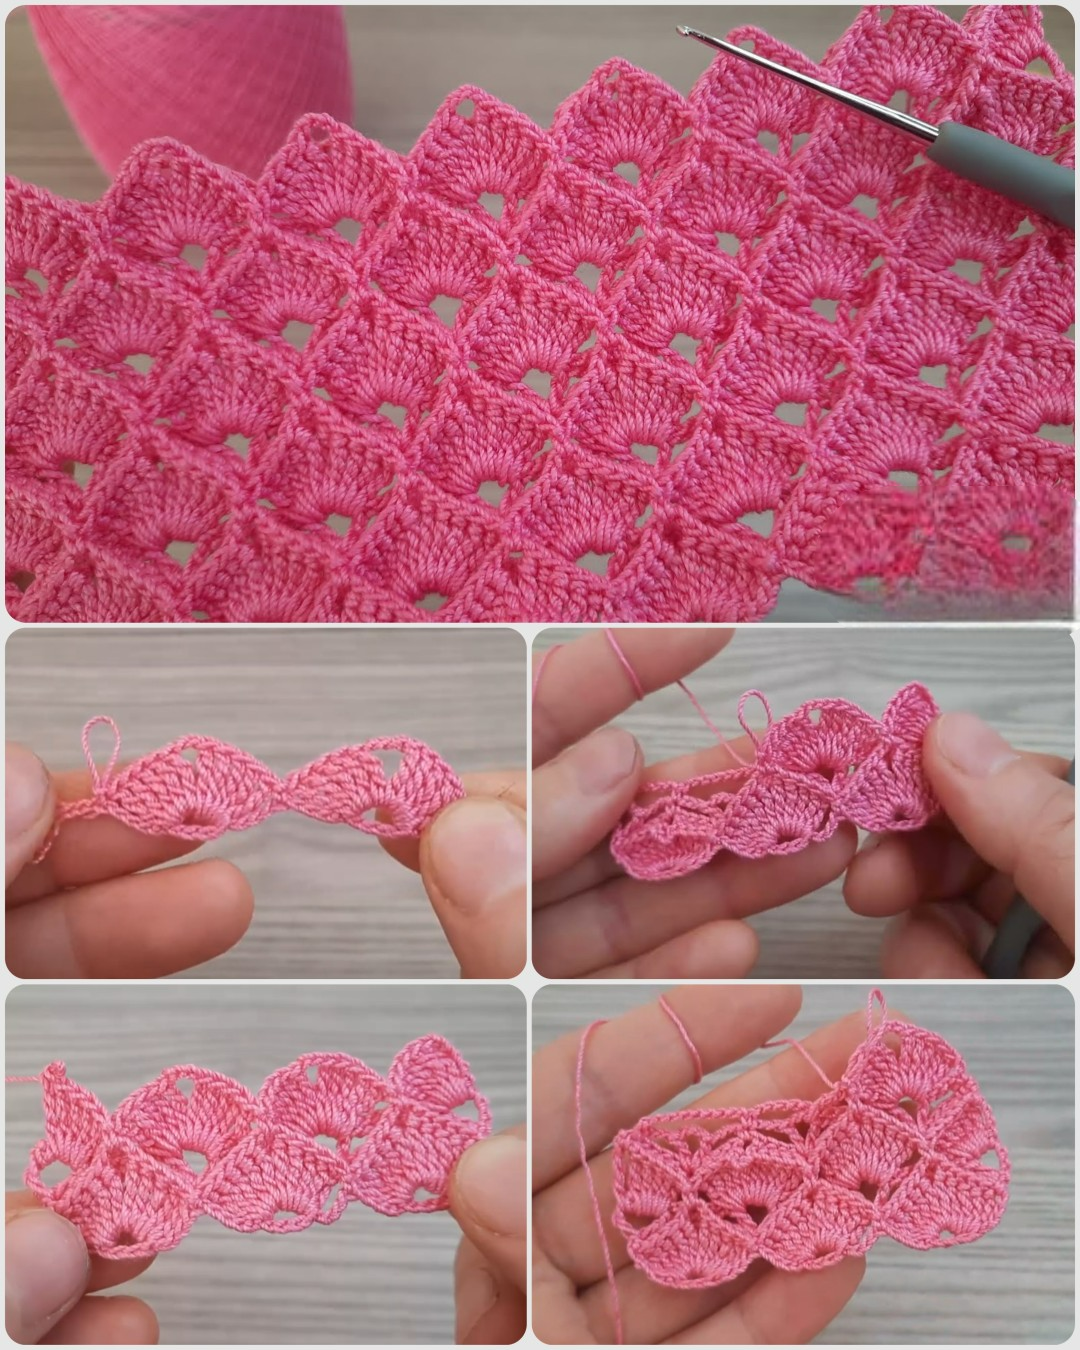
To begin your Crochet Stitch in a Box – Tutorial, you must first understand that this pattern relies on a specific multiple of stitches to create the symmetry required for the “boxes.” Generally, you will work with a foundation chain that is a multiple of four or six, plus a few extra chains for the turning height. This ensures that every geometric window aligns perfectly with the row below it, creating the signature grid look.
Selecting the right materials is the next critical step in this Crochet Stitch in a Box – Tutorial. For the most defined “box” shapes, I recommend using a smooth worsted weight yarn or a mercerized cotton. These types of yarn lack excessive fuzz, which means the structural lines of your crochet stitches will be sharp and visible, rather than being lost in a halo of fibers.
Your crochet hook choice also plays a major role in the success of the Crochet Stitch in a Box – Tutorial. If your hook is too large, the boxes will look sloppy and lose their square integrity; if it is too small, the fabric will be stiff and uncomfortable. Aim for a hook size that allows the yarn to glide easily while maintaining a firm stitch definition that supports the open-work nature of the pattern.
The first row of any Crochet Stitch in a Box – Tutorial usually involves creating a solid base of single crochet or double crochet stitches. This foundation acts as the “floor” for your first set of boxes. It is essential to count your stitches carefully here, as a single mistake in the first row will carry through the entire project, causing the boxes to lean or look uneven.
In this Crochet Stitch in a Box – Tutorial, we emphasize the use of chain spaces to create the “hollow” part of the box. By skipping a specific number of stitches in the foundation and replacing them with chains, you create the windows that give the pattern its name. This alternating sequence of solid pillars and airy spaces is what builds the stunning visual texture we are aiming for.
Lastly, remember that the Crochet Stitch in a Box – Tutorial is essentially a two-row repeat. Once you have established your base and your first row of windows, the subsequent rows will simply mirror or offset these placements. This makes the pattern very easy to memorize, allowing you to focus on the tactile joy of the yarn and the rhythmic movement of your hands as you craft.
2. Technical Execution of the Boxed Rows and Pillars
The core of the Crochet Stitch in a Box – Tutorial is the creation of vertical pillars that support the horizontal “lids” of each box. Usually, these pillars are made using double crochet or treble crochet stitches. The height of these stitches determines how “tall” your boxes will be, allowing you to customize the look from short, squat rectangles to elegant, elongated squares.
When working through the Crochet Stitch in a Box – Tutorial, you will find that the “boxes” are closed by a row of stitches that travel across the top of the chain spaces. This is where the geometric shape truly comes together. By working into the chains or the stitches from the previous row, you lock in the open space, creating a sturdy fabric that is surprisingly warm despite its ventilated appearance.
Consistency is the most important factor in this Crochet Stitch in a Box – Tutorial. You must ensure that your yarn tension remains even, especially when transitioning between a solid pillar and a chain space. If your chains are too loose, the top of your box will sag; if they are too tight, the pillars will pull toward each other, distorting the square shape of the pattern.
As you follow this Crochet Stitch in a Box – Tutorial, you might notice that the edges of your work can sometimes become wavy. To prevent this, always ensure your turning chains are the correct height for the stitch you are using. For a double crochet pillar, a chain-three is standard, while a treble crochet usually requires a chain-four to maintain a straight and professional-looking edge.
Another advanced tip within this Crochet Stitch in a Box – Tutorial is the “stacked” vs. “offset” look. You can choose to place your boxes directly on top of each other for a traditional grid, or you can shift them by half a box width in every other row to create a “brick-lay” effect. Both variations are beautiful and rely on the same fundamental principles of the boxed stitch.
While practicing the Crochet Stitch in a Box – Tutorial, it helps to use a light-colored yarn. Dark yarns, while beautiful, can make it difficult to see exactly where your hook should go, especially when working into the tops of pillars or specific chain loops. Once you have mastered the rhythm, you can move on to deeper colors or even variegated yarns for a stained-glass effect.
3. SEO Optimization and Choosing Projects for this Stitch
When writing about or showcasing your work from this Crochet Stitch in a Box – Tutorial, using the right terminology is key for SEO-driven content. Terms like “textured crochet,” “open-work patterns,” and “geometric crochet” help search engines understand the value of your tutorial. This ensures that other makers looking for structural inspiration can easily find your guide among the sea of online patterns.
The Crochet Stitch in a Box – Tutorial is particularly well-suited for home decor items. Because of its structural integrity, it makes excellent crochet throw pillows, sturdy market bags, or even table runners. The “boxes” provide a modern, minimalist aesthetic that fits perfectly with contemporary interior design trends, making it a popular choice for handmade gifts.
For wearable items, the Crochet Stitch in a Box – Tutorial offers great breathability. Using this stitch for a summer cardigan or a lightweight shawl allows for airflow while still providing the coverage and drape of a traditional garment. The “boxed” nature of the stitch creates a sophisticated lace-like quality that isn’t too delicate for everyday wear, balancing style and functionality.
If you are a content creator, this Crochet Stitch in a Box – Tutorial is a goldmine for visual engagement. The clear lines and repetitive nature of the boxes make for excellent photography and high-quality video thumbnails. Highlighting the 3D texture of the pillars in your images will attract viewers who are looking for patterns that offer more than just a flat, basic surface.
In this Crochet Stitch in a Box – Tutorial, we also suggest considering the “filler” possibilities. Some crafters like to go back through the boxes with a contrasting color of yarn, using a surface slip stitch to outline the boxes. This creates a “plaid” or “tartan” look that is incredibly impressive but actually very simple to achieve once the base grid is finished.
Finally, think about the durability of your projects. The Crochet Stitch in a Box – Tutorial creates a fabric that doesn’t stretch out of shape as easily as some other lace patterns. This makes it ideal for items that will see a lot of use, such as baby blankets or pet accessories. The “pillars” act as a cage that keeps the fabric stable, ensuring your hard work lasts for many years.
4. Finishing Touches and Blocking for a Professional Look
No Crochet Stitch in a Box – Tutorial is complete without discussing the importance of blocking. Because this stitch is so geometric, any slight variations in tension will be more apparent than in a random stitch pattern. Wet blocking or steam blocking your finished piece will allow the fibers to relax and settle into their intended square shapes, giving you a perfectly straight result.
To block your work from the Crochet Stitch in a Box – Tutorial, pin the edges of your project to a foam mat, making sure to measure the width and height to ensure everything is symmetrical. If you are making a blanket, this step is vital to ensure the corners are square. Once the piece dries, you will see a massive difference in the clarity and “crispness” of your boxes.
When it comes to weaving in ends, this Crochet Stitch in a Box – Tutorial requires a bit of strategy. Since there are many “holes” or windows in the pattern, you must hide your yarn tails inside the solid pillars. Using a tapestry needle, weave the tail up and down through the vertical stitches of a pillar to ensure the end is invisible and won’t pop out through the open spaces.
Adding a border is a great way to frame the results of your Crochet Stitch in a Box – Tutorial. A simple crab stitch (reverse single crochet) or a few rows of plain single crochet can provide a solid frame that makes the internal “boxes” pop. This also adds a bit of weight to the edges, helping the project hang straight if it is a scarf or a wall hanging.
In this Crochet Stitch in a Box – Tutorial, we also encourage you to experiment with beads. You can slide a bead onto your yarn and place it right in the center of a box or at the intersection of the pillars. This adds a touch of “boho-chic” and weight to the fabric, making it a perfect technique for decorative window curtains or high-fashion shawls.
As you reach the end of this Crochet Stitch in a Box – Tutorial, take a moment to admire the mathematical beauty of your work. Crochet is as much about geometry as it is about art, and the box stitch is the perfect marriage of the two. With these tips and techniques, you are now ready to create complex-looking projects that are actually built on a foundation of simple, logical steps.
FAQ – Frequently Asked Questions
1. Is the Crochet Stitch in a Box – Tutorial suitable for beginners?
Yes! While it looks complex, it only uses basic stitches like chains and double crochets. If you can maintain a consistent count and identify where to place your hook, you can master this tutorial in a single afternoon.
2. How much yarn does this pattern use compared to solid stitches?
Interestingly, the Crochet Stitch in a Box – Tutorial often uses less yarn than a solid double crochet fabric because of the open “windows.” This makes it a “yarn eater” friendly pattern, perfect for when you want to make a large project like a blanket with a limited amount of yarn.
3. Can I use a variegated yarn for the Crochet Stitch in a Box – Tutorial?
Absolutely. Variegated yarn can create a beautiful “stained glass” effect where each box contains a different burst of color. However, if the color changes are too frequent, they might “break up” the visual lines of the boxes, so choose a yarn with long color transitions for the best effect.
4. What should I do if my boxes look like triangles?
This usually happens due to uneven tension or missing a chain stitch in the “lid” of the box. Ensure you are chaining the exact same number of stitches as the ones you skipped on the row below. Using stitch markers at the start of each repeat can help you stay on track.
5. Is this stitch reversible?
One of the best features of the Crochet Stitch in a Box – Tutorial is that it is completely reversible. Both sides look identical, which makes it the ideal choice for scarves, blankets, and towels where both sides of the fabric will be visible.
Conclusion
This Crochet Stitch in a Box – Tutorial has guided you through the essential steps of creating a beautiful, geometric fabric that combines structural pillars with airy chain spaces. We have discussed everything from choosing the right mercerized cotton and the importance of yarn tension, to the technical execution of the rows and the transformative power of blocking.
By mastering this two-row repeat, you have unlocked the ability to create modern, textured pieces that are both functional and artistic. Whether you are making a summer shawl or a sturdy home accessory, the “box” logic will serve as a reliable foundation for your creativity.