This Crochet Star – Tutorial is your definitive guide to creating one of the most versatile and charming motifs in the world of fiber arts. Whether you are looking to create festive holiday ornaments, stylish appliques for clothing, or a celestial mobile for a nursery, learning how to craft a perfect star is a fundamental skill. In this comprehensive guide, we will walk through every loop and stitch, ensuring that your final project looks professional, crisp, and absolutely magical.
Mastering the Crochet Star – Tutorial requires a blend of patience and the right materials, but the results are well worth the effort. Stars are unique because they rely on specific geometric increases to create those iconic points, which can be intimidating for beginners. However, by breaking down the process into manageable steps, you will see that it is simply a repetition of basic stitches like the double crochet, half double crochet, and the essential slip stitch.
The beauty of this Crochet Star – Tutorial lies in its adaptability; you can use any yarn weight, from delicate lace thread to chunky wool, to change the size and texture of your star. As we dive into the technical aspects, remember that consistency in your tension is the secret ingredient to preventing your star from curling or looking lopsided. Let’s prepare your crochet hook and favorite yarn as we begin this creative journey into the world of celestial stitching.
1 Understanding the Basics of the Crochet Star – Tutorial
Before you dive into the actual stitching, it is vital to understand the structure of the project. A standard star usually begins with a magic ring or a small circle of chains, which serves as the foundation for the center. This center is the “gravity” of your work, holding all the points together securely while maintaining a clean aesthetic.
Choosing the right yarn weight is the next step in ensuring your success with this guide. For beginners, a medium-weight (worsted) cotton yarn is often recommended because it provides excellent stitch definition. When you can clearly see where your hook needs to go, you are much less likely to make mistakes that affect the symmetry of the star.
Your crochet hook size should correspond directly to the yarn you have selected. If you want a stiff star that holds its shape—perfect for ornaments—consider using a hook that is slightly smaller than what the yarn label suggests. This creates a tighter fabric, which is a common pro-tip found in any high-quality Crochet Star – Tutorial.
The primary stitches you will encounter in this project include the chain stitch, single crochet, and treble crochet. By varying the height of these stitches within a single point, you create the tapered triangular shape that defines a star. Understanding this height progression is key to mastering the geometry of the design.
We must also discuss the importance of the slip stitch, which is used to join rounds and transition between the points of the star. Without a clean join, the center of your star might look bulky or uneven. This tutorial emphasizes the “invisible join” technique to give your work a professional, store-bought finish.
Finally, always keep a pair of sharp embroidery scissors and a yarn needle nearby. These tools are essential for the finishing stages, specifically for weaving in your ends. A well-finished star is just as important as the stitching itself, as it ensures your hard work doesn’t unravel over time or under pressure.
2 Step-by-Step Guide to the Foundation and First Round
To begin your Crochet Star – Tutorial, start by creating a magic ring (also known as a magic circle). This technique allows you to pull the center hole completely shut, resulting in a seamless look. If you find the magic ring too difficult, you can alternatively chain 4 and join with a slip stitch to form a ring.
Once your ring is established, you will need to work your first round of stitches into the center. Typically, this involves a series of double crochet stitches separated by small chains. For a five-pointed star, you generally want to create a base that is divisible by five, such as 10 or 15 stitches, depending on the specific pattern scale.
As you work around the circle, ensure you are crocheting over the “tail” of your yarn. This makes it much easier to secure the center later on. This foundational round sets the diameter of your star’s “body,” so keep your stitch gauge even to avoid a wavy or ruffled center.
After completing the required number of stitches, pull the tail of the magic ring firmly to close the gap. Join the round by inserting your hook into the top of the first stitch and performing a slip stitch. You should now have a perfect, flat circle that looks like a small sun, ready to sprout its celestial points.
In this Crochet Star – Tutorial, we emphasize counting your stitches at the end of every round. It is the most common mistake for crafters to lose a stitch here, which leads to a four-pointed or six-pointed star by accident. Double-check that your foundation is perfectly symmetrical before moving to the next phase.
If you are using multiple colors, this is the point where you would change yarn colors. Simply cut the first color, leaving a tail, and pull the new color through the loop on your hook. This creates a vibrant, multi-toned effect that makes each Crochet Star – Tutorial project unique and eye-catching.
3 Crafting the Points for a Perfect Finish
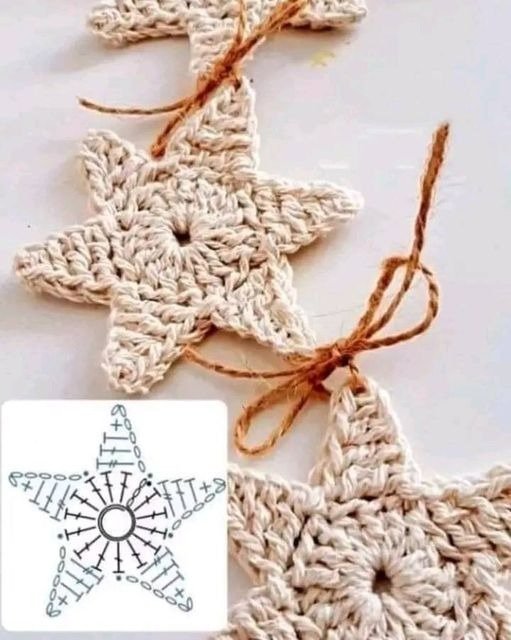
Now comes the most exciting part of the Crochet Star – Tutorial: creating the points. To do this, you will work a sequence of stitches into the stitches of your foundation circle. You will typically start with a chain to gain height, then work back down that chain with progressively taller stitches.
The sequence often looks like this: a single crochet, followed by a half double crochet, then a double crochet, and perhaps a treble crochet at the base. This “staircase” of stitches creates the sharp angle of the star’s point. Each point is anchored back to the center circle using a slip stitch in the next available space.
To get that very sharp “tip” at the top of the star, many patterns suggest a picot stitch. This involves chaining two or three and then slip-stitching back into the first chain. This tiny loop creates a crisp, pointed apex that makes the Crochet Star – Tutorial results look significantly more refined and professional.
Repeat this process for each of the five points, ensuring you space them evenly around the circle. If your points look “floppy,” it may be because your chains are too loose. Try to maintain a slightly firmer tension while working the points to give the star the structural integrity it needs to stand or hang straight.
While working the points, you might notice the work starting to curl inward. Do not worry—this is normal! Once we reach the blocking stage, those fibers will relax and lay perfectly flat. The mechanical action of the stitches naturally pulls on the yarn, but the final result will be a beautiful, balanced celestial shape.
Once the final point is completed, join back to the very first stitch of the round with a final slip stitch. Fasten off your yarn, leaving a tail of about six inches. This tail is crucial for the final steps of this Crochet Star – Tutorial, as it will be used to either create a hanging loop or to sew the star onto another surface.
4 Finishing Touches and Blocking Your Work
No Crochet Star – Tutorial is complete without discussing the finishing process. First, use your yarn needle to weave in all loose ends. The best way to do this is to weave the needle through the back of the stitches in a zigzag motion, which prevents the yarn from slipping out during use or washing.
To truly make your star shine, you must perform blocking. This involves wetting your crochet piece slightly and pinning it into the desired shape on a foam mat. By stretching the points out and pinning them securely, you set the “memory” of the yarn fibers, ensuring the star remains flat and sharp forever.
If you are making Christmas ornaments, you might want to use a stiffening agent. You can buy commercial fabric stiffeners or use a simple mixture of white glue and water. Dip your star into the mixture, squeeze out the excess, and pin it to shape. Once dry, your Crochet Star – Tutorial creation will be as rigid as wood.
For those who want extra flair, consider adding beads or sequins to the tips of the stars. You can sew these on after the star is finished or string them onto your yarn before you even begin crocheting. This adds a touch of sparkle that catches the light beautifully when hung near a window or on a tree.
Another great way to use the results of this Crochet Star – Tutorial is to create a garland. Simply crochet a long string of chains and attach multiple stars at regular intervals. This creates a bohemian-style decor piece that is perfect for birthdays, nurseries, or seasonal celebrations throughout the year.
Finally, remember that practice makes perfect. Your first star might be a little wonky, but by the third or fourth one, your muscle memory will take over. The Crochet Star – Tutorial is a journey of skill-building that opens the door to more complex shapes like snowflakes, hexagons, and intricate mandalas.
FAQ – Frequently Asked Questions
What is the best yarn for a Crochet Star – Tutorial?
Cotton yarn is generally the best choice because it has very little stretch and offers great stitch definition. This ensures the points of your star remain sharp and the center remains firm.
Can a complete beginner follow this tutorial?
Absolutely! While it requires knowledge of basic stitches, the Crochet Star – Tutorial is a perfect “next step” project for someone who has mastered the basics of making a flat circle.
How do I make the star larger or smaller?
The easiest way to adjust the size is to change your yarn weight and hook size. Use a lace-weight yarn for a tiny star or a jumbo chenille yarn for a large, plush star pillow.
Why is my star curling up like a bowl?
This usually happens if your tension is too tight or if you haven’t performed “blocking.” Wet blocking usually solves this issue, allowing the stitches to relax into a flat position.
How many points should a crochet star have?
The classic star has five points, but this Crochet Star – Tutorial can be adapted for six or even seven points by adjusting the number of foundational stitches in the first round.
Can I wash my crochet stars?
Yes, as long as you used washable yarn. However, if you used a stiffening agent like glue or starch, washing will remove the stiffness, and you will need to re-apply it and re-block the star.
Conclusion
In this Crochet Star – Tutorial, we have covered everything from the initial magic ring to the final blocking techniques. You have learned how to manipulate stitch heights to create sharp points and how to finish your work like a professional.
Crocheting stars is a rewarding experience that allows you to create heartfelt, handmade gifts and decorations that carry a personal touch. We hope this guide has inspired you to pick up your hook and start stitching your own galaxy of stars.