Building a custom Fabric Chair Cover through a detailed Tutorial is one of the most rewarding ways to refresh your living space without the heavy price tag of new furniture. Whether you are looking to hide a few stains on a dining room chair or simply want to update your interior design to match the current season, sewing your own covers offers endless creative freedom. Many people feel intimidated by the idea of draping and pinning, but once you understand the basic geometry of your seating, the process becomes a relaxing and fulfilling weekend project.
In this comprehensive Fabric Chair Cover – Tutorial, we will explore the essential techniques needed to achieve a professional, tailored look that stays in place even with daily use. Choosing the right textile is just as important as the sewing itself, as you need a balance between durability and flexibility to hug the curves of the frame. By following a structured approach, you can transform mismatched chairs into a cohesive set that reflects your personal style and adds a layer of comfort to your home.
This Fabric Chair Cover – Tutorial is designed to be accessible for beginners while providing the technical depth that experienced makers appreciate. We will focus on creating a removable slipcover that is easy to wash, ensuring that your hard work remains beautiful for years to come. From calculating fabric yardage to mastering the invisible zipper or simple tie-backs, every step is optimized to help you succeed. Let’s gather our measuring tapes and pins to begin this exciting home improvement journey.
1. Selecting the Best Materials for Your Fabric Chair Cover
Choosing the right material is the foundation of any successful Fabric Chair Cover – Tutorial. For high-traffic areas like the dining room, you should look for upholstery-grade cotton, canvas, or linen blends. These fabrics offer the necessary thickness to withstand friction while providing a “humanized” feel to the touch. Avoid overly slippery synthetics unless they have a bit of spandex for stretch-fit designs.
When you start your Fabric Chair Cover – Tutorial, remember that the fabric weight determines how the cover drapes. A medium-weight fabric is usually the “sweet spot” because it is easy to feed through a standard sewing machine but heavy enough to hide the original upholstery underneath. If you choose a patterned fabric like floral prints or geometric shapes, keep in mind that you will need extra yardage to align the patterns across different sections.
Don’t forget the importance of pre-washing your fabric before you cut a single inch. Natural fibers tend to shrink, and there is nothing more frustrating than finishing a beautiful Fabric Chair Cover only to have it become too tight after the first laundry cycle. Using a mild detergent and drying it on a medium setting will stabilize the fibers. This ensures your final piece maintains its dimensions throughout its entire lifespan.
In addition to the main textile, you will need high-quality all-purpose polyester thread. This type of thread is preferred for home decor because it has a slight give and won’t rot over time like 100% cotton thread might. For a professional finish in this Fabric Chair Cover – Tutorial, consider using a heavy-duty needle (size 90/14 or 100/16) to handle the multiple layers of fabric at the seams.
Supporting materials like piping cord, velcro, or decorative ribbons can add a high-end “boutique” look to your project. Piping provides structural integrity to the edges, helping the cover hold its shape against the chair’s corners. If you are aiming for a shabby chic style, long fabric ties at the back are a functional and beautiful way to secure the cover without complex closures.
Lastly, make sure you have a set of sharp fabric shears and plenty of quilting pins. Taking the time to properly pin your fabric while it is draped inside-out on the chair is the secret to a custom fit. This Fabric Chair Cover – Tutorial emphasizes precision, so having a fabric marking pen or tailor’s chalk handy will help you trace the seams accurately before you head to the sewing machine.
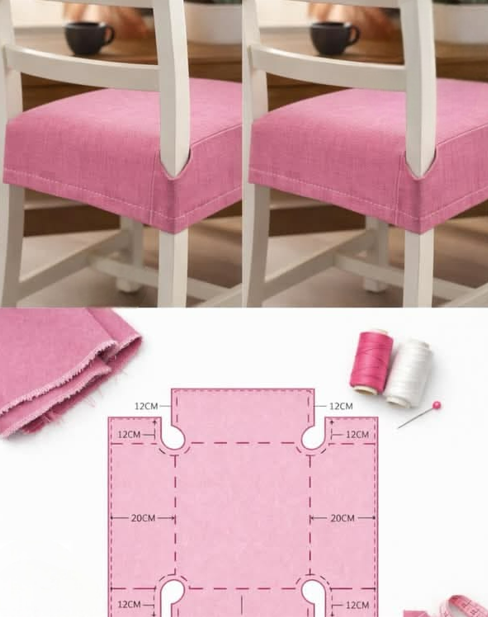
2. Accurate Measurements and Pattern Creation
The most critical phase of this Fabric Chair Cover – Tutorial is the measuring process. You must measure the total height of the chair back, the width of the widest point, and the depth of the seat. Always add a seam allowance of at least 1.5 centimeters to every side. It is better to have a slightly loose cover that you can take in than one that is too small to fit over the frame.
To create a DIY pattern, many experts recommend the “draping method” used in high-end tailoring. Instead of paper, you can use an old bedsheet or muslin fabric to drape over the chair and pin it directly into the shape you want. Mark the lines where the pieces meet, and this becomes your template. This Fabric Chair Cover – Tutorial technique ensures that unique curves or tapered legs are accounted for perfectly.
When measuring the seat area, consider if your chair has a removable cushion. If it does, you might want to create a two-piece Fabric Chair Cover—one for the frame and one for the cushion. This allows for better movement and a much neater appearance. Ensure you measure the thickness of the seat, as this “box” shape requires a side panel, often referred to as a gusset, to sit flat.
For the back of the chair, decide if you want a full-length skirt or a short, “cap-style” cover. A full-length Fabric Chair Cover can hide ugly chair legs and create a formal atmosphere for weddings or dinner parties. If you choose a skirt, measure from the seat down to about 2 centimeters above the floor. This prevents the fabric from gathering dust or causing a tripping hazard while still providing full coverage.
Keep a detailed sketchbook or a digital note of all your dimensions. In this Fabric Chair Cover – Tutorial, we recommend labeling each piece: “Back Front,” “Back Rear,” “Seat,” and “Skirts.” This organization is vital when you start laying your pieces onto your fashion fabric. It prevents the common mistake of cutting two “left” sides or forgetting to leave extra room for the hem at the bottom.
If your chair has arms, the complexity increases, but the logic remains the same. You will need to measure the inner arm, outer arm, and the front scroll. Treat each surface as a flat plane and connect them with seams. This Fabric Chair Cover – Tutorial approach breaks down a complex 3D object into manageable 2D shapes, making the sewing process much less overwhelming for a hobbyist.
3. Step-by-Step Sewing and Assembly Process
Now that your pieces are cut, it is time to assemble your Fabric Chair Cover. Start by sewing the back front to the back rear pieces, right sides together. Always use a straight stitch for the main seams and follow up with a zigzag stitch or a serger on the raw edges to prevent fraying. This ensures that your work inside the Fabric Chair Cover – Tutorial is as durable as it is beautiful.
Once the back section is finished, slide it onto the chair to check the fit. This is the “fitting” stage of our Fabric Chair Cover – Tutorial. If it feels too loose, you can pin it tighter while it is on the chair and sew a new line. It is much easier to make adjustments now than after the seat is attached. Once satisfied, move on to joining the seat panel to the bottom of the back section.
When sewing corners, specifically where the seat meets the backrest, it is helpful to notch the fabric. By cutting small “V” shapes into the seam allowance at the corners, the fabric can spread and lay flat rather than bunching up. This small detail is what separates a homemade-looking Fabric Chair Cover from a professional-grade slipcover. Take your time with these pivot points.
If you are adding a skirt or a ruffle, this is the stage to do it. Pleated skirts offer a modern, clean look, while gathered ruffles provide a more traditional, cozy feel. Pin the skirt to the bottom edge of the seat, ensuring the pleats are evenly spaced. This Fabric Chair Cover – Tutorial suggests using a walking foot on your sewing machine if you are working with very thick layers to ensure even feeding.
Closures are the next step in our Fabric Chair Cover – Tutorial. For a snug fit, an invisible zipper along one of the back seams is a fantastic option. If you prefer something simpler, you can leave the back bottom open and use velcro strips or large buttons. The goal is to make the cover easy to remove so that the “humanized” aspect of your home remains practical and easy to clean.
The final sewing task is the bottom hem. Double-fold the bottom edge of the skirt or seat to hide the raw edges and sew a clean line all the way around. Using a topstitch can add a decorative element here. Once finished, give your new Fabric Chair Cover a thorough pressing with a steam iron. Heat helps the seams “set” and gives the entire project a crisp, high-quality finish that looks like it came from a designer store.
4. Maintenance and Customization Tips
Maintaining your Fabric Chair Cover is essential for longevity. Because these items are used daily, they are prone to spills and dust. By following this Fabric Chair Cover – Tutorial, you have created a piece that is machine washable. We recommend washing on a delicate cycle with cold water and air-drying to prevent any further shrinkage, preserving the perfect fit you worked so hard to achieve.
To keep your Fabric Chair Cover looking fresh, you can apply a fabric protector spray. This adds an invisible layer that repels liquids, giving you time to wipe away a spill before it soaks into the fibers. This is particularly useful if you have children or pets. Regularly vacuuming the covers with an upholstery attachment also prevents dust from becoming embedded in the weave of the textile.
Customization is where you can truly have fun with the Fabric Chair Cover – Tutorial. Consider adding embroidery, applique, or even fabric paint to create a one-of-a-kind design. For holiday themes, you could create a set of covers in red and green, or use soft pastels for a springtime refresh. The beauty of a DIY project is that you are the lead designer of your environment.
If you find that your cover shifts when people sit down, you can use upholstery pins or “tuck grips” (small foam tubes) pushed into the crevices of the chair. This keeps the Fabric Chair Cover taut and prevents it from looking messy. In this Fabric Chair Cover – Tutorial, we emphasize that a good fit is 50% sewing and 50% how you secure it to the furniture.
You can also experiment with color blocking. Using a different color for the seat and the back can create a very modern, “high-fashion” look. If you have leftover fabric, why not sew a matching throw pillow or a small table runner? This creates a cohesive “humanized” aesthetic throughout the room, linking your craft projects together into a professional interior design scheme.
Finally, remember that your skills will grow with every project. This Fabric Chair Cover – Tutorial is just the beginning. You can apply these same draping and sewing principles to sofas, ottomans, and even car seats. Sharing your results with a community of fellow makers can provide inspiration and new ideas for your next handmade home decor adventure. Your journey into textile transformation has only just started!
FAQ – Frequently Asked Questions
What is the best fabric for a beginner’s Fabric Chair Cover?
For beginners, a medium-weight cotton duck or twill is ideal. These fabrics are sturdy, don’t slip while sewing, and are very forgiving. They are also widely available in many colors and patterns, making them perfect for your first Fabric Chair Cover – Tutorial project.
How much fabric do I need for a standard dining chair?
Generally, you will need about 1.5 to 2 meters of fabric per chair, depending on whether you want a full skirt. It is always wise to buy an extra half-meter to account for mistakes or matching patterns. Always measure twice before purchasing!
Can I make a Fabric Chair Cover without a sewing machine?
While a sewing machine is much faster and provides stronger seams, you can technically sew a cover by hand using a backstitch. However, for durability and a professional look, a machine is highly recommended for this Fabric Chair Cover – Tutorial.
How do I prevent the cover from sliding off?
Using ties, elastic hems, or velcro under the seat are the best ways to keep it secure. You can also use non-slip fabric shelf liner placed between the chair and the cover to add extra grip.
Do I need to line my chair covers?
Lining is not strictly necessary, but it does add a layer of luxury and helps the cover last longer. If you are using a light-colored fabric to cover a dark chair, a white lining will prevent the original color from showing through.
Is it cheaper to make or buy chair covers?
Making your own is usually cheaper, especially if you want high-quality fabric. Commercial covers are often made of thin, stretchy material. By following a Fabric Chair Cover – Tutorial, you get a custom fit and superior fabric for a fraction of the price of a custom upholstery service.
Conclusion
In this Fabric Chair Cover – Tutorial, we have covered everything from selecting the right textile to the final topstitching. By taking precise measurements, creating a custom pattern through draping, and using proper sewing techniques, you have the power to completely revitalize your home furniture.
This project not only saves money but also allows you to infuse your personal “humanized” touch into your living space, making it truly unique.