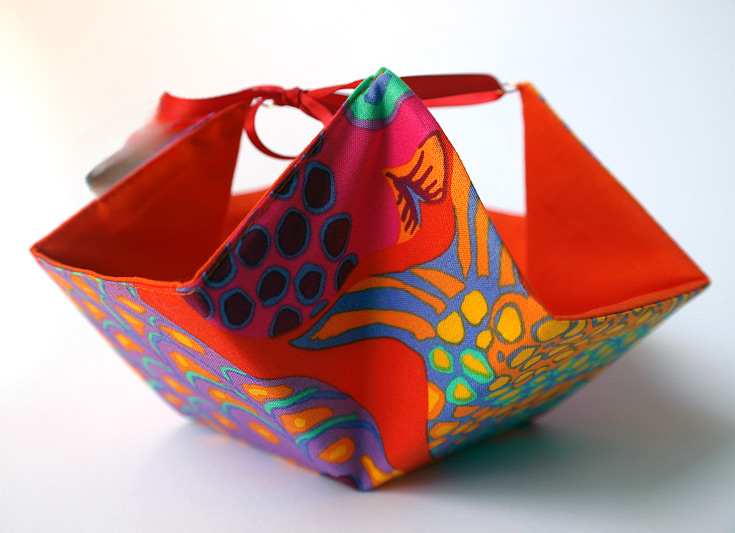
Creating a Fabric Basket with Ties – Tutorial is one of the most rewarding projects for both beginners and seasoned sewists looking to organize their homes with a touch of handmade charm. These versatile containers are perfect for storing everything from craft supplies and nursery essentials to warm bread on the dinner table. By following a Fabric Basket with Ties – Tutorial, you gain the ability to customize your storage solutions to match any room’s decor, choosing specific fabric patterns and interfacing weights that provide both beauty and structural integrity.
This Fabric Basket with Ties – Tutorial focuses on a design that is as functional as it is aesthetic, featuring side ties that allow the basket to be folded flat when not in use or expanded to hold larger items. The beauty of a sewing project like this lies in its simplicity; you don’t need complex machinery or years of experience to achieve a professional-looking result. With just a few basic materials like cotton fabric, fusible fleece, and a standard sewing machine, you can create a collection of handmade baskets that look like they came straight from a high-end boutique.
Engaging with a Fabric Basket with Ties – Tutorial also provides a fantastic opportunity to practice essential sewing techniques such as topstitching, squaring corners, and applying interfacing. Beyond the practical skills, making your own DIY fabric bins is an eco-friendly alternative to purchasing plastic storage containers. It allows you to upcycle fabric scraps or use fat quarters you’ve been saving for a special occasion. Throughout this guide, we will break down every step to ensure your finished project is sturdy, stylish, and exactly what you envisioned.
1. Essential Materials for Your Fabric Basket with Ties – Tutorial
To begin this Fabric Basket with Ties – Tutorial, you will first need to gather high-quality quilting cotton or linen-blend fabric. Choosing the right material is crucial because the weight of the cloth determines how well the basket will stand on its own. I recommend picking two contrasting prints—one for the exterior and one for the lining—to give your fabric storage bin a pop of color when the edges are folded over.
Next, you must select the appropriate interfacing or stabilizer. For a soft yet structured look, fusible fleece (like Pellon 987F) is the gold standard for any Fabric Basket with Ties – Tutorial. If you prefer a very stiff basket that won’t slouch, you might consider a heavyweight firm stabilizer like Peltex. This layer is what transforms a floppy piece of cloth into a functional, upright container.
You cannot complete a Fabric Basket with Ties – Tutorial without the “ties” themselves. You can make these using matching fabric strips, or for a quicker and more rustic look, use twill tape, grosgrain ribbon, or cotton cord. Ensure you have about two yards of your chosen tie material to allow for generous bows at each corner, which adds to the overall decorative appeal of the piece.
Standard sewing notions are also required, including all-purpose polyester thread in a coordinating color. Since you will be sewing through multiple layers of fabric and fleece, a 90/14 universal needle or a denim needle is highly recommended to prevent skipped stitches. Using a rotary cutter and a self-healing mat will also help you achieve the precise 90-degree angles necessary for a symmetrical basket.
Marking tools are a must-have for this Fabric Basket with Ties – Tutorial. Use a water-soluble fabric pen or tailor’s chalk to mark your stitch lines and tie placements. Precision at the marking stage ensures that your fabric ties are perfectly centered and that the “box” shape of your basket is uniform on all four sides once it is fully assembled.
Lastly, don’t forget your iron and ironing board. In any sewing tutorial, pressing is often the difference between a project that looks “homemade” and one that looks “handmade.” You will need the iron to fuse the fleece to your fabric and to crisp up the edges of your fabric ties and the top rim of the basket for a clean, sharp finish.
2. Cutting and Preparing Your Fabric Pieces
The first active step in our Fabric Basket with Ties – Tutorial is cutting your fabric to size. For a medium-sized basket, you will typically need two squares of outer fabric, two squares of lining fabric, and two squares of fusible fleece, all measuring 15×15 inches. This size is manageable for beginners and results in a final product that is roughly 5 inches deep, 5 inches wide, and 5 inches tall.
Once your squares are cut, you need to prepare the “notches” that create the basket’s depth. In this Fabric Basket with Ties – Tutorial, we use a technique called boxing corners. At each of the four corners of your 15-inch squares, cut out a 5×5 inch square. This will leave you with a “plus sign” or cross shape, which is the foundational geometry for a collapsible fabric basket.
Now it is time to apply the fusible fleece. Lay your exterior fabric pieces wrong-side up on your ironing board and place the fleece on top, glue-side down. Press firmly with a hot steam iron, following the manufacturer’s instructions. This step in the Fabric Basket with Ties – Tutorial is vital because it bonds the layers together, preventing the fabric from shifting or wrinkling during the sewing process.
If you are making your own fabric ties instead of using ribbon, cut four strips of fabric measuring 2 inches wide by 12 inches long. Fold them in half lengthwise, press, then fold the raw edges toward the center crease and press again. Topstitch along the open edge to create a clean, finished tie. Preparing these early in the Fabric Basket with Ties – Tutorial keeps your workflow organized and efficient.
Take a moment to check the orientation of your fabric prints. If you are using a directional print (where the pattern has a specific “up” and “down”), ensure that the pattern is facing the correct way on all four sides of the “plus” shape. This attention to detail is a hallmark of a high-quality Fabric Basket with Ties – Tutorial and ensures your finished basket doesn’t have upside-down flowers or animals.
Before moving to the sewing machine, stay organized by clipping your pieces together. Use sewing clips (like Wonder Clips) instead of pins to hold the fleece-backed fabric, as pins can sometimes struggle with the thickness and leave permanent holes in some delicate fabrics. Having everything prepped and ready makes the next phase of the Fabric Basket with Ties – Tutorial much more enjoyable.
3. Assembling the Basket and Attaching Ties
The assembly phase of the Fabric Basket with Ties – Tutorial begins with joining the side seams. With the right sides together, fold up the sides of your “plus” shape and sew the vertical seams using a 1/4 inch seam allowance. Do this for both the exterior fabric and the lining fabric. You will notice the 3D shape of the basket starting to form immediately, which is always an exciting moment in any DIY project.
When sewing the lining, remember a crucial tip for this Fabric Basket with Ties – Tutorial: leave a 3-to-4-inch opening at the bottom of one of the side seams. This “turning hole” is essential for flipping the basket right-side out later. Use a backstitch at the beginning and end of this gap to ensure the stitches don’t unravel when you are pulling the heavy interfaced fabric through it.
Now, let’s attach the fabric ties. In this Fabric Basket with Ties – Tutorial, the ties are placed at the top corners of the exterior basket. Pin one tie to the right side of the exterior fabric, about 1/2 inch down from the top edge at each corner. Ensure the long ends of the ties are tucked inside the basket “bucket” so they don’t get caught in the side seams as you continue to sew.
Next, place the exterior basket inside the lining basket, ensuring right sides are touching. The “pretty” sides of the fabric should be facing each other. Align the top raw edges and the side seams perfectly. This is a critical junction in the Fabric Basket with Ties – Tutorial, as alignment here determines if your basket rim will be straight or wonky once it is finished.
Sew all the way around the top perimeter of the basket using a 3/8 inch seam allowance. Take your time sewing over the areas where the fabric ties are sandwiched, as these layers can be quite thick. If your machine struggles, use the hand wheel to guide the needle through the bulk. This ensures a secure attachment for the ties, which will be under tension when the basket is tied shut.
Reach through the opening you left in the lining and carefully pull the exterior fabric through. This is often called “birthing” the basket. Once it is right-side out, tuck the lining into the exterior. Use a turning tool or a blunt chopstick to push out the corners for a sharp look. This Fabric Basket with Ties – Tutorial step finishes with a good press of the top edge to prepare for the final decorative touches.
4. Finishing Touches and Customization Tips
The final structural step in our Fabric Basket with Ties – Tutorial is topstitching. Stitch a neat line about 1/8 inch from the top folded edge of the basket. This not only gives the project a professional, “store-bought” appearance but also keeps the lining from rolling toward the outside. It also provides extra reinforcement to the fabric ties, ensuring they stay firmly attached through years of use.
Don’t forget to close the hole in the lining! You can do this by folding the raw edges inward and sewing a very narrow topstitch across the gap. Since this is at the bottom of the inside of the basket, a machine stitch is perfectly acceptable, though some purists following this Fabric Basket with Ties – Tutorial may prefer a ladder stitch (invisible hand stitch) for a flawless interior.
One of the best things about this Fabric Basket with Ties – Tutorial is how easy it is to customize. You can add quilt batting and perform free-motion quilting on the exterior panels before assembly for a textured, cozy look. Alternatively, adding a layer of chalkboard fabric to one side allows you to label the contents of your organized storage bins, making them perfect for a playroom or pantry.
If you want a different aesthetic, consider using eyelets or grommets instead of sewing the ties directly into the seams. This allows you to swap out different ribbons or cords depending on the season. This variation of the Fabric Basket with Ties – Tutorial is popular for holiday gift baskets, where you might want to use festive velvet ribbons that can be removed after the holidays.
Consider the scale of your project. This Fabric Basket with Ties – Tutorial can be scaled up or down simply by changing the initial square size and the size of the corner cut-outs. A tiny 6×6 inch square with 2-inch cut-outs makes a perfect jewelry dish, while a large 24-inch square can create a substantial laundry hamper or toy bin, provided you use extra-heavy stiff interfacing.
To maintain your creation, remember that most cotton fabric baskets are machine washable. However, due to the fusible fleece and structure, I recommend washing on a delicate cycle and air drying. Reshape the basket while damp and give it a quick steam press once dry to restore the crisp edges you achieved during this Fabric Basket with Ties – Tutorial. Your handmade basket is now ready to beautify your home!
FAQ – Frequently Asked Questions
What is the best fabric for a fabric basket?
For the best results in a Fabric Basket with Ties – Tutorial, use 100% quilting cotton, canvas, or linen. These fabrics are easy to sew, take interfacing well, and come in endless prints. Avoid very stretchy knits or extremely thick upholstery fabrics unless you are an experienced sewist with a heavy-duty machine.
Can I make this basket without a sewing machine?
While a machine is much faster, you can certainly follow this Fabric Basket with Ties – Tutorial using hand sewing. Use a strong backstitch for the seams to ensure the basket can hold weight. It will take significantly longer, but the result will be a charming, hand-crafted heirloom.
My basket is too floppy, what did I do wrong?
If your basket doesn’t stand up, the issue is usually the interfacing. Ensure you used a high-quality fusible fleece or stiff stabilizer. Also, make sure the fleece was fused properly with enough heat and pressure. For very large baskets, you may need to apply interfacing to both the exterior and the lining fabrics.
How do I clean my fabric basket?
Most baskets made via this Fabric Basket with Ties – Tutorial can be spot-cleaned with a damp cloth. For a deeper clean, hand wash in cool water with mild detergent and air dry. Avoid the dryer, as high heat can sometimes cause the fusible interfacing to ripple or peel away from the fabric.
Can I use ribbon instead of making fabric ties?
Absolutely! Using ribbon, twill tape, or leather cord is a great way to save time. Just make sure the ribbon is durable; grosgrain is usually better than satin because it holds a knot or bow more securely without slipping.
Conclusion
In this Fabric Basket with Ties – Tutorial, we have covered everything from selecting the right stabilizers and cotton fabrics to the final topstitching that gives your project a polished look.
You’ve learned how to box corners, apply fusible fleece, and create functional fabric ties that make these baskets as versatile as they are beautiful. These baskets are more than just storage; they are a testament to your creativity and a practical way to bring order to any space in your home.