The Circular tote shoulder Bag Fabric – Tutorial is your gateway to creating a stylish, eco-friendly accessory that blends geometric flair with everyday utility. Making your own circular tote shoulder bag allows you to showcase unique fabric patterns while mastering the art of sewing curved seams, a skill that elevates any DIY sewing project. This comprehensive guide will walk you through every step, ensuring your finished shoulder bag looks professional, remains durable, and serves as a sustainable alternative to store-bought fashion.
To begin this Circular tote shoulder Bag Fabric – Tutorial, you should focus on selecting the right materials, as the weight of your fabric determines the bag’s structure and longevity. Heavy-duty options like denim remnants, canvas, or upholstery fabric are ideal for maintaining that iconic round shape without sagging. If you prefer a softer look, you can use quilted cotton paired with a firm interfacing to provide the necessary support for the circular design.
Proper preparation is the secret to success when working on a circular tote shoulder bag fabric project. You will need to create a circular pattern template—a simple task using a compass or a large household item like a pizza pan—to ensure your fabric circles are perfectly symmetrical. In the following sections, we will dive into the technical details of cutting fabric, sewing gussets, and attaching sturdy shoulder straps to complete your personalized handcrafted tote bag.
1. Selecting the Best Fabric and Essential Tools
The first step in any Circular tote shoulder Bag Fabric – Tutorial is gathering high-quality materials that can withstand daily wear and tear. For the exterior, sturdy cotton duck or upcycled denim works wonders because these materials hold their shape well when cut into large circles. You will also need a coordinating lining fabric, such as lightweight calico or poplin, to give the interior of your shoulder bag a clean and finished appearance.
Don’t forget the importance of fusible interfacing in this fabric bag tutorial. Applying a layer of medium-weight interfacing to the back of your circular fabric pieces prevents the bag from losing its form when filled with your essentials. This extra step is what distinguishes a homemade bag from a high-quality handcrafted accessory, giving it a crisp, boutique-like finish that many sewing enthusiasts strive for.
In terms of tools, ensure you have heavy-duty sewing machine needles (size 90/14 or 100/16) if you are working with thicker fabrics like denim. A rotary cutter and a self-healing cutting mat are highly recommended for achieving the smooth, precise edges required for a circular tote. Precision is vital here because even a slight wobble in your cut can lead to uneven seams during the assembly process.
Threads should be all-purpose polyester or heavy-duty nylon depending on the weight of your circular tote shoulder bag fabric. Matching the thread color to your main fabric creates a seamless look, while using a contrasting color can add a decorative “topstitch” effect that highlights the bag’s unique geometry. Having a good set of sewing clips is also better than pins for this project, as clips hold multiple layers of thick fabric and interfacing more securely.
Measuring is the backbone of the Circular tote shoulder Bag Fabric – Tutorial. You will need a flexible measuring tape to calculate the circumference of your fabric circles, which helps in determining the exact length of the zipper gusset or the side panel. Accurate measurements ensure that all components fit together like a puzzle, preventing frustrating “leftover” fabric or gaps at the end of your sewing session.
Lastly, consider adding hardware like magnetic snaps, D-rings, or swivel hooks to your tote shoulder bag. While optional, these elements increase the functionality of your circular tote, allowing for secure closures or adjustable shoulder straps. Organizing all these sewing supplies before you start will make the creative process much more enjoyable and efficient as you follow this step-by-step fabric tutorial.
2. Cutting the Circles and Preparing the Gusset
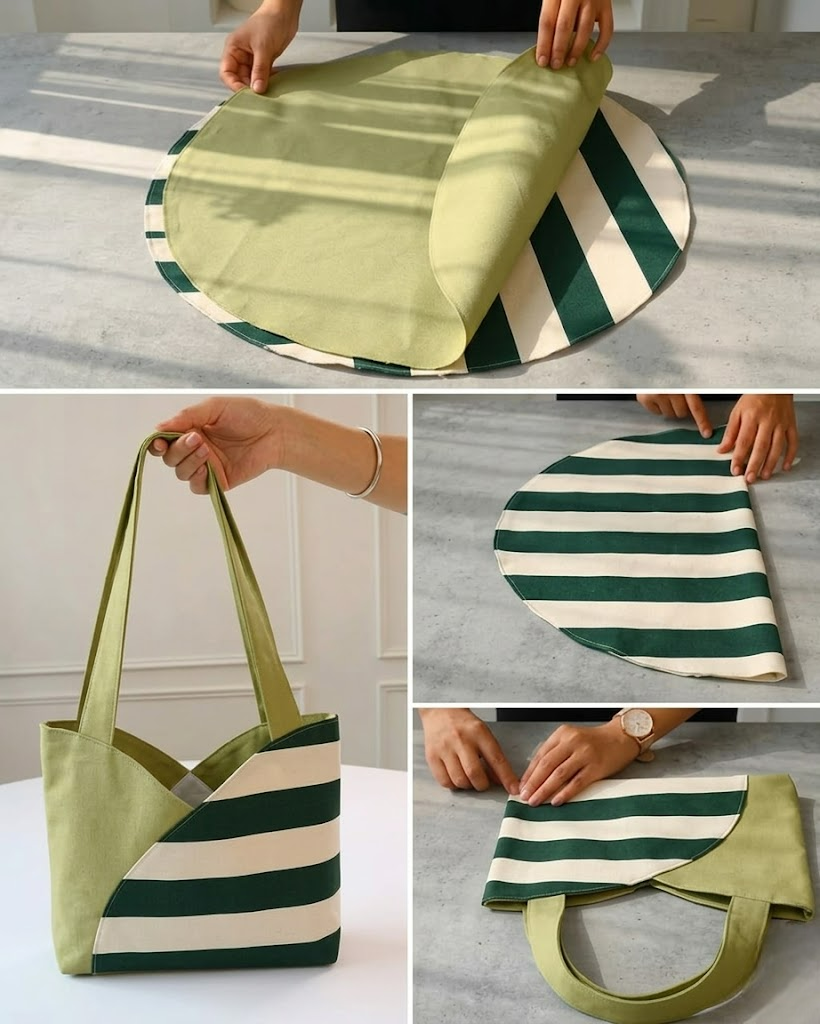
The core identity of the Circular tote shoulder Bag Fabric – Tutorial lies in its shape, which requires cutting two identical fabric circles for the front and back. Fold your main fabric in half, place your round template on top, and secure it with weights before cutting. You will repeat this process for the lining fabric and the interfacing, resulting in six circular pieces in total that will form the body of your shoulder bag.
The gusset is the long strip of fabric that connects the two circles, providing the bag with depth and “roominess.” To calculate the length of the gusset, multiply the diameter of your circle by 3.14 (Pi), or simply walk your measuring tape around the edge of the circle. This sewing technique ensures the side panel wraps perfectly around the circular tote, creating a professional three-dimensional structure.
Once your fabric strips for the gusset are cut, it is time to prepare the zipper closure. Most circular tote shoulder bags feature a zipper across the top curve for security. You will need to split your top gusset fabric lengthwise and sandwich a nylon coil zipper between the exterior fabric and the lining. This creates a “hidden” zipper look that is both aesthetic and functional for a modern tote bag.
Applying the interfacing is the next crucial phase in the Circular tote shoulder Bag Fabric – Tutorial. Using a hot iron, fuse the interfacing to the wrong side of your exterior fabric circles and the gusset strips. This step adds the “body” needed to support the weight of items like a wallet, phone, or book, ensuring your circular shoulder bag doesn’t collapse under its own weight.
Preparing the shoulder straps involves cutting two long strips of fabric, usually about 30 inches long and 4 inches wide. Fold these strips lengthwise, sew along the edge, and turn them right side out to create durable bag handles. For extra comfort, you can insert cotton webbing inside the fabric tubes, making the shoulder straps stronger and more comfortable for long-term wear.
Before moving to the final assembly, double-check that all your fabric components are notched. Small “V” shaped clips around the edges of the circular pieces and the gusset help align the centers and sides perfectly. This alignment technique is a staple in advanced sewing tutorials, as it prevents the fabric from shifting or bunching while you navigate the curves on your sewing machine.
3. Assembling the Circular Body and Straps
Now we reach the most exciting part of the Circular tote shoulder Bag Fabric – Tutorial: bringing the pieces together. Start by pinning or clipping the gusset to the first exterior fabric circle, right sides facing together. Slow and steady wins the race when sewing curves; use a shorter stitch length to ensure the seam is strong and the curve remains smooth and perfectly round.
After the first circle is attached, repeat the process with the second fabric circle. Ensure the zipper is partially open before you finish sewing; this is a common “pro-tip” in DIY bag making so you can turn the bag right side out later. At this stage, your circular tote shoulder bag will start looking like a real accessory, and you can see the fabric patterns beginning to pop.
Attaching the shoulder straps requires precision to ensure the bag hangs correctly on your shoulder. Position the ends of the straps about 4 to 5 inches apart on the top of the gusset, near the zipper ends. Reinforce these points with a “box stitch” (a square with an X inside) to ensure the straps never pull away from the fabric body, even if the bag is heavily loaded.
The lining assembly follows the same steps as the exterior, but you must leave a 5-inch opening at the bottom of one lining circle. This “turning gap” allows you to pull the entire exterior bag through the lining, hiding all the raw seam allowances inside. This bag-making method, often called “birthing the bag,” results in a clean, professional interior that mirrors high-end fabric shoulder bags.
Once the exterior and lining are joined at the top edge, carefully turn the bag right side out through the hole in the lining. Use a blunt tool or your fingers to push out the circular seams, ensuring the tote bag achieves its full round potential. The fabric should sit flat and smooth, showcasing the tutorial’s focus on clean lines and structural integrity.
The final construction step in this Circular tote shoulder Bag Fabric – Tutorial is topstitching around the zipper and the top rim of the bag. This not only looks beautiful but also prevents the lining fabric from getting caught in the zipper teeth. Use a slightly longer stitch for topstitching to give it a decorative “hand-finished” look that highlights your hard work and sewing skills.
4. Finishing Touches and Styling Tips
To complete your Circular tote shoulder Bag Fabric – Tutorial, you must close the opening in the lining. You can do this with a quick machine stitch close to the edge or a ladder stitch by hand for a completely invisible finish. Once closed, tuck the lining inside the circular bag and give the entire project a final press with a steam iron to set the seams and smooth the fabric.
Adding a personalized touch can make your shoulder bag truly one-of-a-kind. Consider attaching a fabric tassel, a crocheted flower, or even a monogrammed patch. These small details increase the “boutique” value of your DIY project and allow you to express your personality through your handcrafted tote.
Maintaining your circular tote shoulder bag fabric is easy if you chose the right materials. Most cotton and denim bags can be spot-cleaned or gently hand-washed to keep them looking fresh. If you used upcycled materials, your bag is not only a fashion statement but also a testament to sustainable crafting and the beauty of giving old fabric a new life.
Styling a round bag is effortless because the geometric shape acts as a focal point for any outfit. Whether you are heading to the beach with a canvas tote or running errands with a denim shoulder bag, the circular design adds a touch of modern sophistication. It pairs beautifully with flowy summer dresses, casual jeans, or even structured blazers, making it a versatile addition to your wardrobe.
If you enjoyed this Circular tote shoulder Bag Fabric – Tutorial, consider making a “mini” version for use as a circular crossbody bag. By simply adjusting the diameter of your fabric circles and lengthening the strap, you can create a whole collection of round bags for different occasions. The sewing techniques you learned here are foundational and can be applied to many other fabric craft projects.
Share your creation with the sewing community! Posting photos of your finished circular tote on social media or craft forums helps inspire others to start their own sewing journey. Using high-quality fabric and following these SEO-optimized steps ensures that you’ve created something both beautiful and durable—a true masterpiece of fabric art.
FAQ: Common Questions About the Circular Tote Bag
1. What is the best fabric for a circular tote?
The best fabric for a circular tote shoulder bag is something sturdy like canvas, denim, or duck cotton. These materials provide the necessary structure to keep the bag round. For a softer feel, you can use quilted cotton with a firm interfacing.
2. Is sewing a circular bag difficult for beginners?
It is a moderate project. While sewing curves requires a bit more patience than straight lines, this tutorial breaks it down into manageable steps. Using sewing clips and notches makes the process much easier for those new to bag making.
3. How much fabric do I need for this tutorial?
Generally, half a yard of exterior fabric and half a yard of lining fabric is enough for a standard 12-inch circular tote. If you are making longer shoulder straps, you might want to have a full yard of the main fabric just to be safe.
4. Why do I need interfacing for a fabric bag?
Interfacing acts as the “skeleton” of your bag. Without it, a circular bag made of regular fabric will look floppy and lose its shape. It ensures your shoulder bag looks professional and stays upright when you set it down.
5. Can I make this bag without a zipper?
Yes! You can leave the top open like a traditional tote or use a magnetic snap or a button closure. However, a zipper provides the most security for your belongings in a circular shoulder bag.
6. Can I use upcycled jeans for this project?
Absolutely! Upcycling old jeans is a fantastic way to get durable denim for free. The seams and pockets of the jeans can even be incorporated into the circular design for an edgy, recycled fashion look.
Conclusion
This Circular tote shoulder Bag Fabric – Tutorial has provided you with all the essential steps to create a stunning, functional, and trendy accessory from scratch. From selecting the perfect durable fabric and applying fusible interfacing to mastering the art of sewing curved seams, you now possess the skills to produce a high-quality handcrafted bag. We have explored how the gusset adds depth and how the shoulder straps provide comfort and style, resulting in a circular tote that is as practical as it is beautiful.
Creating your own fabric shoulder bag is more than just a DIY project; it is an exercise in creativity and sustainable fashion. By following this structured tutorial, you have learned SEO-friendly sewing techniques that will serve you in all your future crafting endeavors. We hope this guide inspires you to experiment with different fabric textures and colors to make a bag that truly reflects your personal style.