Hair elastics with padded fabric bow – Tutorial is the ultimate guide for those looking to transform a simple hairstyle into a sophisticated fashion statement using basic sewing skills. In the world of DIY accessories, the hair elastics with padded fabric bow have gained immense popularity because they offer a comfortable grip without damaging the hair, while the padded bow adds a three-dimensional, high-end look that flatters various hair textures and lengths. Whether you are a seasoned crafter or a complete beginner, this project is designed to be accessible, rewarding, and highly customizable to match your personal wardrobe or even to start a small boutique business.
Creating your own hair accessories allows for a level of personalization that store-bought items simply cannot match. By following this hair elastics with padded fabric bow – tutorial, you can choose specific fabric types like silk, velvet, or cotton prints that align with current fashion trends or seasonal themes. The “padded” element is the secret ingredient here; it provides a soft, pillowy structure that stays upright and maintains its shape throughout the day, unlike flat ribbons that can often look limp or unprofessional. This tutorial focuses on durability and aesthetics, ensuring your finished product is both beautiful and functional.
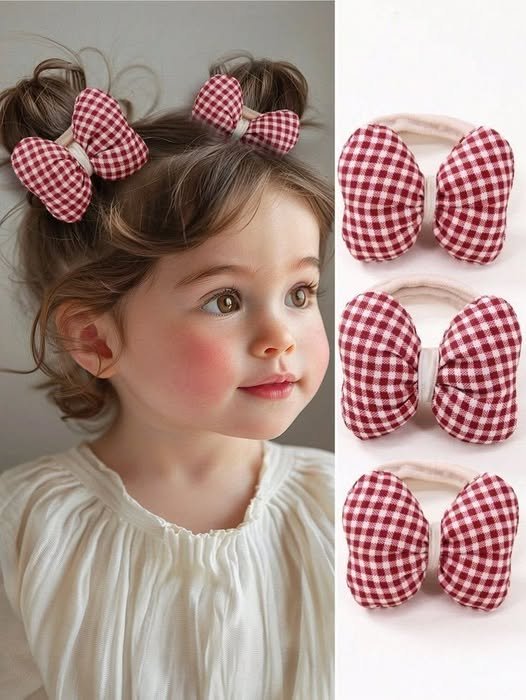
Before we dive into the technical steps, it is important to understand why the hair elastics with padded fabric bow is such a versatile choice for people of all ages. For children, the soft padding ensures there are no sharp edges, and for adults, the elegant fabric choice can elevate a professional ponytail or a casual “messy bun.” Throughout this comprehensive guide, we will explore the materials needed, the step-by-step assembly process, and professional tips to make your DIY fabric bows look like they were plucked straight from a luxury department shelf. Let’s get started on your creative journey today.
1. Essential Materials for Your Hair Elastics with Padded Fabric Bow – Tutorial
The first step in any successful DIY project is gathering high-quality materials that ensure longevity. For this hair elastics with padded fabric bow – tutorial, you will primarily need high-quality fabric scraps, preferably 100% cotton or polyester blends that are easy to sew and wash. The fabric choice defines the “vibe” of your accessory, so consider vibrant patterns for summer or deep jewel tones for winter.
To achieve that signature “cushiony” feel, you will need polyester fiberfill or thin quilt batting. This is what makes the bow “padded” rather than flat. A small amount goes a long way, so you can often use leftovers from other sewing projects. This padding is essential for giving the fabric bow its iconic 3D shape that stands out in any hairstyle.
For the base of the accessory, select durable seamless hair elastics. It is vital to use elastics that do not have metal joiners, as these can snag the hair and break the fabric over time. High-quality hair ties provide the necessary tension to hold the weight of the padded bow without slipping down during the day.
You will also need standard sewing tools: a sharp pair of fabric scissors, matching polyester thread, and a sewing machine (though hand-sewing is also possible). Using a rotary cutter and a cutting mat can help you achieve perfectly straight lines for your bow rectangles, which is crucial for a symmetrical, professional finish.
Don’t forget a fabric marker or tailor’s chalk to trace your patterns. Precision at the cutting stage prevents uneven edges when you turn the fabric right side out. Having a loop turner or a simple safety pin will also be helpful for the smaller fabric components of the hair elastics with padded fabric bow.
Lastly, a hot glue gun or strong fabric glue can be used for the final assembly if you prefer not to sew the bow onto the elastic. However, for maximum durability, especially if the accessory will be used frequently, we recommend a few hand-stitched reinforcement points to secure the padded fabric bow firmly to the elastic band.
2. Preparing and Cutting Your Fabric Pieces for the Padded Bow
To begin the construction of your hair elastics with padded fabric bow, you need to cut three specific pieces of fabric. The largest piece will be the main body of the bow, usually a rectangle measuring 8 inches by 5 inches. This size is standard for a medium-sized bow, but you can scale it up or down depending on your preference for the hair accessory.
The second piece is the “center strip,” which holds the bow’s shape and attaches it to the hair elastic. This should be a smaller rectangle, roughly 3 inches by 2 inches. This strip will be folded and sewn to hide the raw edges of the padded fabric, creating a clean and polished look in the middle of your design.
If you are using quilt batting instead of loose fiberfill, cut a piece of batting slightly smaller than your main fabric rectangle (about 7.5 inches by 4.5 inches). This ensures that the padding stays centered and doesn’t get caught in the seam allowance when you sew the edges of your fabric bow together.
Place your main fabric pieces right sides together. If you are using interfacing for extra stability, now is the time to iron it onto the wrong side of the fabric. Following the hair elastics with padded fabric bow – tutorial precisely at this stage ensures that your fabric won’t fray or lose its structure after a few wears.
Use your fabric pins to hold the layers in place. It is a common mistake to skip pinning, but with padded bows, the layers can shift easily due to the thickness of the batting. Keeping everything aligned is the “pro-tip” for making handmade hair accessories that look high-end and perfectly symmetrical.
Once cut, you should have your main bow piece, your center strip, and your padding ready. Double-check that your fabric scissors have created clean lines. Any jagged edges might show through once the fabric is turned right side out, so take your time during this preparation phase to ensure the best results for your hair elastics with padded fabric bow.
3. Sewing and Stuffing the Padded Fabric Bow Components
Now, let’s start sewing! Stitch around the perimeter of the large rectangle with a 1/4 inch seam allowance, leaving a small 1-inch gap in the middle of one of the long sides. This gap is crucial because it allows you to turn the fabric bow right side out and insert the padding later. Backstitch at the start and end of your seam for strength.
After sewing, clip the corners of the rectangle carefully, being sure not to cut the stitches. This allows for sharp, crisp corners when the bow is turned. Reach through the gap and pull the fabric through, then use a turning tool or a chopstick to gently push out the corners of your padded fabric bow until they are perfectly square.
If you are using loose polyester fiberfill, start stuffing small clumps through the gap. Distribute the stuffing evenly so the bow is “puffy” but not overstuffed to the point where the fabric pulls at the seams. If you used batting, it should already be inside; simply ensure it is lying flat within the sewn fabric structure.
Once the bow body is stuffed to your liking, use a ladder stitch (also known as an invisible stitch) to close the 1-inch gap. This hand-sewn finish is a hallmark of quality in the hair elastics with padded fabric bow – tutorial, as it makes the seam completely disappear, leaving a flawless exterior for your handmade bow.
Next, sew the center strip by folding it lengthwise, right sides together, and stitching along the edge. Turn it right side out and press it flat with an iron. This strip is what gives the hair elastics with padded fabric bow its “pinched” center, creating that classic bow aesthetic that we all love in hair styling accessories.
Cinch the middle of your large padded rectangle with your fingers to create the bow shape. Wrap the center strip around the pinched area to see how it looks. You want it tight enough to create nice folds in the padded fabric, but not so tight that it distorts the overall shape of the hair tie accessory.
4. Final Assembly and Attaching the Hair Elastic
The final stage of the hair elastics with padded fabric bow – tutorial involves bringing all the pieces together. Take your seamless hair elastic and place it against the back of the cinched bow. You will wrap the center strip around both the middle of the bow and the elastic band itself, locking them together in one secure unit.
You can secure the center strip by hand-sewing the ends together on the back side of the bow. Use a strong upholstery thread or double-strand your regular thread to ensure the hair elastic doesn’t pull away from the bow during use. This mechanical bond is much stronger than glue alone and is highly recommended for long-lasting hair accessories.
If you prefer a faster method, you can use hot glue to secure the strip, but be careful not to get glue on the elastic itself, as this can reduce its stretchiness. The goal is to have the padded fabric bow sit firmly on top of the elastic so that when the hair is tied, the bow remains visible and upright on the head.
Adjust the “poufs” of your bow after the center is secured. Since it is a padded bow, you can fluff the sides to ensure they are even. This volume is what distinguishes this project from a standard ribbon bow, giving it a luxurious, boutique-style appearance that is very popular in modern hair fashion.
Check for any loose threads and trim them away. Give the bow a final gentle press with steam if the fabric allows it, but be careful not to melt the polyester stuffing inside. Your hair elastics with padded fabric bow is now complete and ready to be worn or gifted to a friend!
By mastering this hair elastics with padded fabric bow – tutorial, you have learned the fundamentals of fabric manipulation, stuffing techniques, and accessory assembly. You can now experiment with different sizes, adding lace trim, or even using embroidery on the fabric before sewing to create truly unique, one-of-a-kind handcrafted hair elastics.
FAQ – Frequently Asked Questions
What is the best fabric for making padded hair bows?
The best fabrics are medium-weight cottons, linens, or velvets. They hold their shape well and are easy to sew. Avoid extremely slippery fabrics like thin satin for your first attempt at the hair elastics with padded fabric bow – tutorial, as they can be difficult to stuff evenly.
Can I wash these hair elastics with padded fabric bows?
Yes, if you use washable fabric and polyester fiberfill, you can hand wash them in cold water with mild detergent. Air dry them to maintain the shape of the padded bow and the elasticity of the hair tie.
How do I make the bow stand up better on the head?
The key is the padding and the tightness of the center strip. Using a layer of stiff interfacing or slightly more fiberfill will provide the structural integrity needed for the bow to remain upright when attached to the hair elastic.
Can I make these without a sewing machine?
Absolutely! This hair elastics with padded fabric bow – tutorial can be completed entirely by hand using a simple backstitch for the main seams and a ladder stitch for the closure. It just takes a little more time and patience.
Are these bows suitable for thin hair?
Yes, but you should choose a smaller hair elastic and scale down the dimensions of the fabric bow so it doesn’t weigh down the hair. A smaller, lightweight padded bow looks beautiful on fine hair or half-up hairstyles.
How can I sell these online?
Focus on high-quality photography and use keywords like handmade hair accessories, padded fabric bow, and DIY hair fashion. Platforms like Etsy or Instagram are perfect for showcasing the unique patterns and textures of your hair elastics.
Conclusion
In this hair elastics with padded fabric bow – tutorial, we have covered everything from material selection to the final assembly of a professional-grade hair accessory. We learned how to prepare the fabric, the importance of using polyester padding for a 3D effect, and the best ways to securely attach a hair elastic for daily wear. This project is not only a great way to use up fabric scraps but also a perfect entry point into the world of fashion crafting.
We hope this guide inspires you to create a whole collection of padded bows to match every outfit in your wardrobe. The beauty of the hair elastics with padded fabric bow lies in its simplicity and the endless possibilities for customization. Whether you make them for yourself, as gifts, or to sell, the skills you’ve practiced here are the foundation of great accessory design.