A Bag Gifted with Love, Fabric – Tutorial is more than just a simple DIY project; it is a heartfelt journey into the world of handmade expression and sustainable gifting. In a fast-paced digital age, taking the time to select a beautiful textile and transform it into a functional piece of art sends a powerful message of care and intentionality. This Bag Gifted with Love, Fabric – Tutorial aims to bridge the gap between beginner sewing skills and professional-looking results, ensuring that your next gift is wrapped in something truly special.
When we talk about a Bag Gifted with Love, Fabric – Tutorial, we are focusing on the tactile beauty of natural fibers and the versatility of reusable gift packaging. Unlike paper bags that tear easily and end up in landfills, a fabric gift bag remains a part of the recipient’s life long after the initial surprise. Whether you are using recycled cotton, vintage linen, or vibrant prints, the choice of material dictates the personality of your project and reflects the unique bond you share with the person receiving it.
This comprehensive Bag Gifted with Love, Fabric – Tutorial will guide you through every technical step, from measuring your seam allowance to mastering the drawstring closure. We will explore the essential sewing tools required, the importance of fabric grain lines, and how to add personalized touches like hand-embroidery or custom labels. By the end of this guide, you will have the confidence to create a collection of bags that are not only aesthetically pleasing but also durable and environmentally conscious.
1. Understanding the Essentials of a Bag Gifted with Love, Fabric – Tutorial
Selecting the right textile materials is the cornerstone of any successful sewing project, especially when creating a Bag Gifted with Love, Fabric – Tutorial. You want a fabric that has enough body to hold its shape but is soft enough to cinch tightly if you are making a drawstring version. Popular choices include 100% cotton calico, heavyweight canvas, or even sustainable hemp blends that offer durability and a premium feel.
The cutting process is where precision meets preparation, ensuring that your Bag Gifted with Love, Fabric – Tutorial yields a symmetrical and professional result. Always remember to pre-wash your fabric to prevent shrinking later, and use a rotary cutter and a self-healing mat for the cleanest edges possible. Aligning your pattern pieces with the warp and weft of the fabric ensures that the bag won’t twist or warp after its first wash.
In this Bag Gifted with Love, Fabric – Tutorial, we emphasize the use of high-quality polyester or cotton thread that matches or complements your fabric choice. A reinforced stitch at the stress points, such as the handle attachments or the bottom corners, is vital for a bag intended to carry weight. Taking these small technical steps early on elevates the “homemade” look to a “handcrafted” masterpiece that stands the test of time.
Measurement is another critical factor in our Bag Gifted with Love, Fabric – Tutorial, as it determines the final utility of the bag. Whether you are aiming for a small jewelry pouch or a large tote bag, adding a standard half-inch seam allowance is a rule of thumb you shouldn’t ignore. This extra space provides security for the seams and allows for French seams if you want an extra-clean interior finish without using a serger.
Choosing the right interfacing can make a significant difference in the structure of your Bag Gifted with Love, Fabric – Tutorial. If you are using a lightweight fabric like silk or thin cotton, a fusible fleece or lightweight stabilizer can provide the necessary stiffness. This ensures that your gift bag doesn’t collapse under its own weight and maintains a crisp, high-end appearance even when empty.
Lastly, the concept of the Bag Gifted with Love, Fabric – Tutorial is rooted in the “slow sewing” movement, which encourages crafters to enjoy every stitch. Don’t rush the process; instead, focus on the stitch consistency and the alignment of your fabric patterns. A well-made bag is a reflection of the patience and affection you put into it, making the final product a true symbol of your creative spirit and love.
2. Step-by-Step Construction for the Perfect Gift Bag
The first physical step in our Bag Gifted with Love, Fabric – Tutorial involves pinning your fabric pieces with the “right sides” facing each other. This right-side-to-right-side technique ensures that all raw edges and seams remain hidden on the inside once the bag is turned out. Using quilting clips or fine pins will keep the layers from shifting as you move the fabric through the sewing machine feed dogs.
Next, we move to the stitching phase, which is the heart of the Bag Gifted with Love, Fabric – Tutorial. Use a standard straight stitch for the sides and bottom, ensuring you backstitch at the beginning and end of every run to lock the threads. If you are dealing with fabrics that fray easily, like linen or burlap, consider using a zigzag stitch or an overlock stitch along the raw edges to provide long-term durability.
Creating the casing for the drawstring is a pivotal moment in this Bag Gifted with Love, Fabric – Tutorial. By folding the top edge down twice—first by a quarter inch and then by a full inch—you create a clean “tunnel” for your ribbon or cord. Pressing these folds with a steam iron before sewing is the secret to a perfectly straight casing that doesn’t bunch or pucker during assembly.
Turning the bag “right side out” is often the most satisfying part of the Bag Gifted with Love, Fabric – Tutorial. Use a point turner or a blunt chopstick to gently push out the bottom corners, giving the bag a sharp, professional rectangular or square shape. Once turned, give the entire piece a final press with a hot iron to set the seams and give the fabric a smooth, polished finish.
Thread choice for the drawstring in our Bag Gifted with Love, Fabric – Tutorial can vary from satin ribbons to braided cotton cords. Threading the cord through the casing is made easy with a safety pin or a bodkin. For a professional touch, you can add wooden beads or fabric “tulips” to the ends of the cords to prevent them from slipping back into the casing and to add a decorative flair.
To finish the construction phase of the Bag Gifted with Love, Fabric – Tutorial, consider adding a boxed bottom. By pinching the bottom corners and sewing a straight line across them, you create a flat base that allows the bag to stand upright. This simple geometric adjustment transforms a flat pouch into a three-dimensional container, perfect for holding bulkier gifts like candles, jars, or books.
3. Customization and Embellishment Techniques
Personalization is what truly makes a Bag Gifted with Love, Fabric – Tutorial stand out from store-bought alternatives. You can use fabric markers, iron-on vinyl (HTV), or even block printing to add the recipient’s name or a meaningful quote. These bespoke details turn a simple utility item into a cherished keepsake that the recipient will likely reuse for years to come.
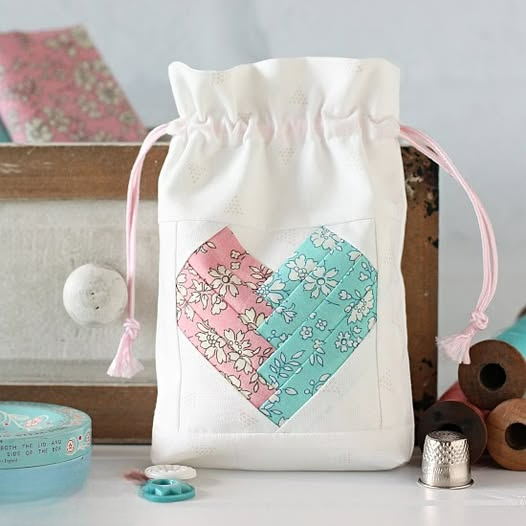
In this Bag Gifted with Love, Fabric – Tutorial, we also explore the beauty of appliqué. By sewing small scraps of contrasting fabric onto the main body of the bag, you can create hearts, stars, or floral patterns. This is not only an excellent way to use up your fabric remnants but also adds a layer of texture and visual interest that makes the bag feel uniquely “gifted with love.”
For those who enjoy traditional crafts, adding hand embroidery to your Bag Gifted with Love, Fabric – Tutorial provides a vintage, cottage-core aesthetic. Simple stitches like the running stitch, satin stitch, or French knots can be used to create delicate borders or monograms. Hand-stitching requires more time, but the emotional value it adds to the fabric gift bag is immeasurable and deeply appreciated.
Another way to enhance your Bag Gifted with Love, Fabric – Tutorial is by playing with lining fabrics. Using a contrasting color or a hidden floral print for the interior of the bag creates a “surprise” element when the gift is opened. A silk lining can add a touch of luxury, while a waterproof PUL lining makes the bag practical for carrying toiletries or snacks in the future.
Don’t forget the power of trimming and hardware in your Bag Gifted with Love, Fabric – Tutorial. Adding a bit of pom-pom trim, lace edging, or even metallic eyelets can shift the style of the bag from rustic to modern or whimsical. These small investments in haberdashery can significantly increase the perceived value of your handmade gift without requiring advanced sewing skills.
The final touch in any Bag Gifted with Love, Fabric – Tutorial is the attachment of a handmade tag. You can use a small scrap of the same fabric to create a matching label or use kraft paper tied with twine. Writing a short note explaining that the bag itself is part of the gift reinforces the sustainable living message and highlights the effort you put into the tutorial.
4. Sustainability and the Future of Fabric Gifting
The core philosophy behind the Bag Gifted with Love, Fabric – Tutorial is the reduction of waste and the promotion of eco-friendly gifting. Every year, millions of tons of wrapping paper end up in landfills, much of which cannot be recycled due to plastic coatings and glitter. By switching to a reusable fabric bag, you are participating in a circular economy that values longevity over disposability.
Educating others about the Bag Gifted with Love, Fabric – Tutorial is a great way to spread the message of conscious consumerism. When you give someone a gift in a fabric bag, you are often gifting them their first piece of reusable packaging, which they can then use to gift something to someone else. This “pay it forward” mentality is a beautiful byproduct of the DIY sewing community.
The versatility of the designs found in a Bag Gifted with Love, Fabric – Tutorial means they have a life beyond the holiday season. These bags can be repurposed as travel organizers, shoe bags, lingerie pouches, or even produce bags for the farmer’s market. The durability of the fabric construction ensures that the “gift of love” continues to serve a practical purpose in the recipient’s daily routine.
From a technical SEO perspective, a Bag Gifted with Love, Fabric – Tutorial aligns perfectly with the rising search trends for sustainable DIY and zero-waste crafts. More people than ever are looking for ways to reduce their environmental footprint while maintaining their creative hobbies. By sharing this tutorial, you are providing a solution that is both stylish and ethically responsible.
Incorporating upcycled textiles into your Bag Gifted with Love, Fabric – Tutorial takes the sustainability factor even further. Old bedsheets, outgrown shirts, or vintage scarves can be given a second life as beautiful gift containers. This textile upcycling not only saves money but also ensures that every bag produced is a “one-of-a-kind” piece that cannot be replicated by mass production.
Ultimately, a Bag Gifted with Love, Fabric – Tutorial is a celebration of the human touch in an automated world. It encourages us to slow down, choose our materials with care, and create something that carries a piece of our heart. As you master these techniques, you’ll find that the act of making the bag is just as rewarding as the act of giving the gift itself.
FAQ: Common Questions About Fabric Gift Bags
1. What is the best fabric for a beginner’s gift bag?
For beginners, 100% cotton is the best choice. It is easy to cut, doesn’t slip while sewing, and takes a press very well. Avoid “slippery” fabrics like satin or chiffon until you are more comfortable with your machine settings.
2. How do I wash my fabric gift bag?
Most bags made from cotton or linen can be machine washed on a cold, gentle cycle. It is best to air dry them to maintain the shape and then give them a quick press with an iron to remove any wrinkles. If you used delicate trims, consider hand washing.
3. Can I make these bags without a sewing machine?
Absolutely! While a machine is faster, a Bag Gifted with Love, Fabric – Tutorial can be completed using a backstitch for the seams and a running stitch for the casing. Hand-sewing adds a beautiful, rustic charm to the project.
4. How much fabric do I need for a medium-sized bag?
Generally, a fat quarter (a standard quilting measurement of 18″ x 22″) is more than enough to create a medium-sized gift bag. This makes it a very affordable project, especially if you buy fabric remnants or “fat quarter bundles.”
5. What can I use instead of a ribbon for the drawstring?
You can use twine, strips of jersey fabric, t-shirt yarn, or even braided embroidery floss. The key is to choose a material that is strong enough to handle repeated pulling and knotting without fraying or snapping.
6. Are fabric gift bags really better for the environment?
Yes, because they are designed for multi-year reuse. Unlike paper, which degrades or gets torn after one use, a well-made fabric bag can last for decades, significantly reducing the amount of paper waste generated during birthdays and holidays.
Conclusion
In this Bag Gifted with Love, Fabric – Tutorial, we have explored everything from the fundamental selection of textiles to the intricate details of personalization and sustainability. We learned that creating a handmade bag is an act of love that provides a durable, eco-friendly alternative to traditional gift wrapping.
By following the steps—preparing the fabric, sewing the seams, creating the drawstring casing, and adding your own unique embellishments—you have created a gift that is both practical and sentimental. We hope this guide inspires you to dive into your fabric stash and start creating!