The Navy Squares Block – Tutorial is exactly what you need if you are looking to elevate your quilting skills and bring a timeless, sophisticated look to your next textile project. Quilting is an art form that beautifully merges tradition with modern creativity, and the Navy Squares Block stands out as a versatile favorite among both beginners and advanced makers. In this comprehensive guide, we will walk you through every step required to create this stunning geometric pattern, ensuring your points align perfectly and your colors pop with elegance.
When you dive into this Navy Squares Block – Tutorial, you are not just learning a simple sewing sequence; you are mastering a design foundation that can be used for cozy quilts, stylish throw pillows, or elegant table runners. The deep, rich tones of navy blue combined with contrasting neutral or bright fabrics create a visual depth that instantly draws the eye. Utilizing strategic quilting techniques and proper fabric selection will ensure that your final project looks professionally crafted, durable, and visually striking.
Before we begin cutting our fabric, it is essential to understand that precision is the secret ingredient to a successful Navy Squares Block. Throughout this tutorial, we will emphasize the importance of accurate measuring, careful pressing, and consistent seam allowances. By focusing on these core elements, you will find that assembling this geometric masterpiece is not only stress-free but also incredibly rewarding. Let’s gather our tools, prepare our workspace, and explore the wonderful world of quilting with this step-by-step Navy Squares Block – Tutorial.
1. Fabric Selection and Preparation for the Navy Squares Block
Choosing the right materials is the foundational step of our Navy Squares Block – Tutorial, as the contrast between your fabrics determines the overall impact of the design. For a classic aesthetic, select a high-quality navy blue quilting cotton as your primary color, pairing it with crisp whites, creams, or silver-grays to make the geometric lines stand out.
Before making a single cut, it is highly recommended to pre-wash your fabrics, especially when working with deep pigments like navy blue. Dark dyes can sometimes bleed into lighter fabrics during the first wash, so using a color catcher in your washing machine is a smart safeguard to protect your hard work.
Once your fabric is washed and dried, a thorough pressing with a hot iron is crucial. Wrinkles can distort your measurements, leading to misaligned corners later in the tutorial process. Applying a light amount of fabric starch can add crispness to the cotton, making it much easier to cut straight lines and handle small pieces without stretching them.
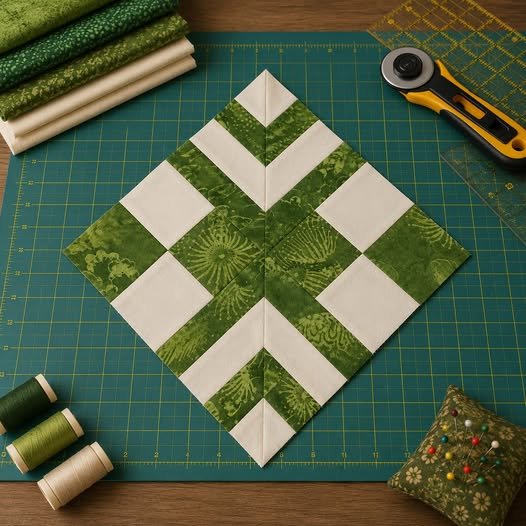
Next, you will need to organize your cutting mat, rotary cutter, and an acrylic quilting ruler. Accuracy at this stage saves a massive amount of time during assembly, so always double-check your measurements before pressing down with your cutter.
For a standard block, you will want to cut your navy blue fabric and your contrasting accent fabric into precise squares and strips according to your desired block size. Labeling your cut pieces with sticky notes can help you stay organized, keeping your workspace efficient and clutter-free.
With your fabric pieces perfectly flat, cleanly cut, and neatly organized, you are now fully prepared to move on to the sewing machine. Taking these extra steps in preparation guarantees that your Navy Squares Block will come together smoothly and look professional.
2. Step-by-Step Assembly and Sewing Techniques
Now that your pieces are ready, the core assembly of our Navy Squares Block – Tutorial begins at the sewing machine, where precision stitching takes center stage. To achieve a flawless layout, always use a standard quarter-inch seam allowance, which is the universal rule for successful patchwork quilting.
Start by arranging your cut fabric pieces on a flat surface or a design wall next to your machine to visualize the final Navy Squares Block layout. This simple visual check prevents you from accidentally sewing pieces upside down or mixing up the color sequence.
Begin stitching your smaller squares into pairs, placing the right sides of the fabric together and aligning the raw edges perfectly. Use a neutral quilting thread, such as a high-quality cotton thread in grey or beige, which blends seamlessly with both light and dark fabrics.
Chain piecing is an excellent SEO-friendly quilting tip to speed up this process; simply feed your pairs through the machine one after the other without cutting the thread in between. Once a row of pairs is sewn, clip the connecting threads and prepare them for the next stage.
Connect your pairs to form complete rows, ensuring that the fabric colors alternate correctly to create the signature Navy Squares Block pattern. Consistency in your speed and alignment during this step will prevent the fabric from warping or puckering along the seams.
Finally, sew the completed rows together to lock the entire block into place, using pins at every intersection to keep the corners perfectly aligned. Once the final seam is cast, you will see the beautiful, geometric harmony of your newly created block come to life.
3. Pressing Secrets for Flawless Intersections and Sharp Corners
Pressing is often overlooked, but it is a critical component of this Navy Squares Block – Tutorial that separates amateur projects from professional masterpieces. There is a distinct difference between ironing and pressing: ironing involves sliding the tool, which can stretch fabric, while pressing means lifting and setting the iron down.
To ensure your Navy Squares Block lies completely flat, you must press your seams to the dark side whenever possible. In this case, pressing toward the navy blue fabric prevents the darker seam allowance from showing through the lighter accent fabrics.
When joining your rows, use a technique known as nesting seams, where the seam allowance of the top row faces left and the bottom row faces right. This allows the fabric folds to lock together perfectly like puzzle pieces, eliminating bulk and creating razor-sharp corners.
Set your iron to the appropriate cotton setting and utilize steam cautiously, as too much moisture can distort the bias edges of your squares. If you notice any stubborn bulk at the intersections, a wooden quilting clapper can be pressed onto the hot seam to trap heat and flatten it instantly.
Check the front of your block after pressing each section to ensure no fabric has accidentally folded over itself near the seam lines. A perfectly pressed block not only looks incredible but also makes the final quilting process much easier when sewing multiple blocks together.
By mastering these pressing habits throughout the Navy Squares Block – Tutorial, you ensure that your final quilt top will be smooth, uniform, and incredibly easy to quilt over with your machine.
4. Creative Layouts and Design Variations for Inspiration
The beauty of completing this Navy Squares Block – Tutorial lies in the endless design possibilities that open up when you combine multiple blocks together. By simply rotating the blocks or altering the color placement, you can create a wide variety of secondary patterns across your quilt top.
One popular layout variation is the straight set arrangement, where the blocks are sewn side-by-side in a clean grid pattern, highlighting the bold geometric structure. Adding a solid navy border around this layout creates a sophisticated, modern framed look that anchors the design beautifully.
Alternatively, you can choose an on-point layout, tilting your blocks at a 45-degree angle to give the entire quilt a dynamic, flowing sense of movement. This advanced style transforms the square motifs into elegant diamond shapes, completely changing the visual energy of the textile.
You can also experiment with sashing—adding thin strips of neutral fabric between the blocks—to give each Navy Squares Block breathing room and make the colors pop even more. Sashing is highly recommended if you want to expand the size of your quilt without making extra blocks.
For a more contemporary twist, consider mixing shades of navy, indigo, and denim within the same block to create a trendy monochromatic quilt design. This gradient effect adds modern texture and visual interest while keeping the classic spirit of the tutorial intact.
No matter which layout you choose, the skills you developed in this tutorial will allow you to scale your project from a simple pillowcase to a massive king-size quilt. Let your personal style guide your arrangement, and don’t be afraid to experiment with your layout before sewing the final pieces together.
Frequently Asked Questions (FAQ)
What is the best fabric choice for a Navy Squares Block?
High-quality 100% quilting cotton is always the best choice for this project. It holds its shape well, is easy to cut, does not slip during sewing, and is available in a wide variety of navy shades and contrasting prints.
How do I prevent the navy blue fabric from bleeding into the white squares?
To prevent color bleeding, always pre-wash your dark fabrics with a color catcher sheet. You can also use specialized quilting soaps formulated to trap loose dyes in the water, ensuring your light fabrics stay bright and clean.
What seam allowance should I use for this quilting tutorial?
You should always use a precise quarter-inch (1/4″) seam allowance. Most quilting presser feet are designed to help you maintain this exact measurement, which is vital for aligning geometric patterns perfectly.
Can a beginner complete this Navy Squares Block – Tutorial?
Yes, absolutely! This design is highly beginner-friendly because it relies on straight lines and basic squares. Following the pressing and cutting tips outlined above will help any beginner achieve excellent results.
Do I need a rotary cutter to make this block?
While you can use fabric scissors, a rotary cutter combined with an acrylic ruler and a cutting mat is highly recommended. It provides the level of precision needed to ensure all your squares are identical and perfectly square.
Conclusion
In this Navy Squares Block – Tutorial, we have covered everything from selecting the perfect high-contrast fabrics to mastering precise cutting, sewing, and pressing techniques.
By focusing on accurate quarter-inch seams and utilizing the nesting method for your intersections, you can confidently create beautifully aligned geometric quilt blocks. Whether you decide to arrange them in a traditional grid, an elegant on-point layout, or a modern monochromatic style, the skills you have learned here today form a fantastic foundation for your quilting journey.