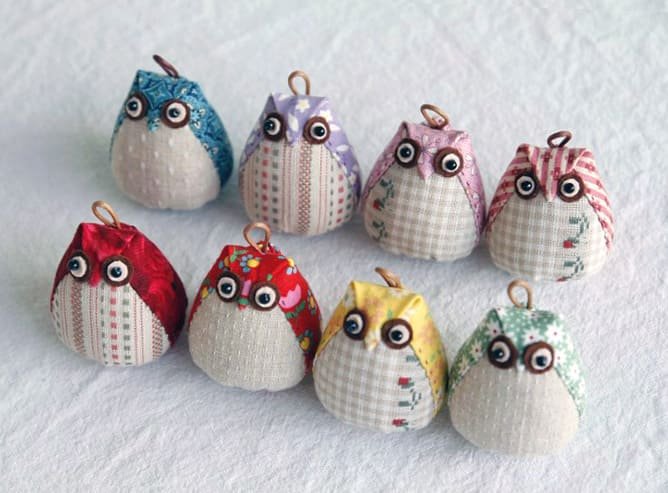
Crafting your own everyday accessories is one of the most rewarding ways to express your creativity, and making a Fabric Owl Keychain – Tutorial is the perfect place to start. There is something incredibly satisfying about transforming a few scraps of material into a charming, functional piece of art that you can carry with you everywhere. Whether you are an experienced sewist looking to clear out your scrap bin or a complete beginner eager to try your hand at a quick and delightful project, this step-by-step guide is designed to walk you through the process with ease. By the end of this article, you will not only have a gorgeous new accessory for your keys or backpack, but you will also master a versatile crafting technique that makes for wonderful, personalized gifts.
In today’s fast-paced world, handmade items carry a special warmth and sentimental value that mass-produced store goods simply cannot replicate. Owls have long been celebrated as symbols of wisdom, luck, and intuition, making them an incredibly popular motif in the crafting community worldwide. This specific Fabric Owl Keychain – Tutorial focuses on creating a compact, sturdy, and visually striking owl that combines modern aesthetics with traditional sewing techniques. It is an ideal weekend project that requires minimal tools, takes less than an hour to complete, and allows for endless customization through fabric choices, colors, and embellishments.
When it comes to engaging, budget-friendly crafts, maximizing your materials is key to a sustainable and enjoyable hobby. This tutorial is highly optimized to help you utilize leftover fabrics from larger sewing ventures, making it an eco-friendly choice for conscious creators. Throughout this detailed guide, we will explore everything from selecting the right textiles and cutting precise templates to assembling the body, adding expressive facial features, and securely attaching the metal hardware. Get ready to dive into the wonderful world of textile art as we uncover the secrets to making a durable and eye-catching accessory that stands the test of time.
1. Gathering Your Materials for the Owl Keychain Craft
Before jumping into the sewing process, it is essential to prepare your workspace and collect all the necessary supplies to ensure a smooth, uninterrupted crafting experience. For this Fabric Owl Keychain – Tutorial, the choice of fabric plays a massive role in the final look and structural integrity of your mini owl plush. Cotton fabrics with small, vibrant prints, polka dots, or plaids work beautifully because they scale down well to fit the small dimensions of a keychain. You will need at least two contrasting fabric patterns: one main print for the body and wings, and a lighter, solid color for the face and belly area to create a beautiful visual contrast.
In addition to your beautiful textile scraps, you will need a few standard sewing tools that form the backbone of any successful textile project. A pair of sharp fabric scissors is crucial for achieving clean edges, while a pack of high-quality sewing needles and strong matching threads will ensure your stitches remain intact through daily wear and tear. For the filling, premium polyester fiberfill stuffing is highly recommended because it provides a lightweight, resilient structure that keeps its shape even when jumbled inside a crowded purse or pocket. You will also want small scraps of felt in white, black, and orange to construct the expressive eyes and the tiny beak.
The final piece of the puzzle is the metal hardware that transforms your fabric sculpture into a fully functional, everyday accessory. A standard split key ring attached to a small lobster clasp or a short length of sturdy ribbon is ideal for this project. Having a water-soluble fabric marker or tailor’s chalk on hand will also help you transfer the design templates accurately onto your cloth without leaving permanent stains. Once you have arranged your fabric pieces, stuffing, scissors, and hardware neatly on your cutting table, you are officially ready to begin the exciting creation process.
2. Step-by-Step Cutting and Preparing the Fabric Patterns
Precision during the cutting phase is the secret ingredient to a professional-looking finished product that aligns perfectly during assembly. To start your Fabric Owl Keychain – Tutorial layout, print or draw a simple owl silhouette template consisting of a curved body, two small wing shapes, a heart-shaped face overlay, and a tiny triangle for the beak. Pin your paper templates securely onto the wrong side of your chosen fabrics, ensuring that you account for a small seam allowance if you plan to sew the edges inward. Take your time with the scissors, tracing the smooth curves carefully to avoid jagged edges that could fray over time.
Once your main fabric pieces are cleanly cut, it is time to prepare the delicate facial elements using your colorful felt scraps. Cut two medium-sized white circles for the outer eyes, two smaller black circles for the pupils, and a small orange triangle or diamond for the sharp little beak. Arranging these small felt pieces onto the main face fabric before stitching allows you to experiment with different expressions, such as wide-eyed wonder or a sleepy, cozy glance. Using a tiny dab of fabric glue can help hold these miniature felt elements temporarily in place so they do not shift around during the actual sewing phase.
Now that all your individual components are cut and laid out, it is a fantastic practice to press your cotton pieces with a warm iron. Ironing removes any stubborn creases and flattens the seams, making the fabric significantly easier to handle, manipulate, and sew accurately. Group your cut pieces into logical assembly piles: the front body with the face attached, the back body panel, the wing pairs, and the ribbon loop for the hardware. Organizing your workspace in this manner reduces mistakes, speeds up your production time, and keeps your creative energy focused entirely on the joy of sewing.
3. Assembling the Owl Body and Adding Facial Features
With all your pieces beautifully prepared, the real magic begins as we bring our charming little nocturnal creature to life through stitching. Start by securing the felt eyes and beak onto the face section using a neat applique stitch, a simple running stitch, or a tight zigzag stitch on your sewing machine. Sewing these facial features onto the front panel before joining the front and back body pieces together is a critical tip that ensures all your messy knots and thread tails remain hidden on the inside of the keychain. Ensure the stitches are tight and close together so the small felt pieces cannot be easily pulled off by daily usage.
Next, if you are including separate wings, position them on the sides of the front body piece, facing inward, and baste them lightly in place to secure them. Now, cut a short piece of grosgrain ribbon or fabric strap, loop it through your metal key ring, and position the raw edges of the ribbon at the very top center of the owl’s head, pointing downward into the body. This clever placement ensures that when the owl is turned right-side out later, the ribbon loop and the key ring will pop out perfectly from the top of the head, creating an incredibly secure attachment point.
Align the back body piece directly on top of the decorated front piece, making sure the right sides of the fabrics are facing each other (right sides together). Pin the perimeter securely, taking extra care to sandwich the internal wings and the top ribbon loop safely between the layers so they don’t get caught incorrectly in the side seams. Sew around the entire edge using a consistent seam allowance, but remember to leave a small two-inch opening along the bottom straight edge of the owl. This unsewn gap is absolutely vital, as it serves as the doorway for turning the project right-side out and adding the soft filling.
4. Stuffing Finishing Touches and Securing the Hardware
Now that the perimeter is securely stitched, gently clip the curved edges and corners with your scissors, being careful not to cut into your actual stitches, to allow the fabric to flex smoothly without bunching up. Carefully reach through the bottom opening and turn the entire owl right-side out, gently using a chopstick or a dull knitting needle to push out the ears and rounded base. You will instantly see your beautiful Fabric Owl Keychain – Tutorial design come to fruition as the colorful patterns, cute felt face, and top key ring pop into their proper positions. Give the empty shell a quick press with the iron to flatten the outer seams beautifully.
Take small pinch-sized pieces of your polyester fiberfill stuffing and begin gently packing them into the owl, starting with the upper ears and working your way down to the base. It is much better to use multiple small clumps of stuffing rather than one large ball, as small amounts prevent the toy from becoming lumpy and allow you to distribute the weight evenly. Stuff the owl firmly so that it displays a plump, adorable shape, but leave just enough slack near the bottom opening so that you can easily fold the raw fabric edges inward.
To close the opening seamlessly, tuck the raw edges inside by a quarter of an inch and press them together flatly with your fingers. Use a needle and matching thread to perform a ladder stitch (also known as a blind stitch) across the gap, pulling the thread tight to make the closure completely invisible from the outside. If you prefer a faster method, you can also topstitch closely along the very bottom edge using a sewing machine. Give your completed owl a final gentle squeeze to distribute the stuffing perfectly, pull on the key ring to ensure it is rock-solid, and celebrate your gorgeous handmade accessory!
Frequently Asked Questions
What is the best type of fabric to use for a handmade keychain project?
The best fabric for this craft is 100% quilting cotton because it comes in thousands of vibrant patterns, does not stretch out of shape easily during sewing, and is durable enough for daily use. You can also incorporate sturdy upcycled materials like denim or linen for a rustic look, paired with soft wool felt for the eyes.
Can I complete this entire owl tutorial without a sewing machine?
Absolutely! Because this project is small and compact, it can easily be sewn entirely by hand using a basic backstitch for the body seams and a running stitch or blanket stitch for the felt facial features. Hand sewing gives you incredible control over the tiny curves and corners of the keychain.
How do I ensure the keychain loop doesn’t rip out over time?
To make the loop exceptionally strong, triple-stitch over the ribbon area where it meets the top seam of the owl’s head. Using durable ribbon materials like grosgrain, nylon webbing, or a folded strip of the main fabric will also prevent the hardware from fraying or tearing away through heavy use.
Is this fabric craft project safe and suitable for young children?
Yes, this project is highly safe for children if you sew all the components securely and use felt for the facial features instead of plastic safety eyes or buttons, which can pose a choking hazard. It is a fantastic introductory craft for teaching kids basic hand-sewing skills under adult supervision.
How can I clean and wash my fabric owl keychain if it gets dirty?
If your keychain accumulates dirt from keys or bags, it is best to spot-clean it using a damp cloth and mild soap. Avoid tossing it directly into a washing machine, as the metal key ring can rust or damage the internal fiberfill stuffing and distort the cute shape.
Conclusion
Mastering this delightful Fabric Owl Keychain – Tutorial provides you with an incredible creative outlet that bridges the gap between practicality and artistic expression.
Throughout this article, we have explored how to select the perfect coordinating fabric scraps, cut precise pattern pieces, construct a charming felt face, and safely assemble and stuff the final product with durable hardware. This project proves that you do not need expensive materials or advanced sewing skills to create something truly magical, functional, and visually stunning.