The Crochet Cross Bookmark – Tutorial guide you are reading today will open up a wonderful world of meaningful, handmade crafting that you can complete in just one afternoon. Finding the perfect balance between functionality and spiritual beauty can be a challenge in standard craft projects, but a crochet cross bookmark bridges that gap beautifully. Whether you are looking to create a thoughtful handmade gift for a religious milestone, a beautiful placeholder for your favorite Bible, or simply a relaxing project to clear your mind after a busy day, this comprehensive crochet cross bookmark tutorial is designed to walk you through every single step with absolute ease.
Crocheting small items is one of the most rewarding ways to use up your yarn stash while practicing new stitches without committing to a massive, months-long project like a blanket. This specific crochet cross bookmark design relies on basic stitches combined in a clever layout to create the iconic four-point shape of a traditional cross. By focusing on tension control and choosing the right thread, you will notice how quickly a simple piece of string transforms into an elegant, durable piece of art that can last for generations. Many crafters find that making a crochet cross bookmark becomes their go-to project for charity drives, church bazaars, or personalized holiday stocking stuffers.
As you dive deeper into this Crochet Cross Bookmark – Tutorial, you will discover that the beauty of this pattern lies entirely in its adaptability and simplicity. Even if you are a beginner who has only recently mastered the basic chain stitch and single crochet, our detailed layout will ensure you never feel lost or overwhelmed. We will cover everything from selecting the ultimate cotton thread to blocking your finished piece so it sits perfectly flat inside any book. Get your crochet hooks ready, find a comfortable place to sit with a warm cup of tea, and let’s explore the wonderful process of creating a beautiful handmade crochet cross bookmark together.
1. Choosing the Best Materials for Your Crochet Cross Bookmark
When embarking on a Crochet Cross Bookmark – Tutorial, the first and most critical decision you will make involves selecting your yarn or thread. Unlike bulky winter blankets or cozy sweaters, a book marker needs to be incredibly thin, flat, and durable so it does not damage the binding of a book. For this reason, experienced crafters universally recommend using 100% mercerized cotton thread rather than standard acrylic yarn. Cotton thread provides the crisp stitch definition required to make the delicate lace details of the crochet cross truly stand out.
The size of the thread you select will directly dictate the final dimensions of your finished project. Using a classic size 10 crochet thread is the gold standard for creating an elegant, traditional crochet cross bookmark that looks delicate yet feels sturdy. If you prefer a slightly chunkier, more modern vintage look that works up even faster, you can opt for a size 5 thread or even a superfine weight category 1 fingering yarn. Choosing cotton also ensures that your project can handle the starching or blocking process later on without melting or losing its structural integrity.
Hand in hand with your thread selection is choosing the correct crochet hook size, which is vital for maintaining the right tension. For a size 10 thread, a steel crochet hook ranging from 1.5mm to 1.75mm is generally ideal to keep your stitches tight and neat. If your stitches tend to be overly loose, your cross might lose its shape and appear sloppy, whereas a hook that is too small will make the cotton thread split. Always check your comfort level with small steel hooks, as using an ergonomic handle can prevent hand fatigue during your crochet cross bookmark tutorial session.
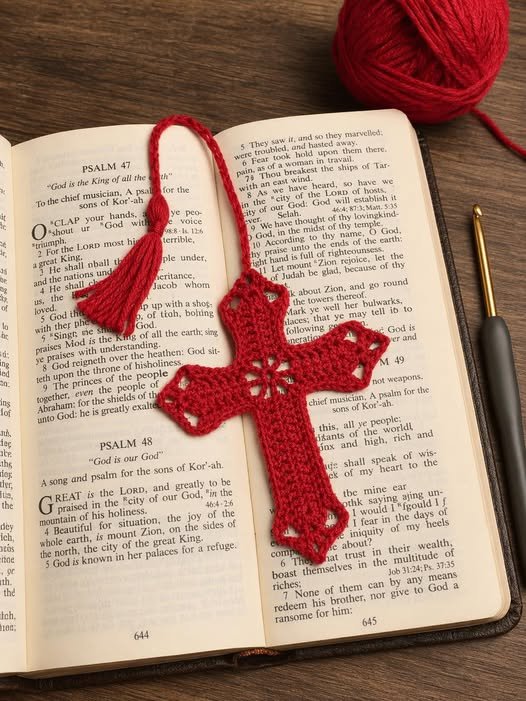
Color selection plays a massive role in the emotional impact and visual appeal of your finished handmade bookmark. Traditional pure white, soft cream, and elegant ivory are the most popular choices, particularly if the crochet cross is intended for First Communions, baptisms, or Easter gifts. However, do not be afraid to experiment with modern pastel shades like lavender, mint green, or duck-egg blue to give the project a contemporary twist. Variegated threads that gently shift from one color to another can also create a stunning, unique stained-glass effect as you work up the rows.
Before you make your first slip knot, make sure you gather a few essential secondary tools alongside your hook and thread. You will need a pair of sharp embroidery scissors to snip the thread cleanly without fraying the delicate cotton fibers. A fine tapestry needle or a smaller steel hook is also necessary for weaving in the loose yarn tails securely so they never unravel during use. Lastly, having a few rust-proof pins and a foam blocking mat nearby will make the final shaping process infinitely easier and more professional.
By taking the time to carefully curate high-quality materials before diving into the actual stitching, you set yourself up for absolute success. A well-chosen thread and hook combination makes the actual process of the Crochet Cross Bookmark – Tutorial a pure joy rather than a struggle against splitting yarn. Once you have your cotton thread, matching hook, scissors, and tapestry needle arranged neatly on your workspace, you are officially ready to begin building the foundation of your beautiful new craft project.
2. Step-by-Step Stitch Guide for the Cross Structure
To begin the structural layout of your crochet cross bookmark, you will start by creating the vertical stem, which forms the longest section of the cross. Tie a secure slip knot onto your hook and chain a total of thirty-five stitches, ensuring your tension remains uniform and not too restrictive. Starting in the second chain from your hook, work a single crochet into each stitch all the way back down to the beginning of your chain foundation. This simple row establishes the clean, solid spine of your crochet cross and provides the necessary stability for the decorative borders.
Once the foundational row of your vertical stem is complete, it is time to pivot and create the horizontal arms that give the cross its iconic shape. To achieve this without breaking your thread, you will utilize a clever technique of chaining outward from the middle section of your established spine. Count exactly twelve stitches up from the bottom, attach your thread with a slip stitch, and chain twelve new stitches out to the left side. Turn your work, single crochet back along those new chains, and slip stitch directly into the central spine to complete the first side arm.
Now that the left arm is securely attached, you will immediately repeat a similar process on the exact opposite side to maintain perfect symmetry. Chain twelve stitches outward to the right, turn your work carefully, and single crochet back toward the central vertical column of the crochet cross bookmark. Fasten this arm down with a precise slip stitch into the same central anchor point on the spine to ensure there are no awkward gaps or lumps. You should now clearly see the classic silhouette of a cross taking shape on your crafting table.
With the basic skeletal frame of the cross fully assembled, the next phase of this crochet cross bookmark tutorial involves adding a beautiful decorative border. Instead of leaving the edges flat, you will work a combination of half double crochets, double crochets, and delicate picot stitches all the way around the perimeter. The picot stitch, created by chaining three and slip stitching back into the first chain, adds a gorgeous, vintage lace-like texture to the tips. This border row softens the sharp geometric angles of the cross, giving it a classic, professional heirloom appearance.
As you navigate around the outer corners of the arms and the top peak of the cross, it is essential to add extra stitches to prevent the edges from curling inward. Working three stitches into the exact same corner space allows the border to turn corners smoothly while remaining entirely flat. Pay close attention to your stitch count during this phase to ensure that the left arm looks identical to the right arm. Consistency is the secret key to making a handmade crochet cross bookmark look like a luxury item purchased from a high-end boutique.
Once you have successfully worked your decorative border all the way around the entire cross, join the final stitch to the first one using a clean slip stitch. Cut your cotton thread, leaving a generous six-inch tail for weaving, and pull the thread completely through the final loop to secure it. Take a moment to gently stretch the piece with your fingers, admiring how the stitches interact to form the beautiful, holy emblem. Your cross structure is now completely crocheted, and you are ready to add the elegant finishing flourishes.
3. Adding the Elegant Tassel and Finials
A truly spectacular crochet cross bookmark is never complete without a beautiful, flowing tassel attached to the bottom base of the vertical stem. A tassel not only adds a touch of traditional luxury but also serves a practical purpose by hanging outside the closed book for easy access. To create a matching tassel, take a small piece of stiff cardboard measuring roughly three inches in width to use as a wrapping template. Wrap your main cotton thread around the cardboard template approximately twenty-five to thirty times, depending on how thick you want the tassel to look.
Carefully slide a separate six-inch piece of thread underneath the wrapped loops at the very top edge of the cardboard template and tie a tight, secure double knot. This piece of thread will act as the anchor that permanently secures the tassel to the bottom tip of your crochet cross. Once the top knot is firmly secured, slide your embroidery scissors through the bottom loops at the opposite end of the cardboard and cut them cleanly. You will instantly see a fringe of loose threads dropping down, forming the raw body of your brand-new tassel.
To give the tassel its signature polished look, you need to create the traditional wrapped head or “neck” just below the top anchor knot. Cut another eight-inch piece of thread, wrap it tightly around all the dangling strands about half an inch below the top knot, and tie it firmly. Use your tapestry needle to pull the loose ends of this wrapping thread down into the center of the tassel body so they disappear completely. Finally, use your sharp scissors to trim the bottom fringe into a perfectly straight, even line so it looks incredibly neat.
Thread the top anchor strands of your newly created tassel through the center of your tapestry needle and insert it into the lowest stitch of the cross spine. Tie a very secure double knot to attach the tassel permanently to the crochet cross bookmark, making sure there is no loose slack. Weave the remaining thread tails upward into the dense stitches of the vertical stem for at least an inch before cutting the excess thread. This method ensures that even with constant daily use inside heavy books, the tassel will never pull free or unravel.
If you want to elevate the design even further, you can slide a tiny wooden or porcelain bead onto the anchor thread before tying it to the cross. Adding a small bead adds a delightful weight to the bookmark and introduces an interesting mixed-media texture to the overall handmade project. Alternatively, you can crochet a simple, delicate chain tail extending from the top peak of the cross, ending with a tiny flower finial. These small personal artistic touches are what make following a crochet cross bookmark tutorial so incredibly rewarding for creative individuals.
Step back and examine the balance between the main crocheted cross structure and the dangling decorative tassel at the bottom. The tassel should complement the cross nicely without overpowering the delicate lace stitches you worked so hard to create in the previous steps. With all your thread tails woven away invisibly and the tassel hanging straight, the construction phase of your project is officially complete. Now, you can move on to the final crucial step that elevates a homemade craft into a flawless, retail-ready masterpiece.
4. Professional Blocking and Starching Techniques
The absolute secret to transforming a limp, wrinkled piece of crochet work into a crisp, professional-grade crochet cross bookmark is the process of blocking. When you first finish crocheting with fine cotton thread, you might notice that the edges tend to curl slightly and the arms don’t sit perfectly straight. This is completely normal and happens because of the natural twist of the fibers and variations in human stitch tension. Wet blocking relaxes the cotton fibers, allowing them to settle permanently into the precise geometric shape that you originally intended.
To begin the blocking process, submerge your completed crochet cross into a small bowl of lukewarm water mixed with a drop of gentle fabric wash. Let it soak for roughly ten minutes until every single fiber is completely saturated, then remove it and gently press it between a clean towel. Never wring, twist, or squeeze the delicate cotton thread, as this can distort your beautiful stitches and warp the symmetry of the cross arms. Once the excess water is removed and the bookmark is damp, lay it flat onto a clean foam blocking mat.
Using rust-proof stainless steel pins, carefully secure the top peak of the cross to the foam mat, then stretch the vertical stem straight down and pin the base. Next, pull the left and right horizontal arms outward with equal tension, ensuring they form a perfect ninety-degree angle with the main spine. Pin every single decorative picot stitch along the outer border individually to open up the lace details and showcase the intricate stitch work. Take your time during this step, using a ruler if necessary to verify that both sides are perfectly symmetrical and balanced.
If you want your handmade crochet cross bookmark to feel stiff and hold its shape permanently like a traditional heirloom, you should apply a starching solution. You can use a commercial fabric starch spray, or create a simple, eco-friendly DIY solution using a mix of regular cornstarch and water. Lightly spray or brush the starch solution over the pinned cross, ensuring it absorbs evenly into the cotton thread without soaking the tassel. Allow the project to dry completely overnight in a well-ventilated room away from direct sunlight or heavy dust.
Once the cotton thread is completely dry to the touch, carefully remove the stainless steel pins one by one from the foam mat. You will immediately notice that the crochet cross feels delightfully crisp, holds its shape effortlessly, and sits entirely flat without a single curl. The starching process also adds a protective layer to the cotton fibers, making the bookmark highly resistant to dirt and wear over time. Your stunning creation is now fully finished and ready to be placed inside a book or wrapped as a beautiful gift.
Properly finishing your work through blocking and starching is what separates amateur crafts from high-quality items that look stunning on camera or on store shelves. If you run a craft blog or social media page, this is the perfect moment to take bright, high-contrast photos of your finished masterpiece. Now that you understand the entire journey from selecting thread to the final block, let us review some of the most common questions crafters encounter.
Frequently Asked Questions (FAQ)
Q: Can I use regular acrylic yarn instead of cotton thread for this tutorial?
A: While you can technically use any yarn, regular acrylic yarn will result in a much thicker, bulkier bookmark that may damage book spines. Cotton thread is highly recommended because it allows the crochet cross bookmark to lay flat, look delicate, and hold its structural shape through blocking.
Q: How long does it take to complete one crochet cross bookmark?
A: For an intermediate crafter, a single crochet cross can easily be completed in about forty-five minutes to an hour. It is a fantastic “one-sitting” project that provides instant gratification and is perfect for quick handmade gift production.
Q: Is this crochet pattern suitable for absolute beginners?
A: Yes, this project is highly accessible if you already know how to chain, single crochet, and double crochet. The clever layout of the arms might require close attention to stitch counting, but our step-by-step breakdown makes it easy to follow along successfully.
Q: How do I clean the bookmark if it gets dirty over time?
A: You can hand wash the cotton bookmark gently in cold water with mild soap, press it flat between a towel, and re-pin it to dry. Keep in mind that washing will remove any starch applied previously, so you will need to re-starch it to regain the crisp texture.
Q: Can I add beads or charms to the tassel for a unique look?
A: Absolutely! Adding small pearls, wooden beads, or metallic charms to the anchor thread of the tassel adds a beautiful, personalized touch that makes the crochet cross bookmark feel even more special and customized.
Conclusion
In this comprehensive Crochet Cross Bookmark – Tutorial, we have covered every single detail necessary to create a stunning, timeless heirloom piece from scratch. We explored the vital importance of choosing premium mercerized cotton thread and fine steel hooks to ensure a flat, non-bulky finish that protects your favorite pages.
We also walked through the structural layout of the central spine, the symmetrical creation of the side arms, and the addition of a gorgeous lace-style picot border. Finally, we learned how to craft a plush matching tassel and utilize professional wet-blocking and starching techniques to give your work a crisp, commercial-grade finish.