Handmade Pincushion – Tutorial is the ultimate guide you need to create a functional, beautiful, and personalized sewing accessory from scratch. Whether you are a seasoned sewist or someone just stepping into the world of fabric crafts, having a dedicated place to store your pins is absolutely essential. A handmade pincushion not only keeps your creative workspace organized but also protects your fingertips from stray needles while adding a charming, personalized touch to your sewing room.
Crafting your own sewing accessories allows you to practice essential skills while working on a manageable, rewarding project. This step-by-step tutorial will guide you through the entire process, ensuring that you understand the materials, techniques, and assembly methods required to achieve a professional finish. By making it yourself, you have total control over the design, size, and fabrics, making it an excellent project for utilizing scrap fabric or upcycling meaningful textiles.
In this comprehensive guide, we will explore everything from selecting the right materials to mastering the assembly process. You will learn why a handmade pincushion makes a superior alternative to store-bought options and how to optimize your project for durability. Let us dive into this creative journey and build a beautiful, practical sewing tool that will serve you for years to come.
1. Choosing the Best Materials for Your Handmade Pincushion
Selecting the right fabric is the first crucial step in this handmade pincushion – tutorial. High-quality woven cotton, linen, or wool felt are the absolute best choices because their tight weaves hold pins securely without tearing. Avoid fabrics with too much stretch, like thin knits, as they can lose their shape once stuffed.
The filling you choose for your handmade pincushion drastically impacts its overall functionality. While standard polyester fiberfill is readily available and budget-friendly, crushed walnut shells or coarse emery sand are highly recommended by professionals. These heavier materials provide excellent weight, preventing your cushion from sliding around your sewing table.
Another massive benefit of using crushed walnut shells or emery sand is their ability to naturally sharpen and clean your sewing needles. Every time you insert a pin into a handmade pincushion filled with these materials, friction removes microscopic burrs and oils. This ensures your needles remain smooth, sharp, and ready for your next quilting or sewing project.
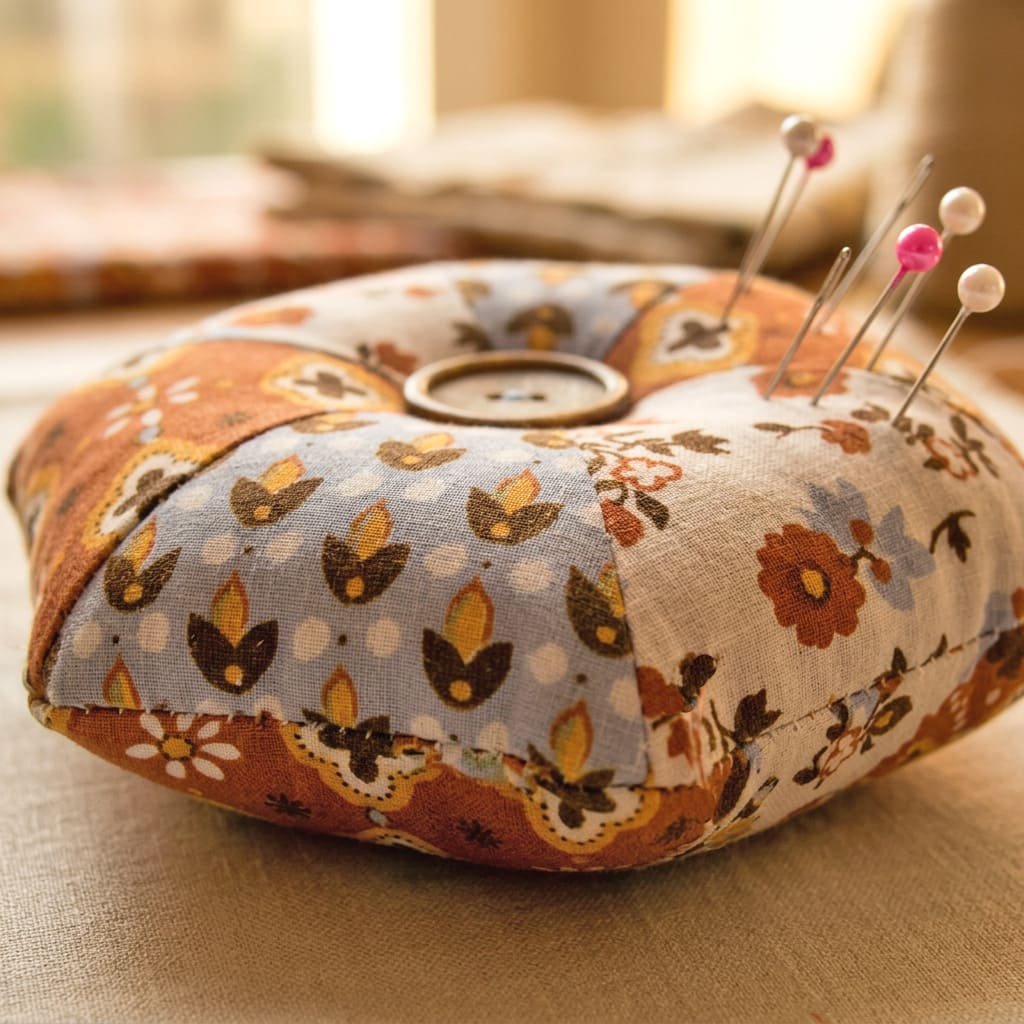
Do not overlook the aesthetic elements of your project, such as matching threads, ribbons, or unique vintage buttons for the center tufting. Choosing a contrasting thread can add a beautiful decorative topstitch, turning a simple tool into a work of art. Gather all your tools, including sharp fabric shears, hand-sewing needles, and a fabric marker before starting.
Sustainable crafters will love that this handmade pincushion – tutorial is incredibly eco-friendly. You can easily use scrap fabrics from previous quilting projects, old denim jeans, or even discarded wool sweaters to create a beautiful patchwork design. Upcycling materials gives your finished craft a unique story and reduces textile waste in your studio.
Ultimately, preparing your materials correctly sets the foundation for a successful sewing experience. Take the time to iron your fabric pieces flat before cutting, as wrinkles can distort your measurements and lead to an uneven shape. Once your fabric squares or circles are neatly cut, you are officially ready to begin the construction phase.
2. Step-by-Step Cutting and Sewing Assembly
To begin the assembly of your handmade pincushion, cut two matching pieces of fabric measuring five inches by five inches for a standard square design. If you prefer a round shape, use a small bowl or a compact disc as a template to trace two identical circles onto your chosen material. Accurate cutting ensures that your seams align perfectly during the stitching process.
Place the two fabric pieces together with their right sides facing each other, securing the edges with sewing clips or straight pins. Using a standard sewing machine or a strong hand stitch like the backstitch, sew around the perimeter using a one-quarter inch seam allowance. It is vital to leave a two-inch opening along one of the sides so you can turn the fabric right side out.
Before turning your handmade pincushion right side out, you must clip the corners diagonally to reduce bulk inside the project. If you are making a circular cushion, cut small notches along the curved seam allowance instead. This simple technical step allows the seams to lay perfectly flat and crisp once the fabric is turned.
Gently pull the fabric through the two-inch gap you left open, using a blunt tool like a chopstick or a knitting needle to push out the corners completely. Press the empty shell flat with an iron, ensuring the raw edges of the opening are folded neatly inward to match the rest of the seam line. This creates a clean edge for closing later.
Now it is time to fill your handmade pincushion using your selected stuffing material. If you are using crushed walnut shells, use a small funnel to pour the material into the fabric opening until the cushion is firm and plump. For polyester fiberfill, pack small tuffs of stuffing tightly into the corners first before filling the center completely.
Once your cushion is firmly stuffed, use a ladder stitch or an invisible slip stitch to sew the two-inch opening closed by hand. Pull your thread taut to hide the stitches completely, then tie a secure knot and bury the thread tail inside the cushion. Your basic structure is now complete, secure, and ready for any final decorative enhancements.
3. Creative Customization and Decorative Tufting Techniques
A fantastic way to elevate your handmade pincushion is by adding a classic center button tufting detail. Thread a long, heavy-duty hand-sewing needle with embroidery floss or upholstery thread, tying a secure knot at the end. Insert the needle directly through the exact center of the cushion from the bottom to the top side.
Thread a beautiful decorative button onto the needle, then push the needle back down through the center to the bottom side. Pull the thread tightly to compress the stuffing, creating an elegant dimple effect that resembles a flower or a traditional tufted cushion. Repeat this process a few times, slide a second button onto the bottom side, and knot the thread securely.
If you want to take your handmade pincushion – tutorial to the next level, try creating a segmented “pumpkin” look. To do this, wrap embroidery floss tightly around the outside of the cushion from the center button to the outer edges, dividing the cushion into six or eight equal segments. This timeless vintage aesthetic works beautifully on round designs.
You can also experiment with surface embellishments like delicate hand embroidery, applique shapes, or attaching pom-pom trim along the outer seams. Adding a small loop of ribbon to one corner allows you to hang the cushion near your sewing machine or attach it to a sewing machine mat. The customization possibilities are truly endless when designing your own tools.
For those who love practical designs, consider adding a heavy magnet or a small pocket to the side of your handmade pincushion. A side pocket can easily hold a small pair of thread snips, a thimble, or a needle threader, keeping your most-used tools within arm’s reach. Personalizing your gear makes your daily sewing routine much more efficient and enjoyable.
Remember that a beautifully customized handmade pincushion also makes a thoughtful, heartwarming gift for fellow crafters, quilters, and hobbyists. By tailoring the fabric choices and colors to match a friend’s personality or sewing room decor, you create a sentimental item they will cherish and use during every single creative project.
4. Maintenance and Best Practices for Sewing Pins
To keep your handmade pincushion looking and performing its best, it is important to practice proper pin maintenance. Avoid inserting rusted, bent, or damaged pins into your cushion, as they can snag the fabric weave and transfer rust to your project. Periodically inspect your pin collection and discard any imperfect notions.
Store your finished cushion in a dry, cool place away from direct sunlight to prevent the fabric colors from fading over time. If your cushion is filled with organic materials like crushed walnut shells, keep it completely away from moisture to prevent clumping. A well-maintained sewing accessory can easily last for decades without losing its shape.
If the exterior fabric of your handmade pincushion accumulates lint, thread fibers, or dust, clean it gently using a sticky lint roller. Avoid submerging the entire cushion in water, especially if it contains organic fillings or metal components inside. For small stains on the surface, a damp cloth with mild soap is usually sufficient for spot cleaning.
Organizing your pins by type within the cushion can greatly improve your workflow during complex garment construction or quilting sessions. You can dedicate one side of your handmade pincushion for extra-fine silk pins, another area for heavy-duty quilting pins, and the center for your hand-sewing needles. This structured approach saves time during assembly.
Over time, you might notice the stuffing settling slightly, which is completely normal for heavily used handmade items. If your cushion begins to feel loose, you can easily add a decorative patch over a seam or insert a bit more filling through a small, carefully opened stitch. Maintenance extends the lifecycle of your favorite studio tools.
By completing this handmade pincushion – tutorial, you have created a reliable workspace companion that reflects your personal crafting style. Embracing handmade tools connects you to traditional sewing heritage while allowing you to build an organized, inspiring, and highly functional creative environment. Happy sewing, and enjoy utilizing your brand-new workspace masterpiece!
Frequently Asked Questions (FAQ)
What is the best filling for a handmade pincushion?
The best fillings are crushed walnut shells or emery sand because they add substantial weight to your cushion and naturally sharpen your pins. If you want a softer, lightweight cushion, high-quality polyester fiberfill or 100% wool roving work exceptionally well.
Can I wash my handmade pincushion if it gets dirty?
It is not recommended to wash or submerge a cushion filled with crushed walnut shells or emery sand, as moisture can cause clumping. Instead, use a lint roller to remove loose threads and spot-clean the fabric surface using a damp cloth with a tiny drop of gentle soap.
How do I prevent my sewing needles from rusting inside the cushion?
To prevent rust, ensure your cushion is stored in a dry environment and filled with non-retaining moisture materials like synthetic fiberfill or cleaned walnut shells. Avoid using raw unwashed fleece, which might still contain natural moisture or specific acids that react with metal over long periods.
What size fabric squares should I use for a beginner project?
For beginners, using fabric squares measuring five inches by five inches is ideal. This dimension provides a comfortable, manageable size to sew and leaves plenty of surface area to hold a large collection of pins without being too bulky on your table.
Do I need a sewing machine to complete this handmade pincushion – tutorial?
Not at all! This project is small enough to be easily sewn entirely by hand using a strong backstitch for the main seams and a ladder stitch to close the final opening. It is an excellent, relaxing project for practicing your hand-sewing precision.
Conclusion
In this handmade pincushion – tutorial, we have covered the entire creative process of making a personalized, durable, and highly functional sewing accessory.
From selecting tight-weave cotton fabrics and specialized fillings like crushed walnut shells to executing clean seams and beautiful tufting details, you now possess the knowledge to construct a beautiful workspace companion. Creating your own tools not only saves money but also ensures your sewing room reflects your unique artistic style.