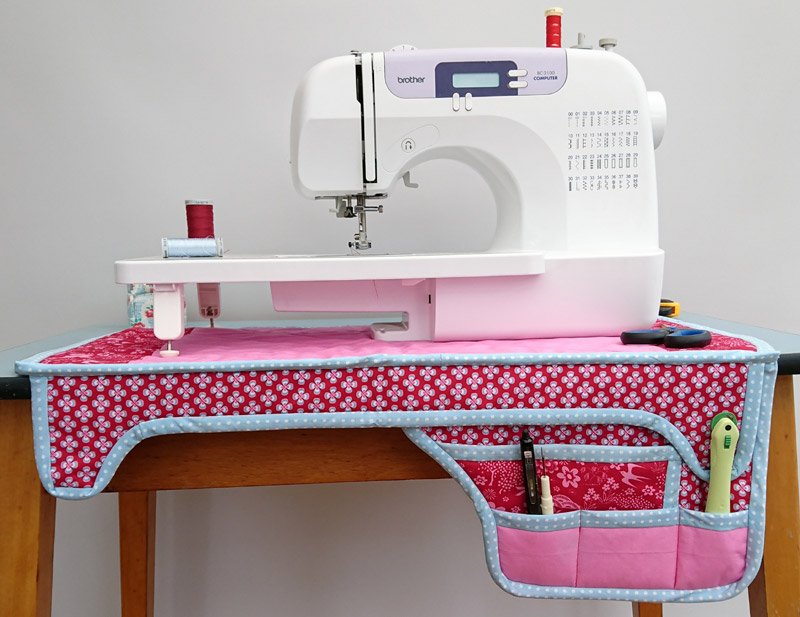
Sewing Machine Mat – Tutorial: If you have ever spent an afternoon sewing, you know how easily a creative space can turn into absolute chaos. A high-quality sewing machine mat is the ultimate unsung hero of a functional craft room, acting as a buffer against vibrations, a shield for your tabletop, and a clever organizer for your most-used tools. Learning how to create one through a step-by-step sewing machine mat – tutorial is a fantastic weekend project that immediately upgrades your sewing experience. Whether you are a seasoned quilter or a complete beginner, this project is highly rewarding, customizable, and incredibly practical for everyday use.
Investing your time in this sewing machine mat – tutorial means you will finally say goodbye to shifting machines, loud motor echoes, and the constant search for misplaced sewing notions. By choosing your own vibrant fabrics and adding personalized pockets, your custom mat will keep your fabric shears, rotary cutters, and sewing pins right at your fingertips. It transforms your workspace from a cluttered table into a dedicated, professional-feeling sewing station that inspires you to create more.
In this comprehensive sewing machine mat – tutorial, we will walk through every single stage of the process, ensuring you achieve a beautiful, professional finish. We will cover selecting the best durable fabrics, adding protective quilting layers, and constructing handy hanging pockets for ultimate storage. Grab your favorite cotton prints, thread your machine, and let’s dive into this fun, practical guide to crafting your very own custom workspace organizer.
1. Choosing the Best Materials for Your Sewing Machine Mat
When embarking on this sewing machine mat – tutorial, selecting the right materials is crucial for both functionality and longevity. You want a fabric that can withstand the constant friction of heavy machinery while still looking beautiful on your table. 100% cotton fabric is the absolute best choice for the exterior because it is easy to wash, comes in endless prints, and presses beautifully.
For the interior layer, you need something that offers excellent shock absorption to dampen the noise of your machine. Low-loft cotton batting or insulated fleece works wonders for reducing machine vibrations during high-speed stitching. This cushioning layer protects your delicate wooden tables from accidental scratches caused by heavy pins or scissors.
Do not overlook the backing fabric, which plays a massive role in keeping your setup stable. A non-slip utility fabric or a heavy-duty canvas ensures that your entire setup stays firmly in place while you work. If you prefer a cohesive look, a sturdy home decor weight cotton will also do an amazing job.
You will also need plenty of matching sewing thread, a reliable fabric marker, and sharp quilting pins to hold your layers together. Since this mat includes functional pockets, choosing a contrasting fabric for the pockets adds a beautiful pop of color. Having these materials ready before starting your sewing machine mat – tutorial ensures a smooth crafting process.
Proper preparation of your textiles will prevent future warping or shrinking when you wash the mat later on. We highly recommend pre-washing and ironing your cotton fabrics to guarantee your measurements remain exact after assembly. Once your materials are washed, pressed, and laid out, you are fully prepared to begin cutting your pieces.
2. Cutting and Preparing Your Fabric Pieces
Precision is the secret ingredient to a professional-looking finish in this sewing machine mat – tutorial. Start by measuring your specific sewing machine base to ensure the mat provides ample coverage on all sides. A standard, universally friendly size for the main body of the mat is typically 20 inches by 24 inches.
To begin cutting, you will need to prepare three identical rectangles of this size: one for the top main fabric, one for the backing, and one for the internal batting layer. Use a high-quality rotary cutter and a self-healing mat to get perfectly straight, clean edges. Accurate cutting now prevents alignment issues later when we begin assembling the layers together.
Next, we need to focus on creating the incredibly useful hanging storage pockets that sit at the front of your desk. Cut a separate fabric rectangle measuring 8 inches by 24 inches for the pocket assembly, along with a matching piece of lightweight fusible interfacing. This interfacing is vital because it reinforces the pockets, preventing them from sagging under the weight of heavy fabric shears.
Iron the fusible interfacing to the wrong side of your pocket fabric following the manufacturer’s instructions carefully. Fold the pocket strip in half lengthwise with wrong sides together, and press it firmly to create a crisp top edge. This crisp edge will serve as the opening for all your handy sewing tools and measuring tapes.
Before moving to the next phase of our sewing machine mat – tutorial, lay your main top fabric flat on your workspace. Place the prepared pocket strip along the bottom edge, aligning the raw edges perfectly at the sides and bottom. Use your fabric marker to draw vertical lines where you want to separate your pockets for different tools.
3. Quilting and Constructing the Mat Body
Quilting the main body of your mat adds structural integrity and gives it a gorgeous, high-end handmade aesthetic. Create a “sandwich” by placing your backing fabric face down, layering the cotton batting on top, and finishing with your main top fabric face up. Smooth out any wrinkles from the center outward to ensure there are no frustrating bubbles trapped inside.
Secure this fabric sandwich thoroughly using safety pins or specialized quilting clips spaced every few inches. For this stage of the sewing machine mat – tutorial, using a walking foot on your sewing machine is highly recommended. A walking foot feeds all three layers through the machine evenly, completely preventing shifting and puckering.
You can choose a simple, elegant straight-line quilting pattern or a classic diamond grid to secure the layers together. Set your stitch length to a slightly longer setting, around 3.0mm, for a beautiful, defined quilted look. Take your time sewing across the canvas, removing the pins just before your needle reaches them.
Once the main body is fully quilted, it is time to permanently attach your prepared pocket piece to the front. Place the pocket strip on the bottom edge of your quilted mat, pinning it securely along the sides and bottom raw edges. Sew directly over the vertical lines you marked earlier, ensuring you backstitch at the top of each pocket for maximum reinforcement.
These vertical lines create individual compartments tailored perfectly for your sewing clips, seam rippers, and extra bobbins. After stitching the pocket dividers, baste around the three remaining raw outer edges using a generous quarter-inch seam allowance. This holds everything firmly together, making the final binding application an absolute breeze to complete.
4. Applying Binding for a Professional Finish
The final step of our sewing machine mat – tutorial involves binding the raw edges to give it a clean, durable finish. You can create your own double-fold bias tape from matching fabric or use a high-quality store-bought binding. Cut fabric strips 2.5 inches wide, sew them together diagonally, and fold them in half lengthwise, pressing as you go.
Align the raw edges of your binding strip with the raw edges of your quilted mat, starting on one of the sides. Leave a 3-inch tail of binding unsewn at the start, which allows for a clean join when you loop all the way around. Sew the binding down using a precise quarter-inch seam allowance, stopping exactly a quarter-inch before reaching the first corner.
To achieve perfect mitered corners, pivot your mat, fold the binding strip up at a 45-degree angle, and then fold it straight back down. This clever folding technique creates a beautiful, neat diagonal fold at the corner that looks incredibly professional. Stitch down the next side, repeating this exact mitered corner process for all four corners of your mat.
When you return to your starting point, trim the excess binding and join the two tails together neatly. Stitch the remaining gap closed, then flip the binding over to the back side of your sewing machine mat. Pull the fold tightly over the raw edges on the back, securing it with plenty of sewing clips.
You can finish the binding by hand-stitching it with an invisible blind stitch for a flawless, show-quality look. Alternatively, you can machine-stitch closely along the edge on the front side, catching the back binding for a fast, modern finish. Give your completed project one final, hot press with your iron to set all your gorgeous stitches.
Frequently Asked Questions (FAQ)
What is the best fabric to use for a sewing machine mat?
The best choice is 100% quilting cotton for the top and pockets because it is durable and easy to handle. For the backing, consider a heavy canvas or a non-slip utility fabric to keep the mat from sliding around your table.
Can I wash my sewing machine mat once it is finished?
Yes, you absolutely can, provided you pre-washed your fabrics before cutting them to avoid unexpected shrinkage. Wash it on a gentle, cool cycle and lay it flat to dry to preserve the structure of the internal batting.
How thick should the internal batting layer be?
A medium to low-loft cotton or polyester batting is ideal for this project. If it is too thick, your machine might wobble; if it is too thin, it won’t absorb noise and vibrations effectively.
What size should I make my mat if my machine is extra-large?
Simply measure the length and width of your machine’s base and add at least 4 to 5 inches to each measurement. This ensures you have plenty of room for the machine to sit comfortably while leaving the pocket section hanging over the edge.
Do I absolutely need a walking foot to sew this project?
While a walking foot is highly recommended for sewing through layers of batting without shifting, it is not mandatory. You can use a standard foot, plenty of pins, and a slow, steady pace to achieve great results.
Conclusion
In this sewing machine mat – tutorial, we have covered everything from selecting durable fabrics to cutting precisely, quilting the body, and applying a flawless binding finish.
Creating this custom mat is a wonderful way to organize your sewing notions, minimize machine noise, and add a beautiful touch of personality to your creative workspace. It serves as a highly practical project that protects both your valuable machinery and your table surfaces for years to come.