Crochet Cell Phone Pouches – Tutorial is the ultimate guide you need to create a stylish, functional, and protective accessory for your smartphone using just a hook and some yarn. In a world where we are constantly glued to our screens, keeping our expensive devices safe from scratches, drops, and dust has become a top priority. While mass-produced plastic cases are widely available, nothing matches the charm, texture, and personalization of a handcrafted sleeve. Designing your own mobile cozy allows you to express your unique style while practicing a relaxing, rewarding craft that has captured the hearts of makers worldwide.
This comprehensive crochet cell phone pouches – tutorial is tailored for crafters of all skill levels, whether you are picking up a hook for the very first time or you are a seasoned stitcher looking for a quick, satisfying weekend project. A custom-made sleeve acts as a soft cushion for your device, absorbing minor impacts and preventing accidental screen scratches when tossed into a crowded bag or purse. Beyond the practical benefits, these handmade items make incredibly thoughtful, budget-friendly gifts for friends, family, and coworkers who appreciate artisan craftsmanship.
Throughout this extensive crochet cell phone pouches – tutorial, we will walk you through every single step of the creation process, from selecting the perfect yarn to executing the foundational stitches and adding beautiful finishing touches. By understanding the core techniques of stitch gauge, tension control, and seamless joining, you will unlock the ability to customize your pouch for any phone model on the market today. Grab your favorite yarn, find a comfortable seat, and let us dive deep into the wonderful world of stitched device protection.
1. Choosing the Right Materials for Your Protective Pouch
Selecting the appropriate yarn type is the most critical first step when embarking on this crochet cell phone pouches – tutorial journey. For a device sleeve, you want a fiber that offers structure, durability, and excellent stitch definition so that your phone remains secure inside. Cotton yarn is widely regarded as the absolute best choice for mobile accessories because it is incredibly sturdy, stretches very little over time, and can be washed easily if it gets dirty.
The weight of your yarn also plays a significant role in the overall thickness and protective quality of the final product. A standard worsted weight yarn (Category 4) or a light DK weight yarn (Category 3) is highly recommended for beginners because they are easy to handle and work up relatively quickly. Avoid using overly fuzzy or textured novelty yarns for this specific project, as they can snag on the corners of your phone and make it difficult to maintain an even, tight stitch gauge.
In addition to your yarn, you will need to select a matching ergonomic crochet hook that complements your chosen fiber weight perfectly. For worsted weight cotton, a size G/4.0mm hook or an H/5.0mm hook is usually ideal, depending on how tightly or loosely you naturally stitch. It is generally better to use a slightly smaller hook than what the yarn label suggests to ensure your stitches are dense and compact, preventing the phone from slipping through any gaps.
Do not forget to gather your essential notions before you begin stitching your brand-new smartphone cover. You will definitely need a sharp pair of craft scissors for clean yarn cuts, a blunt-tipped yarn needle for weaving in your loose ends, and a few locking stitch markers to keep track of your rounds. If you plan on adding a secure closure to your pouch, you should also pick out a beautiful wooden button, a metal snap fastener, or even a small strip of hook-and-loop tape.
Understanding the relationship between your materials will save you a lot of time and frustration later in the making process. When you use high-quality mercerized cotton yarn, your pouch will naturally resist pilling and maintain its vibrant color even after months of daily use and handling. Taking the time to curate the right supplies ensures that your completed case feels premium, looks professional, and stands up to the rigors of everyday life.
Ultimately, the materials you choose will define the aesthetic and tactile experience of your finished handmade tech accessory. You can experiment with bright, cheerful neon colors, elegant muted earth tones, or even variegated yarn that creates automatic striping patterns as you work your way up. No matter what your personal style is, prioritizing structural integrity in your material choices is the key secret to a long-lasting and effective phone holder.
2. Essential Stitches and Step-by-Step Foundation
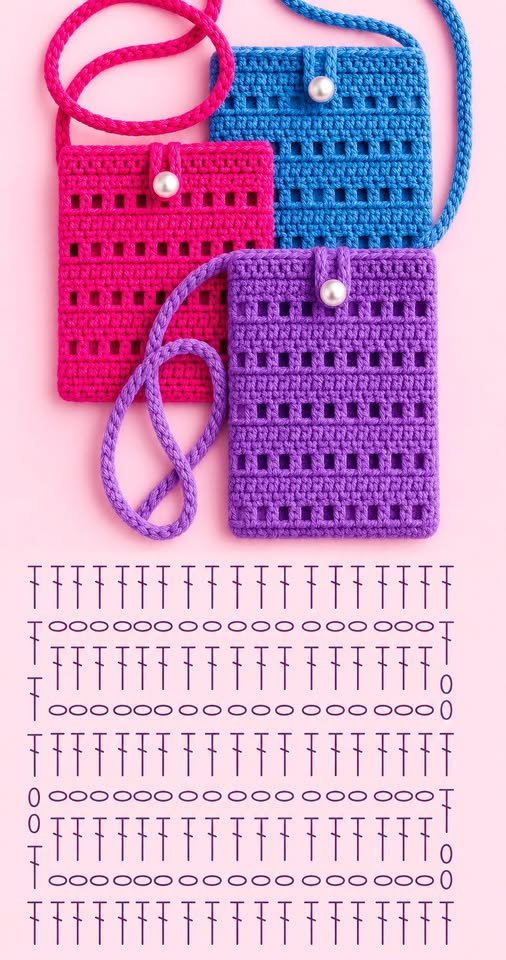
To kick off the structural part of this crochet cell phone pouches – tutorial, you must first learn how to create a proper slip knot and build an accurate foundation chain. The number of chain stitches you need will depend entirely on the physical width of your specific mobile device. As a general rule of thumb, you should chain enough stitches to match the width of your phone, then add two more chains to account for the seam turn.
The fundamental building block for a highly protective, dense fabric is the classic single crochet stitch. This specific stitch is favored by tech accessory designers because it creates a tight, solid texture without large holes, ensuring your phone screen is thoroughly shielded. To practice, you will work your stitches across the foundation chain, making sure not to pull your yarn too tightly, which can cause the bottom of your pouch to curl awkwardly.
To create a seamless bottom for your sleeve, this crochet cell phone pouches – tutorial utilizes a brilliant technique known as working in the round. Instead of turning your work at the end of the first row, you will rotate your piece 180 degrees and continue stitching along the opposite side of your original foundation chain. This creates an oval-shaped base that perfectly cups the bottom of your smartphone without requiring any bulky, uncomfortable sewn seams.
Once your base is established, you will transition into continuous spiral rounds, placing one single crochet stitch into every stitch from the previous row. Utilizing a reliable locking stitch marker is absolutely essential during this phase so you always know exactly where each new round begins and ends. Working in a continuous spiral eliminates the visible seam line that usually forms when you join rounds with a slip stitch, resulting in a flawless exterior.
As you build up the walls of your cover, it is incredibly important to periodically check your fit by sliding your actual phone into the working piece. The sleeve should fit snugly around the device, offering enough friction to keep it from sliding out on its own, but not so tight that you struggle to insert it. If the piece feels too loose, you may want to start over using a smaller hook size to tighten up your overall stitch tension.
Continue repeating these simple, meditative rounds of single crochet until the fabric reaches the exact height of your phone’s top edge. For most modern smartphones, this will require anywhere from twenty-five to thirty-five full rounds of stitching, depending on your individual gauge. Enjoy this rhythmic process, as it is the core foundation that turns a simple ball of string into a beautifully tailored, functional piece of fabric.
3. Customizing Sizes for Different Smartphone Models
One of the greatest advantages of following this specific crochet cell phone pouches – tutorial is the absolute freedom to customize the dimensions for any phone size. Whether you carry a compact mini device or a massive pro max flagship model, modifying the pattern is incredibly straightforward and stress-free. The golden rule is always to measure your phone with its current slim plastic case still on, ensuring the finished yarn sleeve fits comfortably over everything.
To adjust the width of your holder, simply increase or decrease the number of your initial foundation chain stitches accordingly. If you are making a cover for a larger phone, add chains two at a time until the chain gently wraps halfway around the body of the device. Keep in mind that cotton yarn will soften and stretch slightly with repeated daily use, so a snug initial fit is always preferable to a loose one.
For individuals who own exceptionally thick devices or phones with heavy-duty rugged cases, you can introduce half double crochet stitches to add a bit more flexibility. The half double crochet stitch is slightly taller than a single crochet, offering a fraction more drape and elasticity while still maintaining a highly protective barrier. Mixing and matching these basic stitches allows you to engineer the perfect amount of give for your specific storage needs.
Height customization is even easier to execute because you simply stop adding rounds whenever your phone is fully covered by the fabric. If you prefer a completely open-top design for quick and easy access to your device, stop stitching exactly three millimeters below the top headphone jack or charging port. If you want a protective fold-over flap, you will transition from working in the round to working in flat rows back and forth across just one side.
It is also vital to consider the aspect ratio of modern screens, which have become taller and narrower over the last few years. A customized crochet cell phone pouches – tutorial allows you to adapt to these modern design trends effortlessly by simply adding more vertical rounds without widening the base. This ensures that your phone will never awkwardly poke out of the top or get lost inside a pouch that is far too wide.
Don’t be afraid to take notes on a scrap piece of paper regarding how many chains and rounds you used for your specific model. Documenting your personal custom dimensions makes it incredibly easy to replicate the exact project later when you want to make matching gifts. Achieving that perfect, glove-like fit is highly satisfying and represents the true pinnacle of custom DIY tech protection.
4. Advanced Finishes, Embellishments, and Closures
Now that the main body of your sleeve is complete, this crochet cell phone pouches – tutorial will guide you through adding professional finishing touches. To prevent your phone from accidentally slipping out when inverted, incorporating a secure closure system is highly recommended. Creating a button loop flap is a popular option, achieved by chaining a short sequence of stitches from the back center edge and anchoring it with a slip stitch.
Choosing the right button can completely transform the overall design aesthetic of your handmade mobile carrier. A rustic wooden button adds a lovely, cozy, and organic look that pairs beautifully with cream, beige, or forest green cotton yarns. For a more sleek, modern, and minimalist appearance, consider using a polished metallic button or a hidden sew-on magnetic snap that remains completely invisible from the outside.
For those who love hands-free convenience, you can easily extend this project by crafting a sturdy crossbody strap or a comfortable wristlet loop. To make a durable strap that will not stretch out excessively under the weight of your phone, use the thermal stitch or a tight row of slip stitches. Attach the completed strap securely to the upper sides of your pouch using your yarn needle, reinforcing the join with multiple strong passes.
If you want to express your creativity further, consider embellishing the front face of your pouch with beautiful surface crochet or colorful embroidery. You can use a contrasting yarn color to stitch your initials, a cute geometric pattern, or a small minimalist flower directly onto the finished fabric. Adding these tiny, personalized details elevates the project from a simple utility sleeve to a true statement fashion accessory.
Before you consider your project fully complete, you must properly execute the process of weaving in your yarn tails securely. Pass your yarn needle through the insides of your stitches, changing directions at least three times to lock the fiber securely in place. Cutting your yarn tails too short without properly weaving them in can cause your hard work to unravel over time during intense daily use.
The final recommended step for a truly flawless, store-bought look is to gently block your finished pouch using a bit of steam or water. Lightly mist the cotton sleeve with a spray bottle, shape it carefully with your hands, and lay it flat on a clean towel to dry completely. Blocking relaxes the tension of your stitches, evens out any minor imperfections, and gives your new tech cozy a beautifully polished appearance.
Frequently Asked Questions (FAQ)
What is the best type of yarn to use for a crochet phone pouch?
The absolute best fiber for this project is 100% cotton yarn, specifically in a worsted or DK weight. Cotton provides a highly structured, durable, and sturdy fabric that will not stretch out excessively over time under the weight of your smartphone. It also offers excellent stitch definition and can be easily washed, making it perfect for an accessory that you handle multiple times every single day.
How do I make sure the pouch fits my specific phone model perfectly?
To achieve a perfect fit, always measure your foundation chain directly against your phone while its daily protective plastic case is still on. Your initial chain should be able to stretch lightly across the total width of the device. Remember that crochet fabric naturally loosens up slightly with regular use, so it is always best to aim for a snug, secure fit initially rather than a loose one.
Can a beginner complete this crochet cell phone pouches – tutorial?
Yes, absolutely! This project is incredibly beginner-friendly because it primarily uses the most fundamental stitch in the craft: the single crochet stitch. Working in continuous rounds removes the need for complex joining techniques or advanced row-turning rules. It is an ideal, low-stress project for newcomers to practice maintaining consistent stitch tension while creating something genuinely useful.
How can I clean and wash my handmade phone cover safely?
If you used the recommended cotton yarn, you can easily hand wash your phone sleeve in warm water using a mild, gentle detergent. Avoid twisting or wringing the wet fabric aggressively, as this can distort the shape of your stitches; instead, gently press the excess water out with a clean towel. Lay the pouch completely flat on a dry surface to air dry, reshaping it with your fingers while it is damp.
Is it necessary to add a lining fabric inside the pouch?
Adding a fabric lining is not strictly necessary if your single crochet stitches are dense, tight, and compact enough to shield the screen. However, sewing a soft cotton or flannel lining inside your sleeve adds an elite layer of premium protection against dust particles and fine scratches. It also gives the interior of your case a beautiful, high-end professional finish that prevents any internal snagging.
How do I prevent the strap from stretching out too much over time?
Crochet straps naturally want to stretch due to gravity and movement, but you can combat this by using specific dense techniques like the icord method or linked slip stitches. Another brilliant trick is to insert a non-stretchable ribbon, fabric strip, or cord inside your stitched strap before attaching it to the pouch. This reinforces the structure externally, ensuring the strap retains its original length permanently.
Conclusion
In this crochet cell phone pouches – tutorial, we have thoroughly explored how to create a gorgeous, custom-tailored, and highly protective sleeve for your mobile device from scratch. We covered the vital importance of choosing durable cotton yarn, mastering the foundational single crochet stitch in continuous rounds, and adjusting dimensions for a flawless custom fit. Furthermore, we discussed how incorporating personalized closures, handles, and beautiful embellishments can elevate your functional tech cozy into a gorgeous, fashion-forward statement piece.
Building your own device holder is not only an incredibly fun, fast, and budget-friendly project, but it also allows you to contribute positively to sustainable fashion by creating reusable, long-lasting craft items. We truly hope you found this guide helpful, inspiring, and easy to follow as you embark on your personal crafting adventures.