The Log Cabin Block – Tutorial is your ultimate guide to mastering one of the most iconic, beloved, and versatile patterns in the entire history of quilting. Whether you are a complete beginner stepping into the world of fabric arts or an experienced quilter looking to refine your chain-piecing speed, this classic design offers endless creative possibilities. In this comprehensive guide, we will break down every single step required to build a flawless block, ensuring your strips are perfectly straight and your corners are impeccably crisp.
Quilters across the globe adore this specific pattern because it beautifully combines historical tradition with modern design flexibility. By simply shifting your fabric colors or altering the width of your strips, the Log Cabin Block – Tutorial transforms from a rustic, traditional heirloom into a sleek, contemporary piece of modern art. It is a fantastic project for using up scraps from your stash, yet it looks incredibly sophisticated when planned with a curated, cohesive color palette.
As you dive into this Log Cabin Block – Tutorial, you will discover that the beauty of this technique lies in its mathematical simplicity and repetitive, meditative construction process. We will explore the essential tools you need, the standard cutting measurements, the precise layout strategies, and the best pressing techniques to avoid any fabric distortion. By the end of this deep-dive guide, you will have all the confidence and skills necessary to create gorgeous, flat, and perfectly squared quilt blocks for your next big project.
1. Choosing Fabrics and Color Value Placement
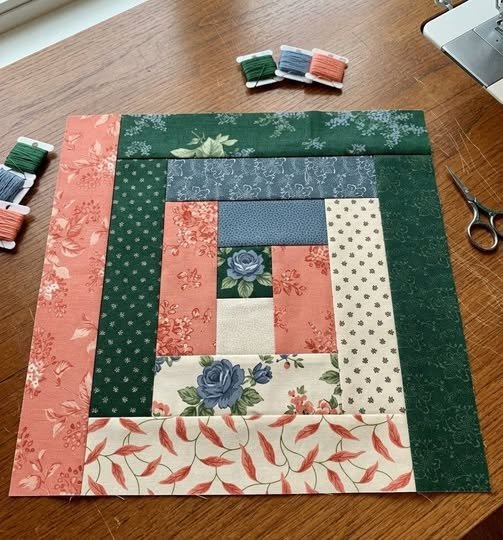
The secret to a visually striking quilt block lies entirely in how you arrange your light and dark values. Traditional quilting lore dictates that the center square represents the hearth of the home, which is why it is historically cut from a bright red or warm yellow fabric. From that central point, the block is visually divided diagonally, with one half featuring light fabrics and the other half utilizing dark fabrics to create a dramatic, high-contrast effect.
When selecting materials for your project, look for high-quality cotton fabrics that hold their shape well during cutting and stitching. You can choose a variety of prints, ranging from delicate florals and reproduction prints for a vintage look, to solid bold colors for a graphic appearance. The magic happens when these values interact, so always step back or take a grayscale photo with your phone to ensure your lights and darks are distinctly separated.
Before making a single cut, organize your fabric strips into two distinct piles based on their visual weight. Your light pile might include cream, beige, pastel, or low-volume white prints, while your dark pile will feature deep blues, rich greens, blacks, or vibrant berries. This deliberate separation is what gives the finished design its characteristic depth and allows you to create incredible secondary patterns when you sew multiple blocks together.
Consistency is key when you are prepping your materials for assembly. While many seasoned crafters love using an assorted scrap bag for a beautifully eclectic aesthetic, beginners might find it easier to work with a dedicated fabric line where the colors are already coordinated. Whichever route you choose, ensure your fabrics are pressed completely flat and free of wrinkles before you begin the cutting process.
It is also important to consider the scale of the prints you are using within the design. Large-scale prints can sometimes get lost or look disjointed when chopped up into narrow strips, so small-scale motifs, tone-on-tone prints, or solid colors generally work best. This ensures that the clean lines of your piecing remain the absolute star of the show without being overshadowed by busy fabric patterns.
Ultimately, proper fabric preparation and thoughtful value placement set the foundation for the rest of your work. By taking the time to carefully curate your color palette and verify the contrast between your chosen strips, you guarantee that your final project will have the stunning visual impact that makes this timeless pattern so incredibly famous worldwide.
2. Precise Cutting and Tool Preparation
To achieve a flawless result with this design, accuracy during the cutting phase is just as important as your accuracy at the sewing machine. You will need a few essential quilting tools to get started, including a self-healing cutting mat, a sharp rotary cutter, and a long acrylic quilting ruler. Having a fresh, sharp blade in your rotary cutter prevents skipped threads and ensures clean, perfectly straight edges on every single strip.
For a standard block size, a very popular and manageable measurement is to cut all your fabric strips to a width of 2.5 inches. Your central hearth square will also be cut as a perfect 2.5-inch by 2.5-inch square to start the foundation. From there, each subsequent log will be cut to specific lengths that correspond to the growing size of the block as you build outward.
Alternatively, many quilters prefer a method called chain piecing, where they sew long, continuous strips of fabric directly onto the growing block and then trim them flush with the edge. This advanced shortcut saves an immense amount of time and reduces the risk of miscalculating individual cut lengths. If you choose to pre-cut your pieces, label them carefully by length to keep your workspace completely organized.
Never underestimate the power of squaring up your fabric before you begin cutting your long strips. Align the factory selvage edges perfectly, lay the fabric on your mat, and use your ruler to trim away a clean edge perpendicular to the fold. This initial step prevents your strips from having a subtle “banana” curve, which can easily ruin the alignment of your final squares.
Take your time during this preparation phase, as rushing through cutting is where the most common quilting mistakes occur. Double-check your ruler alignment before applying downward pressure with your rotary cutter, keeping your fingers safely away from the sharp blade. Accurate cutting ensures that all your seams will line up effortlessly down the road, saving you from using the seam ripper later.
Once all your pieces are cut and sorted into their respective light and dark piles, you are ready to move to the sewing machine. Keep your pieces stacked neatly next to your station in the exact order you will need them, creating an efficient assembly-line workflow that makes the crafting process incredibly smooth, relaxing, and highly enjoyable.
3. Step by Step Construction and Piecing Strategy
Now that your fabric is prepped, it is time to assemble the pieces using a precise quarter-inch seam allowance. Begin by taking your central 2.5-inch square and placing it right sides together with your very first light fabric strip. Lower your presser foot, set a short stitch length to lock the pieces securely, and sew carefully down the edge from top to bottom.
After sewing the first seam, open the units and press the seam allowance flat, always pushing the fabric toward the newly added strip. Next, you will rotate the piece 90 degrees clockwise and attach the second light strip to the side of the combined unit. This specific clockwise rotation is the golden rule that you must follow consistently throughout the entire building process.
Once the first two light strips are securely attached, it is time to switch over to your dark fabric selection. Take your third strip, align it with the next open side of your growing square, and sew it down using that same consistent quarter-inch seam. Rotate the block 90 degrees clockwise once more, and attach your second dark strip to complete the very first full round.
You have now successfully completed one full orbit around the central hearth square, and you can already see the iconic pattern taking shape. To continue expanding your project, simply repeat this exact same sequence, always adding two light strips followed by two dark strips. With each consecutive round you add, the block grows larger, grander, and more visually impressive.
As you sew, it is helpful to use a specialized quarter-inch sewing machine foot if you have one available, as it provides a reliable physical guide. Maintain a steady, moderate sewing speed rather than racing through the seams, ensuring that the fabric edges stay perfectly flush. Consistency in your seam allowance is the ultimate secret to preventing the block from warping or bowing.
Continue building your rounds until your block reaches your desired total dimensions, which is typically anywhere from 10 to 14 inches square depending on your layout goals. Once the final strip is attached, give the entire unit a gentle, thorough press with your iron. You have now created a beautiful, structurally sound masterpiece that is completely ready to be integrated into a larger quilt design.
4. Pressing Techniques and Squaring Up Blocks
Proper pressing technique is an absolute game-changer that separates amateur quilting projects from highly professional, crisp textile art. Never slide your iron back and forth across the fabric, as this aggressive motion can easily stretch the bias edges and distort your straight lines. Instead, lift the iron up and press it straight down firmly onto the seams, letting the heat and weight do the work.
As a general rule for this specific pattern, always press your seam allowances outward away from the center toward the newest log you just attached. This practice keeps the back of your fabric looking neat, organized, and remarkably flat, preventing unnecessary bulk from building up at the intersections. A flat block is infinitely easier to quilt later on, whether you are using a domestic machine or a longarm.
Some quilters swear by using a touch of fabric starch or a formulation spray during the pressing process to give the cotton extra body. If you choose to use starch, apply it lightly and press thoroughly until the fabric is completely dry. This extra step adds stiffness to the pieces, making them much easier to handle and align when sewing multiple finished blocks together.
After your block has been thoroughly pressed and allowed to cool completely on your ironing board, place it back onto your self-healing cutting mat. Use a large square quilting ruler to check the final dimensions and ensure that all four corners form a perfect 90-degree angle. This crucial process is known in the crafting community as squaring up your block.
Carefully align the diagonal line of your square ruler with the diagonal seam lines of your fabric block to ensure everything is centered. Trim away any tiny fractions of an inch or stray threads that extend past your target measurement size using your rotary cutter. Squaring up each unit at this stage guarantees that your entire quilt top will fit together perfectly without any puckering.
Store your finished, squared pieces flat on a shelf or inside a shallow storage bin until you have completed the total number required for your quilt. Treat them with care to avoid fraying the outer raw edges before assembly. With these expert pressing and squaring habits firmly in place, your final quilting project is guaranteed to look absolutely spectacular.
FAQ
What is the history behind this traditional pattern?
This classic design dates back centuries and holds a deeply symbolic meaning in American quilting history. The central square traditionally represents the warm hearth of a home, while the contrasting light and dark sides represent the sunlit and shadowed sides of a cabin.
Can I make this project using pre-cut fabric jelly rolls?
Absolutely, using pre-cut 2.5-inch fabric strips is an incredibly popular, time-saving method for this pattern. It eliminates nearly all of your initial strip-cutting time, allowing you to jump straight into the fun process of layout and sewing.
Why is my finished block turning out wavy instead of flat?
Wavy blocks are usually caused by either an inconsistent seam allowance or accidental fabric stretching during the ironing process. Ensure you are sewing an accurate quarter-inch seam and pressing straight down with the iron rather than sliding it.
How many rounds of strips should I add to a single block?
There is no strict rule, but most traditional designs feature three to four complete rounds around the center square. This usually results in a final block size ranging from 10.5 inches to 12.5 inches square before assembly.
Which way should I press the seams for the best results?
For this specific construction style, it is highly recommended to press all seam allowances outward toward the most recently added strip. This minimizes bulk at the corners and keeps the front of your quilt top looking exceptionally smooth.
Conclusion
This Log Cabin Block – Tutorial has guided you through every essential phase of creating a classic piece of quilting history, from selecting high-contrast fabrics to mastering precise clockwise assembly and squaring up your final work. By focusing on accurate cutting, maintaining a steady quarter-inch seam allowance, and pressing with care, you can easily produce gorgeous, flat blocks that serve as the foundation for breathtaking quilts.
We would absolutely love to hear how your project turned out. Please leave your sincere opinion, share your personal experiences with this technique, and drop any creative suggestions or questions you might have in the comments section below.