
If you want to breathe new life into an old wardrobe staple or customize a new project, learning how to create an easy crochet sleeve for blouse – tutorial style is the perfect way to start. Adding custom sleeves allows you to transform a basic sleeveless top, rescue a damaged garment, or simply practice your crochet skills on a manageable scale. This project is accessible, highly rewarding, and adaptable to almost any style preference you might have.
In this comprehensive easy crochet sleeve for blouse – tutorial, we will walk through the entire process from selecting your materials to seaming the final piece. Handcrafted fashion is experiencing a massive revival right now, and being able to crochet your own garment components puts you at the forefront of sustainable style. You do not need years of experience to achieve professional-looking results with this method.
By following this step-by-step guide, you will master the foundational techniques required to build beautiful, comfortable sleeves that drape perfectly. We will cover sizing adjustments, stitch selection, and assembly methods that ensure your finished blouse looks cohesive and polished. Let us gather our supplies and dive into this creative journey together.
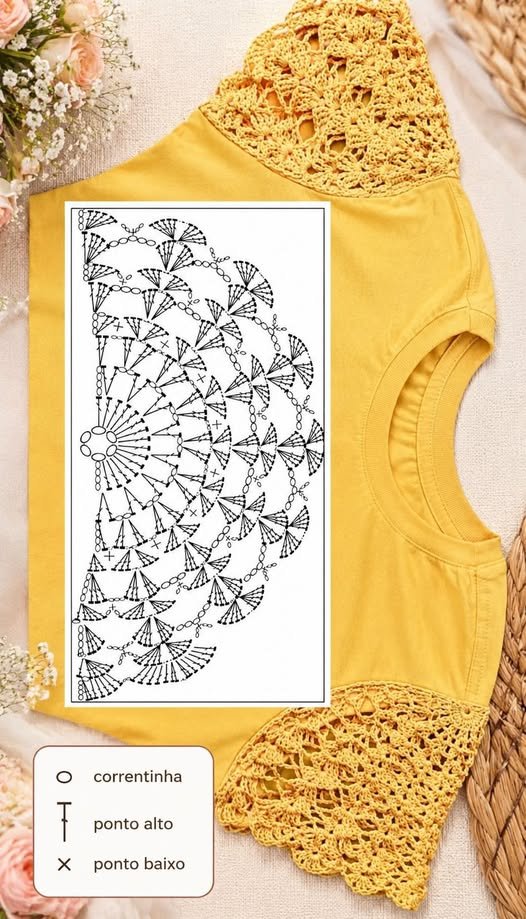
1. Choosing the Right Materials and Measuring for a Perfect Fit
Selecting the appropriate yarn is the first and most critical step in ensuring your sleeve looks great and feels comfortable. For a clothing project like this, a lightweight cotton, bamboo, or premium acrylic blend works best because these fibers offer excellent drape and breathability. You want a yarn that complements the fabric of your existing blouse so that the textures do not clash awkwardly.
Along with your yarn, you will need to select the correct crochet hook size, which is typically recommended on the yarn label. However, for wearables, you might want to go up one hook size if you tend to crochet tightly, as looser stitches create a more fluid fabric. You will also need a tape measure, a pair of scissors, a tapestry needle, and a few stitch markers.
Accurate measurements are the secret weapon behind any successful handmade garment component. To begin, measure the circumference of your armhole on the blouse where the new sleeve will attach, keeping the tape measure comfortably loose. Next, measure the widest part of your bicep and decide how long you want the sleeve to be, whether it is a short cap sleeve or a full-length style.
Write these numbers down carefully, as they will dictate your initial chain length and the overall stitch count for the project. For this easy crochet sleeve for blouse – tutorial, we are aiming for a slightly tapered look that flatters the natural shape of your arm. Remember to add an extra inch to your armhole measurement to account for ease of movement and seam allowance.
Before jumping into the main project, it is highly recommended to crochet a small gauge swatch with your chosen yarn and hook. A gauge swatch helps you determine exactly how many stitches make up an inch, allowing you to adjust your foundation chain precisely to your measurements. Skipping this step can lead to a sleeve that is either suffocatingly tight or completely oversized.
Once your measurements are verified and your swatch matches your expectations, you are fully prepared to begin crocheting. Having all your supplies organized next to you makes the crafting process much more relaxing and enjoyable. With your numbers in hand, you are ready to build a piece of clothing that fits your unique body shape flawlessly.
2. Crafting the Foundation Chain and Working the Main Stitch Pattern
To start the sleeve, create a slip knot and chain a length that matches the total width required for your underarm or bicep measurement, depending on whether you are working from the bottom up or top down. For this particular method, we are working from the cuff upward toward the shoulder. Ensure your foundation chain is loose enough so that the sleeve cuff can stretch comfortably over your hand.
In the first row, you will work your chosen foundational stitch into each chain across, establishing the base structure. For this easy crochet sleeve for blouse – tutorial, we highly recommend using the half double crochet or a simple double crochet stitch pattern. These stitches balance speed with texture, building fabric quickly while maintaining a beautiful, flexible drape that moves naturally with your body.
As you progress through the initial rows, maintain an even tension to keep the edges straight and the stitches uniform. If you notice your work curving drastically, recount your stitches to make sure you have not accidentally added or dropped any along the way. Using stitch markers in the first and last stitch of each row is an excellent way to prevent these common mistakes.
Continue working back and forth in rows until your piece reaches the point where your arm begins to widen toward the bicep. This section forms the lower part of your sleeve and establishes the rhythm of your stitch pattern. Take a moment to gently stretch the fabric and hold it against your arm to double-check that the width feels comfortable.
Crocheting with a relaxed mindset allows the yarn to flow smoothly through your fingers, which naturally improves the final texture of the fabric. If you prefer a more modern look, you can experiment with openwork stitches or mesh patterns, which are perfect for breezy summer blouses. However, solid stitches offer more structure and support for everyday wear.
By the time you finish this section, you will see a neat rectangle or slight trapezoid forming in your hands. This progress is incredibly satisfying and shows that you are well on your way to completing a custom garment transformation. Keep your tension consistent as we prepare to shape the upper portion of the sleeve.
3. Shaping the Sleeve Cap and Managing Increases or Decreases
Shaping is where the real magic happens, transforming a flat piece of crocheted fabric into a three-dimensional sleeve that fits perfectly into an armhole. To achieve this, you will need to implement gradual increases along the edges of your work as you move upward. Increasing simply means working two stitches into the very first and very last stitch of a row.
Spread these increase rows out evenly according to your measurements so the widening looks smooth rather than abrupt. For instance, you might choose to increase only every third or fourth row until you reach your maximum bicep width. Mark your increase rows with a different colored stitch marker so you can easily replicate the exact same pattern for the second sleeve.
Once you reach the full width of your bicep, it is time to shape the sleeve cap, which is the curved top part that sits over your shoulder. To do this, you will begin decreasing at the start and end of your rows, using stitches like the invisible decrease or slip stitching over the first few stitches. This creates a sloped edge that mirrors the curve of your blouse’s armhole.
Take your time during these shaping rows, as precision here ensures a smooth assembly process later on. Follow your calculations closely, matching the slope of the crochet piece to the physical opening of the fabric blouse. If the curve is too steep, the sleeve will pull awkwardly; if it is too flat, it will bunch up at the shoulder.
Never hesitate to rip back a row or two if the shape looks uneven, as this is a normal part of the garment-making process. The beauty of this easy crochet sleeve for blouse – tutorial is its flexibility, allowing you to customize the fit dynamically as you work. Once both sides of the sleeve cap curve symmetrically, you can finish the final row.
Fasten off your yarn, leaving a very long tail of at least twenty inches, which you will use later for sewing. Congratulations, you have successfully crocheted the main body of your sleeve with proper anatomical shaping. Lay it flat and give it a light steam blocking to set the stitches and relaxes the fibers before assembly.
4. Seaming the Sleeve and Attaching It to Your Blouse
Before attaching the sleeve to your blouse, you must first turn the crochet piece into a tube by seaming the underarm edges together. Fold the sleeve in half with the right sides facing together, aligning the rows perfectly from the cuff up to the underarm. Thread your long yarn tail through a tapestry needle to prepare for seaming.
Use a clean, flexible joining method like the mattress stitch or a slip stitch join along the edge to connect the two sides. The mattress stitch is highly recommended because it creates an almost invisible seam that sits flat against your skin without adding bulk. Keep your stitches firm but not overly tight, so the seam retains some of the fabric’s natural elasticity.
Once the underarm seam is secure, keep the sleeve inside out and turn your fabric blouse inside out as well. Insert the crochet sleeve into the armhole of the blouse, aligning the underarm seam of the sleeve with the side seam of the blouse. Use plenty of stitch markers or safety pins to secure the sleeve cap evenly around the entire armhole opening.
Carefully pin the top center of the sleeve cap to the shoulder seam of the blouse, then distribute the remaining fabric evenly between these points. If you find that the crochet piece is slightly larger than the armhole, you can gently ease the fabric in while pinning. Taking your time during this pinning phase prevents puckering and uneven pulling when you wear the top.
Using a strong sewing thread that matches the color of your blouse, sew the crochet sleeve to the fabric edge using a backstitch or a secure whipstitch. Ensure your needle catches both the loops of the crochet stitches and the secure edge of the fabric. If your blouse fabric is prone to fraying, consider using a blanket stitch or overcasting the fabric edge before attaching the sleeve.
After sewing completely around the opening, knot your thread securely and weave in any remaining yarn ends with your tapestry needle. Turn your blouse right-side out and try it on to admire your beautiful, custom creation. Repeat this entire process exactly for the second armhole, ensuring your stitch counts and row numbers match perfectly for a symmetrical look.
FAQs
What type of yarn is best for adding sleeves to a lightweight cotton blouse?
For a lightweight cotton blouse, it is best to use a sport weight or fingering weight cotton or bamboo yarn. These fibers match the breathable, lightweight nature of cotton fabric, ensuring that the sleeves do not feel too heavy or pull down on the shoulders of the blouse.
Do I need to wash my crochet sleeve before sewing it onto the blouse?
Yes, it is highly recommended to block your finished crochet sleeve before attaching it. Wet blocking or steam blocking relaxes the stitches, sets the final dimensions, and ensures that the sleeve will not shrink or distort unevenly the first time you wash the completed blouse.
How do I calculate how many stitches to increase in each row?
To calculate increases, subtract your starting cuff stitch count from your desired bicep stitch count. Divide that number by the number of rows you have available between the cuff and the bicep, which tells you how frequently you need to add stitches to widen the sleeve smoothly.
Can I use this tutorial to make long sleeves instead of short ones?
Absolutely, this method is fully customizable for any length. To make long sleeves, simply continue working the straight or gently increased section of the sleeve until it reaches your wrist before you begin shaping the sloped sleeve cap at the shoulder.
What should I do if the crochet sleeve is slightly larger than the blouse armhole?
If the sleeve is only slightly larger, you can easily ease it into the opening by pinning it carefully at regular intervals before sewing. If it is significantly larger, it is best to undo a few shaping rows and decrease more aggressively to reduce the final stitch count.
Is it better to sew the sleeve on by hand or use a sewing machine?
Sewing the sleeve on by hand using a backstitch or whipstitch gives you much more control over the tension and alignment of the stretch crochet fabric against the stable blouse fabric. A sewing machine can sometimes stretch out the crochet stitches excessively if not handled carefully.
Conclusion
In this easy crochet sleeve for blouse – tutorial, we have explored how to transform a wardrobe piece by creating and attaching custom handmade sleeves. We covered everything from taking precise body measurements and selecting the perfect draping yarn, to building the foundation, shaping the sleeve cap, and seamlessly sewing the final piece onto your blouse.
This project is a fantastic way to merge the art of crochet with sustainable fashion, allowing you to refresh old clothes or design unique, hybrid garments that fit your style flawlessly.