
Customized denim jacket with Granny Squares – Tutorial is the ultimate way to breathe new life into your wardrobe while embracing the timeless charm of crochet. If you have an old denim jacket sitting in the back of your closet, it is time to transform it into a wearable piece of art. This project combines the rugged durability of denim with the cozy, colorful aesthetics of traditional crochet, creating a unique fashion statement.
By following this Customized denim jacket with Granny Squares – Tutorial, you will learn how to seamlessly blend these two distinct textures into a cohesive masterpiece. Upcycled fashion is more than just a passing trend; it is a sustainable lifestyle choice that allows you to express your individuality. Whether you are a seasoned crocheter or a complete beginner, this project offers a fun and rewarding creative outlet.
Throughout this comprehensive Customized denim jacket with Granny Squares – Tutorial, we will guide you through every single step of the process, from selecting the right materials to the final stitching. Preparing your jacket, crafting the perfect squares, and assembling them correctly will ensure a professional and durable finish. Get ready to elevate your style and master the art of boho-chic denim customization.
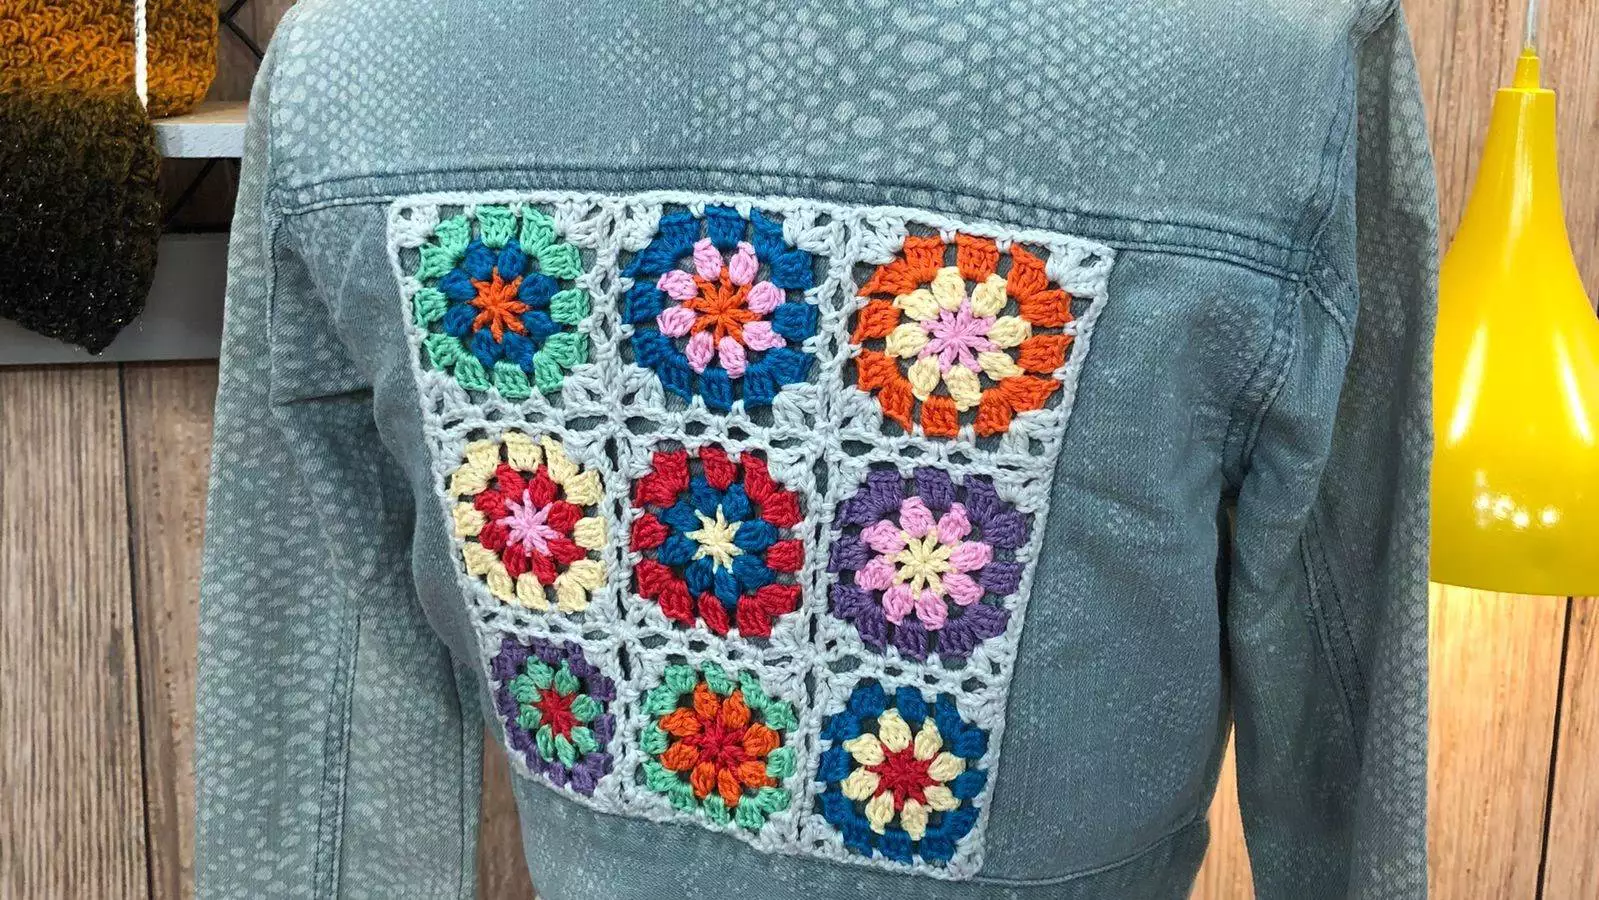
1. Choosing the Right Materials and Preparing Your Denim Jacket
When embarking on a Customized denim jacket with Granny Squares – Tutorial, selecting the correct base garment is crucial for success. Look for a 100% cotton denim jacket that has a bit of structure but is not overly stiff or heavy. A medium-weight denim works best because it can support the weight of the yarn without sagging or pulling out of shape over time.
The yarn you choose for your crochet elements plays a massive role in the final look and longevity of your garment. We highly recommend using 100% mercerized cotton yarn or a high-quality acrylic blend for this specific project. Cotton yarn offers excellent stitch definition, does not pill easily, and matches the casual, breathable vibe of denim perfectly.
In addition to the jacket and yarn, you will need a few essential tools to keep your project moving smoothly. Gather a crochet hook that matches your yarn weight, sharp fabric scissors, a tapestry needle, and plenty of sewing pins. Having a water-soluble fabric marker on hand is also incredibly useful for mapping out your design directly onto the denim.
Before you make a single crochet stitch, you must properly prepare your denim jacket to prevent future washing disasters. Always pre-wash and dry your jacket according to its care label instructions before starting any customization work. Denim can shrink slightly during its first few washes, which would warp your beautiful crochet work if done afterward.
Once your jacket is clean and dry, it is time to decide exactly where your crochet elements will be placed. Popular choices include the entire back panel, the front yokes, or even running down the length of the sleeves. Take accurate measurements of the chosen area using a flexible tape measure so you know exactly how big your crochet piece needs to be.
The final step in preparation is deciding whether you will cut away the denim or sew the squares directly on top. For a breathable, window-like effect, you can cut out the back panel, leaving a small seam allowance around the edges. If you prefer a simpler approach, keeping the denim intact and using it as a solid backing is a fantastic option for beginners.
2. Master the Art of Crafting the Perfect Granny Squares
The heart of this Customized denim jacket with Granny Squares – Tutorial lies in the creation of the classic crochet square itself. To begin, you will want to master the traditional granny square pattern, which relies on clusters of double crochet stitches. This pattern is highly adaptable, allowing you to change colors every round or stick to a sophisticated monochrome palette.
Consistency is absolutely key when crocheting multiple squares that need to be joined together seamlessly later on. Ensure your stitch tension remains even throughout the entire process so that every square turns out exactly the same size. If your tension varies wildly, your final panel will look warped and will not fit the dimensions of your jacket panel.
Experimenting with color combinations is where you can truly let your personal style shine through on your customized denim. You can opt for vibrant, retro-inspired neon shades, soft pastel tones, or earthy neutrals that complement the blue denim beautifully. Try sketching out a quick layout on paper beforehand to visualize how the colors will interact next to each other.
To achieve a truly professional look, you should never skip the incredibly important step known as blocking your crochet squares. Blocking involves pinning your finished squares to a foam board, misting them lightly with water, and letting them dry completely. This process relaxes the yarn fibers, straightens out any curling edges, and forces every square into a perfect geometric shape.
Once you have blocked all your individual squares, you will need to determine how many are required to fill your design space. Lay your squares out directly onto the jacket panel, arranging them like a puzzle until the area is completely covered. If you find yourself with awkward gaps, you can easily crochet smaller half-squares or triangles to fill the spaces.
With your layout finalized, you will join the squares together into a single, solid fabric panel using your tapestry needle. You can use a slip stitch join for a raised, textured seam, or a mattress stitch for an invisible, flat finish. Whichever method you choose, make sure to weave in all your loose yarn ends securely so they do not unravel later.
3. Stitching and Securing Crochet Panels to Denim Successfully
Now that your crochet panel is complete, this Customized denim jacket with Granny Squares – Tutorial moves into the assembly phase. Place your denim jacket flat on a hard work surface and carefully position your joined crochet panel over the designated area. Use an abundance of heavy-duty sewing pins to secure the panel in place, ensuring there are no ripples or tight spots.
To attach the crochet to the denim permanently, you can choose between hand sewing or using a standard household sewing machine. If you choose to sew by hand, a blanket stitch or backstitch using strong embroidery floss provides a beautiful, artisanal finish. Hand sewing gives you immense control over the thick layers of denim and yarn.
If you prefer using a sewing machine, you will need to equip it with a heavy-duty denim needle (size 90/14 or 100/16). Use a sturdy polyester thread that matches either the denim or the outermost border color of your crochet panel. Go slowly, using a slightly longer stitch length to accommodate the bulk of the combined materials without skipping stitches.
When sewing along the edges, make sure your stitches catch both the loops of the crochet border and the underlying denim fabric securely. If you cut out the denim panel earlier, you will need to fold the raw denim edges under to create a clean seam. Sew a double row of stitching around the entire perimeter to ensure maximum durability during daily wear.
Pay close attention to high-stress areas like the shoulders, armpits, and upper back where the jacket naturally pulls when you move. Reinforce these specific spots with a few extra backstitches to prevent the yarn from pulling away from the heavy denim fabric. A well-secured panel guarantees that your handmade fashion statement will withstand the test of time.
After completing the main stitching, remove all the pins carefully and inspect your work from both the outside and inside. Check for any loose threads, missed loops, or areas where the denim might be bunching up unnervingly. Once everything looks pristine and feels completely secure, give the entire area a gentle steam press with an iron to set the stitches.
4. Caring for and Styling Your Upcycled Wardrobe Masterpiece
Completing your project using this Customized denim jacket with Granny Squares – Tutorial is a massive achievement, but proper maintenance is vital. Because this garment combines two very different materials, you cannot simply toss it into a rough laundry cycle. To protect the delicate crochet stitches from snagging, always wash your customized jacket with extreme care.
The absolute best way to wash your new favorite garment is by hand washing in cold water with a mild detergent. Submerge the jacket gently, avoiding any harsh scrubbing or wringing actions that could distort the shape of the granny squares. If you must use a machine, place the jacket inside a mesh laundry bag and use the gentlest cycle available.
When it comes to drying your jacket, always skip the automatic clothes dryer, as the intense heat can ruin yarn fibers. Instead, lay the jacket flat on a clean, dry towel shaped to its natural dimensions, allowing it to air dry completely. Hanging a wet, heavy jacket can cause the damp crochet panel to stretch out of shape permanently due to gravity.
Styling your new Customized denim jacket with Granny Squares is incredibly fun because it acts as the ultimate statement piece for any outfit. Pair it with a simple white t-shirt and casual linen trousers to let the colorful crochet work take center stage. It also looks absolutely stunning draped over a simple sundress for an effortless, bohemian festival vibe.
Do not be afraid to lean into the double-denim look by wearing your customized jacket with a matching pair of classic blue jeans. You can even add smaller crochet accents to the pockets of your jeans to tie the whole handmade aesthetic together beautifully. This versatile jacket transitions seamlessly across seasons, keeping you stylish from breezy spring days to crisp autumn nights.
Ultimately, wearing a piece of clothing that you customized with your own two hands brings an unmatched sense of pride. Every compliment you receive about your jacket becomes an opening to share your passion for crafting and sustainable fashion choices. Wear your unique creation with confidence, knowing you have successfully blended tradition, style, and personal creativity into one garment.
Frequently Asked Questions (FAQ)
Can a total beginner complete this customized denim jacket project?
Yes, absolutely. While it requires patience, the traditional granny square is one of the easiest crochet patterns to learn. As long as you take your time measuring and pinning the panel to the jacket, you can achieve a stunning result even if it is your very first upcycling project.
What is the best type of yarn to use for garments combined with denim?
We highly recommend using 100% mercerized cotton yarn for this project. Cotton is incredibly durable, does not pill, matches the weight and breathability of denim, and holds its shape beautifully through multiple washes. High-quality acrylic blends can also work well if you want a softer feel.
Can I wash my customized jacket in a standard washing machine?
It is highly recommended to hand wash your jacket to preserve the integrity of the crochet stitches. However, if you must use a machine, turn the jacket inside out, place it inside a protective mesh laundry bag, use cold water, and select the most delicate cycle. Always air dry flat.
Do I have to cut out the denim fabric behind the granny squares?
No, you do not have to cut the denim away. Leaving the denim intact and sewing the squares directly on top is much easier and provides extra warmth and structure. Cutting the denim panel out creates a beautiful, semi-sheer lace effect, but it requires more advanced sewing skills to finish the edges cleanly.
Conclusion
In this Customized denim jacket with Granny Squares – Tutorial, we explored the entire journey of transforming a basic wardrobe staple into a vibrant, sustainable fashion statement.
We covered how to choose and prepare your denim jacket, the secrets to crafting perfectly uniform granny squares, and the best techniques for securing your crochet panels permanently. Finally, we discussed essential care tips and creative styling ideas to keep your unique garment looking beautiful for years to come.