A leaf-shaped rug – tutorial is exactly what you need if you want to bring a fresh, organic touch of nature into your home decor. There is something incredibly grounding about incorporating natural shapes into our living spaces, and a monstera, maple, or oak leaf design can instantly soften the hard lines of modern furniture. Crafting your own home accessories is not just a wonderful way to save money, but it also allows you to customize the colors and textures to match your specific style perfectly. In this comprehensive guide, we will walk you through every single step required to create a stunning, cozy piece of floor art from scratch.
When you embark on a DIY home decor project, the sense of satisfaction you get from completing it is unmatched. This specific leaf-shaped rug – tutorial is designed for crafters of all skill levels, meaning you do not need to be a professional textile artist to achieve a beautiful, high-quality result. By using simple materials like cotton canvas, cozy yarn, or tufting fabric, you can fashion a durable piece that feels amazing underfoot. Plus, homemade rugs make incredibly thoughtful gifts for housewarmings, baby showers, or holiday presents for your interior-design-loving friends.
Before we dive into the materials and step-by-step instructions, it is worth noting how popular botanical home accents have become in recent years. Interior design trends are shifting heavily toward biophilic design, which focuses on connecting our indoor spaces with the natural world. A leaf-shaped rug acts as a perfect focal point in a nursery, a cozy reading nook, a bathroom, or right beside your bed. By following this detailed guide, you will learn how to select the right fabrics, transfer your design effortlessly, and finish your rug with a professional look that lasts for years.
1. Choosing the Right Materials for Your Leaf-Shaped Rug
When starting your leaf-shaped rug – tutorial, selecting the best foundational materials is the most critical step for ensuring durability and comfort. For a classic tufted or punched look, you will want to source high-quality monk’s cloth or a sturdy cotton canvas backing that can withstand repeated needle punctures or stitching. The backing fabric needs to be tightly woven yet flexible enough to hold your yarn securely in place without tearing over time.
The type of yarn you choose will ultimately dictate the texture, softness, and washing resilience of your finished botanical floor mat. 100% wool yarn is highly recommended if you want a luxurious, bouncy feel and natural stain resistance, though it can be a bit more expensive. On the other hand, acrylic yarn offers a massive variety of vibrant green and earthy shades, is highly budget-friendly, and can be easily tossed into a gentle washing cycle.
In addition to your primary textiles, you will need a few essential tools to make the crafting process smooth and enjoyable. A reliable punch needle tool or a tufting gun will be your main instrument for inserting the yarn loops into your backing fabric. You will also need a sturdy carpet gripping frame or a large embroidery hoop to keep your canvas taut while you work, preventing unwanted warping.
Do not forget the hidden components that give DIY rugs their professional structure and safety features. A good quality liquid carpet latex or flexible fabric adhesive is necessary to coat the back of your work, locking every single yarn loop permanently into place. To prevent slipping on hardwood or tiled floors, you should also pick up a roll of non-slip rug underlayment fabric to attach to the very bottom.
Finally, gather your basic drafting and cutting tools before you sit down to start creating. A pair of ultra-sharp fabric shears is absolutely vital for trimming yarn loops evenly and cutting out the intricate curves of your leaf shape. You will also need a washable fabric marker or heavy dressmaker’s chalk to sketch your initial design onto the canvas without leaving permanent stains.
By investing a little time into gathering these premium yet accessible rug making supplies, you set yourself up for absolute success. Quality materials mean your rug will not shed excessively, lose its shape after a few weeks, or fall apart in the wash. Now that your workspace is stocked with the essentials, you are ready to move on to the creative design phase of the project.
2. Designing and Transferring Your Leaf Pattern
The true beauty of a leaf-shaped rug lies in its organic asymmetry and the specific type of foliage you choose to replicate. A monstera deliciosa leaf design is incredibly popular for bohemian and tropical aesthetics because of its dramatic natural cutouts and bold, recognizable silhouette. Alternatively, an oak leaf pattern or a classic maple shape offers a more traditional, rustic, and autumnal vibe that warms up a room.
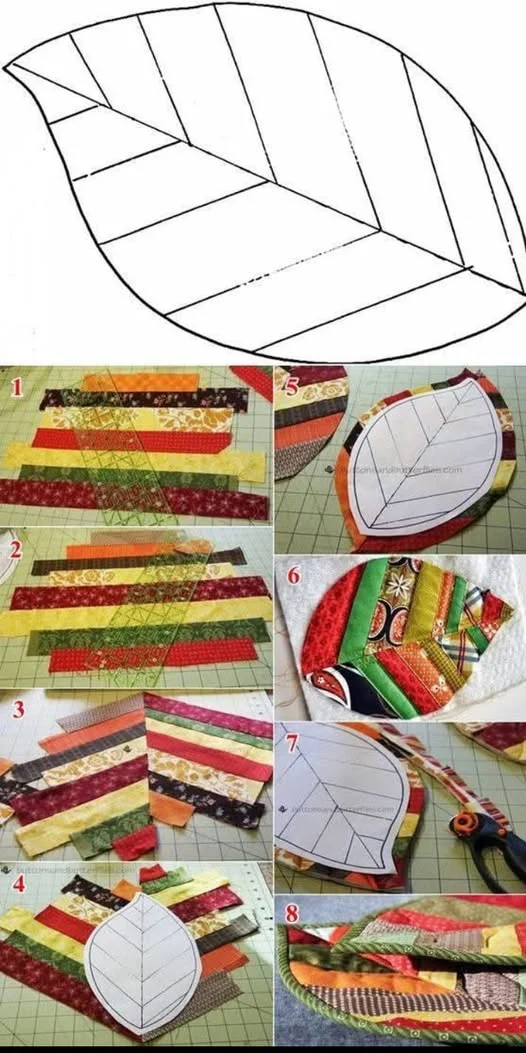
If you do not feel confident drawing freehand, there are plenty of free printable rug templates available online that you can scale up. To create a large-scale pattern at home, you can use a digital projector to cast the image directly onto your framed fabric, or use the classic grid method. The grid method involves drawing small squares over a reference photo and replicating them onto a larger grid drawn on your backing.
When sketching your design onto the rug backing canvas, remember to leave at least a two-inch border of excess fabric around the entire perimeter. This extra space is crucial because it gives you room to stretch the fabric tightly across your frame without distorting the actual design edges. Use bold, clear lines with your fabric marker so that you can easily see your boundaries while working.
It is also highly beneficial to draw the internal veins of the leaf directly onto your canvas during this preparation phase. The leaf vein lines act as a fantastic geometric roadmap that helps guide the direction of your stitches or tufts later on. Mapping these lines early ensures that your final piece has a realistic sense of movement and depth, rather than looking like a flat blob.
If your design requires a specific orientation, always keep in mind that the image will be mirrored on the front if you are working from the back. Punch needle and tufting are typically done from the reverse side of the fabric, meaning your drawn lines represent the back of the rug. Double-check your orientation before you begin applying yarn to ensure your leaf points exactly the way you want.
Once you are completely satisfied with the proportions and placement of your sketch, take a moment to ensure the fabric is drum-tight. As you press your needle into the material, a loose canvas will sag, leading to uneven loop lengths and immense frustration. Spend those extra few minutes tightening your clamps, and your leaf pattern transfer will yield beautiful, professional results.
3. Mastering the Stitching and Tufting Technique
Now comes the most meditative and rewarding part of the entire leaf-shaped rug – tutorial: adding the rich, colorful yarn texture. If you are using a punch needle, hold the tool like a pencil and push it completely down through the fabric until the handle touches the canvas. Always lead with the open slot of your needle facing the direction you are moving, keeping your movements fluid and close to the fabric surface.
To create a gorgeous, lifelike effect, it is best to work on the internal details like the leaf veins before filling in the main body. Use a slightly darker or lighter shade of green yarn for these veins to give your handmade rug an eye-catching, three-dimensional look. Thread your needle carefully, ensuring there are no knots in your yarn skein that could snag inside the tool.
When filling in the large open areas of the leaf, work in neat, concentric rows that follow the natural outer curves of the shape. Keeping your stitches consistent in density is the secret to avoiding bald spots or overly crowded, bumpy sections on the front loop side. Try to maintain a steady rhythm, inserting the needle into every second or third hole of your backing fabric weave.
If you make a mistake or dislike a color choice, do not panic, as textile arts are incredibly forgiving. You can simply pull the yarn out from the back, smooth down the monk’s cloth weave with your fingernail, and re-punch the area. This flexibility allows you to experiment with different shading techniques, blending gradients of deep forest green, sage, and mint seamlessly.
As you progress, periodically flip your frame around to inspect the front side of your growing botanical area rug. You want to check that the loops are forming evenly and that the pile height is consistent across the entire design. Seeing the plush, dense texture come alive on the opposite side is guaranteed to give you a massive boost of crafting motivation.
Take regular breaks to stretch your hands, neck, and shoulders, especially if you are working on a larger accent piece. Punching or tufting a full rug requires repetitive motion, and staying relaxed will help you maintain a steady, beautiful stitch tension. Once every square inch of your leaf outline is packed with cozy yarn, you are ready to transition to the crucial finishing steps.
4. Securing the Backing and Trimming the Edges
Finishing your work correctly is what transforms a simple craft project into a durable, professional-grade DIY area rug. With your leaf fully stitched and still attached to the tension frame, apply a generous, even layer of liquid carpet adhesive to the back. Use a plastic scraper or an old paintbrush to spread the glue, ensuring it penetrates the base of every yarn loop to lock them permanently.
Allow the adhesive to dry completely in a well-ventilated room, which usually takes anywhere from twelve to twenty-four hours. Once the glue is no longer tacky to the touch, carefully cut your rug free from the frame, leaving about an inch of raw canvas border around the edges. Next, make small, V-shaped relief cuts into this excess border fabric along all the curves and indentations of the leaf.
Fold these clipped tabs firmly toward the back of the rug and use hot glue or strong fabric adhesive to secure them down. This folding process creates a clean, rolled edge that prevents your handmade rug from fraying along its custom, organic borders. Take your time around the sharp tips and deep cutouts of the leaf shape to maintain its distinct botanical definition.
Now, place your pre-cut piece of non-slip backing fabric over the messy, glued reverse side of your leaf project. Carefully glue or whip-stitch this protective layer around the perimeter to hide all the raw edges and dried adhesive from view. A clean backing not only looks incredibly professional but also protects your floors and keeps the rug from sliding around safely.
Flip your completed masterpiece over to the right side so you can perform the final, highly satisfying aesthetic grooming process. Use your sharp fabric shears or specialized rug carving shears to trim away any stray, overly long yarn loops that disrupt the flat surface. You can also cut slight channels around the vein lines to separate the colors and make the leaf details pop dramatically.
Give your newly finished creation a gentle vacuum or a brush with a lint roller to remove all the loose fiber trimmings. Step back and admire your incredible work; you have successfully taken raw yarn and fabric and turned them into a stunning piece of art. Your custom creation is now fully prepared to bring warmth, texture, and natural beauty into your favorite living space.
Frequently Asked Questions (FAQ)
Can I wash my leaf-shaped rug in a standard washing machine?
Whether your rug is machine washable depends entirely on the specific fibers and adhesives you used during construction. If you made your rug using 100% acrylic yarn and a washable fabric adhesive, you can wash it on a cold, gentle cycle inside a mesh laundry bag. However, if you used wool yarn or traditional liquid latex backing, machine washing will ruin the structure; these rugs should be spot-cleaned or gently hand-washed instead.
What is the best size for a beginner punch needle leaf rug?
For your very first project, it is highly recommended to aim for a medium accent size, roughly 2 feet by 3 feet. This size is large enough to make a beautiful visual impact in a room while still being manageable to finish in a weekend. Starting with a massive living room rug can feel overwhelming and might lead to hand fatigue before you complete the project.
How do I stop the edges of my leaf rug from curling upward?
Edge curling usually happens if your backing fabric was stretched unevenly or if your yarn tension was too tight while punching. To fix or prevent this, ensure your liquid adhesive layer is completely dry before removing the rug from the frame. If it still curls after cutting, you can steam the back of the rug gently with an iron over a damp towel and weigh the edges down with heavy books for 24 hours.
Can I use a regular burlap fabric instead of monk’s cloth?
Yes, high-quality, tightly woven burlap can be used as a budget-friendly alternative for punch needle rug making. However, keep in mind that burlap is much stiffer, can be rough on your hands, and its fibers break more easily than monk’s cloth. For a smoother, more enjoyable crafting experience and a longer-lasting rug, specialized monk’s cloth or tufting cloth is always the superior choice.
How many skeins of yarn do I need for a medium-sized rug?
On average, a 2×3 foot punch needle rug with a standard pile height will require approximately 4 to 6 skeins of medium-weight yarn (around 200 yards per skein). It is always wise to buy one or two extra skeins of your primary green color from the same dye lot to ensure you do not run out halfway through.
Conclusion
This leaf-shaped rug – tutorial provides you with all the foundational knowledge, techniques, and steps needed to create an exquisite piece of functional home art. From selecting durable backing fabrics and vibrant yarns to transferring intricate botanical designs and mastering the punch needle, you now have the tools to transform raw textiles into a plush masterpiece.
By paying close attention to the final gluing, backing, and carving stages, you ensure that your homemade rug remains beautiful and resilient against daily foot traffic. Bringing biophilic elements into your home through manual crafting is a deeply fulfilling endeavor that elevates your interior spaces wonderfully.