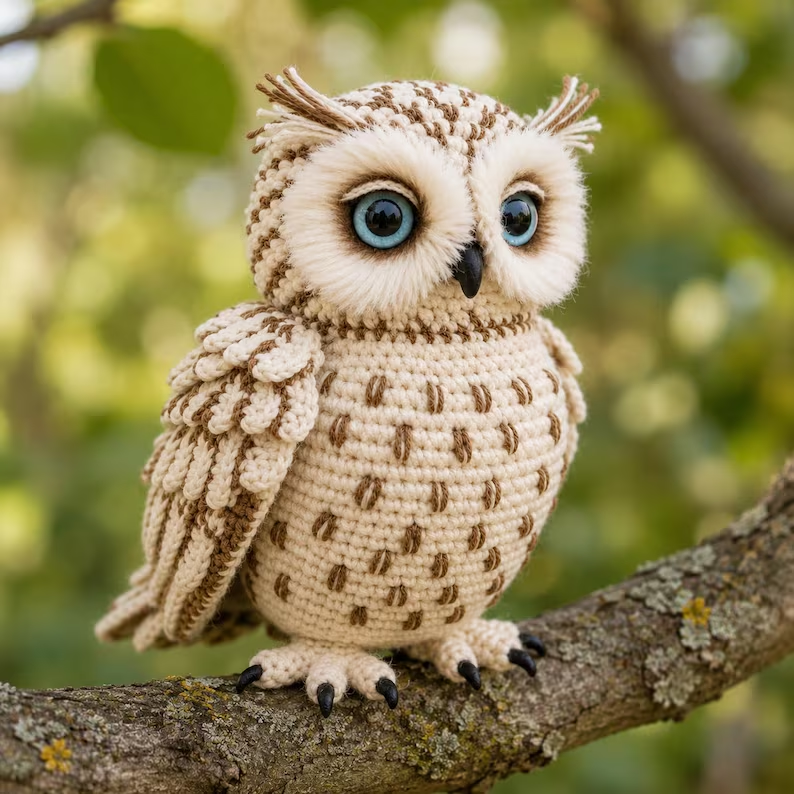
Amigurumi owl – Tutorial: crafting your very own adorable, handmade plush toy is one of the most rewarding projects you can undertake today. If you have ever looked at those charming, wide-eyed crocheted creatures online and wondered how to make one yourself, you have landed in the perfect place to start your creative journey. This comprehensive guide will walk you through the entire process of bringing a whimsical, textured nocturnal friend to life using simple yarn and a crochet hook.
Crochet enthusiasts worldwide have fallen in love with this specific Japanese art form because it combines the relaxing, repetitive rhythm of stitching with the joy of creating something structural and full of personality. An amigurumi owl – tutorial is widely considered the ultimate project for crafters of all skill levels because owls naturally possess simple, geometric shapes that are incredibly forgiving for beginners, yet they offer endless opportunities for advanced crafters to experiment with complex color changes and unique stitch textures.
Throughout this detailed walkthrough, we are going to explore the essential materials, the foundational stitches, and the exact step-by-step assembly methods required to ensure your final piece looks completely polished and professional. By focusing on proper tension, choosing the right materials, and mastering seamless assembly techniques, you will transform a simple skein of yarn into a cherished keepsake or a beautiful handmade gift. Let us gather our supplies, clear our minds, and dive right into the magical world of crochet.
1. Choosing the Right Materials for Your Amigurumi Owl – Tutorial
Selecting the perfect yarn and hook combination is the absolute foundation of any successful amigurumi owl – tutorial, as it directly dictates the final size, structure, and overall durability of your plush toy. For beginners, a standard worsted weight cotton yarn or a high-quality acrylic blend is highly recommended because these fibers offer excellent stitch definition and do not split easily while you work. Cotton yarn is particularly favored in the crochet community because it creates a sturdy, stiff fabric that holds its shape beautifully even after dense stuffing is inserted.
The secret to achieving a flawless finish in this amigurumi owl – tutorial lies in choosing a crochet hook that is significantly smaller than what the yarn label actually recommends. If your yarn suggests a 4.0mm hook, you should opt for a 2.5mm or 3.0mm hook instead to ensure your stitches are tight, compact, and free of visible gaps. Tight stitches are absolutely mandatory in toy making because they prevent the white polyester fiberfill stuffing from peeking through the fabric or spilling out over time.
Aside from your primary yarn and hook, you will also need a few essential notions to keep your work organized, precise, and professional. A reliable pair of sharp embroidery scissors, a blunt-tipped tapestry needle for sewing pieces together, and locking stitch markers are completely non-negotiable tools for this project. Stitch markers are especially vital because amigurumi is worked in a continuous, spiral round without joining, meaning it is incredibly easy to lose track of where a new row begins.
To give your stuffed creature its signature, soulful expression, you will also need to source a pair of plastic safety eyes, with 10mm or 12mm being the ideal sizes for this specific project. Safety eyes come with a secure plastic washer that snaps tightly onto the back of the fabric, making them incredibly secure and perfect for toys that might be handled frequently. However, if you are planning to give this toy to an infant or a very young child, it is always safest to embroider the eyes using black yarn.
Premium polyester fiberfill is the industry standard stuffing material for handmade toys because it is lightweight, washable, hypoallergenic, and retains its bounce beautifully over years of use. When stuffing your project, you want to achieve a firm balance where the toy holds its shape firmly without stretching the stitches so far that the inner stuffing becomes visible. Having a small amount of contrasting yarn scraps on hand is also brilliant for embroidering a tiny beak and delicate chest feathers later on.
Before making your final purchase, take some time to plan out a cohesive color palette that reflects your personal style or matches the decor of a specific nursery room. Classic forest tones like deep browns, warm creams, and muted greens give a traditional look, while pastel pinks, mints, and bright yellows create a modern, playful vibe. Once you have neatly gathered all of these premium materials on your crafting table, you are officially ready to move on to mastering the foundational stitches.
2. Mastering the Foundational Crochet Stitches and Techniques
Before diving directly into the core pattern of our amigurumi owl – tutorial, it is crucial to familiarize yourself with the foundational stitches that form the backbone of three-dimensional crochet. The magic ring, often referred to by crafters as the magic circle, is the absolute starting point for almost every single round amigurumi project. This ingenious technique allows you to crochet a specific number of stitches into an adjustable loop, which can then be pulled completely tight to eliminate any visible hole at the top of your piece.
The single crochet stitch is the primary building block used throughout this entire amigurumi owl – tutorial because it creates a dense, uniform fabric with minimal spacing between rows. To execute a perfect single crochet, you simply insert your hook into the designated stitch, yarn over, pull up a loop, yarn over a second time, and pull through both loops remaining on your hook. Keeping your tension consistently firm while executing this stitch is the ultimate key to achieving a beautifully smooth, even surface.
To transform a flat circle into a three-dimensional, volumetric shape, you must learn how to properly execute single crochet increases and decreases throughout your rounds. An increase is incredibly straightforward, as it simply requires you to work two separate single crochet stitches directly into the exact same stitch from the previous row. This technique expands the circumference of your fabric evenly, allowing your project to grow wider while maintaining a perfectly flat, buckle-free surface.
Conversely, when it is time to narrow down your project and close up the bottom of your creature, you will need to utilize the invisible decrease technique. Unlike a standard decrease which can leave bulky, noticeable bumps on your fabric, the invisible decrease is performed by inserting your hook into the front loops only of the next two adjacent stitches. You then yarn over, pull through both of those front loops, yarn over again, and pull through the final two loops to seamlessly reduce your stitch count.
Another critical skill to practice for a visually striking amigurumi owl – tutorial is mastering a clean, seamless color change to create beautiful contrast between the belly and the main body. To achieve a perfectly clean color transition without messy steps, always introduce your new yarn color during the very final pull-through of the last stitch in the old color. This ensures that the loop sitting on your hook is already the new color, allowing your next row of stitches to begin with a perfectly crisp line.
As you work your way through the continuous spirals, always remember to move your locking stitch marker up into the very first stitch of every single new round you begin. It is highly recommended for beginners to count their stitches at the end of every single completed row to ensure they match the pattern guidelines exactly. Making a small mistake early on can throw off the symmetry of your entire project, so staying organized and patient during these foundational stages is incredibly rewarding.
3. Step by Step Body Assembly and Creating Features
Now that you have mastered the foundational stitches, this section of our amigurumi owl – tutorial will guide you through creating the main body and its defining facial features. The body begins with a magic ring of six single crochets, which you will gradually increase over subsequent rounds until you reach a total of thirty-six or forty-eight stitches. Once the maximum width is successfully achieved, you will crochet several even rows without increasing to create a beautiful, smooth cylinder shape.
Before you begin decreasing to close up the bottom of the body, you must securely install the plastic safety eyes and embroider the face while the fabric is still open. The eyes are typically placed between rounds ten and eleven, spaced approximately seven to eight stitches apart to give the character a wide-eyed, endearing expression. To make the eyes pop, you can crochet two flat white felt circles or small yarn circles and slide them onto the safety eye posts before snapping the washers on.
Once the safety eyes are locked firmly into place, take a tapestry needle threaded with bright orange or yellow yarn to embroider a simple, inverted triangle beak directly between them. To add a delightful layer of texture to this amigurumi owl – tutorial, you can use a contrasting yarn color to stitch small, V-shaped patterns across the front belly area. These simple, embroidered chevrons mimic the appearance of fluffy chest feathers and add an incredible amount of handmade charm and artisanal detail to your toy.
Next, you will crochet two separate, flat teardrop shapes to serve as the wings, which will eventually be sewn onto the sides of the cylindrical body. The wings are kept completely flat and unfilled, allowing them to sit flush against the body or be pinned at a slight angle to give the character a sense of movement. Take your time to align them symmetrically on both sides of the torso, checking their positioning from multiple angles before stitching them down permanently.
As you begin to close the bottom of the body using the invisible decrease technique, pause when you have a relatively small opening left to firmly insert your polyester stuffing. Use your fingers or the back of a crochet hook to push the fiberfill into the upper corners, ensuring the head shape is perfectly rounded and firm. Do not overstuff the very bottom of the piece, as keeping the base relatively flat ensures your finished creation can sit upright on a shelf without tipping over.
To finish the top of the head and create those iconic, tufted ears, you can simply flatten the top opening of your cylinder and slip stitch the two opposing sides together. Once the top seam is completely sealed, cut several short strands of yarn in matching or contrasting colors and loop them through the top corners using a fringe technique. Trim the yarn strands neatly with your embroidery scissors to create adorable, fluffy ear tufts that instantly give your character its distinct personality.
4. Expert Tips for a Professional Finish and Longevity
Achieving a truly professional look in this amigurumi owl – tutorial requires paying close attention to minor details that separate amateur crafts from boutique-quality products. One of the most common mistakes beginners make is accidentally crocheting their plush toys inside out without even realizing it. You can easily identify the correct right side of your work by looking for clean, interlocking V-shaped stitches on the exterior, while the wrong side features horizontal bars.
Another professional secret involves hiding your yarn tails securely so that they never unravel during everyday handling or when the toy is placed in a washing machine. When you finish sewing a component like a wing or a beak, thread the remaining yarn tail into your tapestry needle and push it completely through the body. Pull the yarn slightly taut, snip it incredibly close to the surface of the fabric, and allow the cut end to snap back inside the stuffing.
Maintaining perfectly consistent tension throughout the entirety of this amigurumi owl – tutorial is something that naturally improves with practice, but keeping a relaxed grip helps tremendously. If you notice that your hands are cramping or your stitches are becoming impossibly tight, take a short break to stretch your fingers and wrists. Using an ergonomic crochet hook with a comfortable silicone or thick foam handle can drastically reduce hand fatigue during long, immersive crafting sessions.
If you plan on gifting or selling your handmade creations, keeping them clean, pristine, and free of household dust or pet dander during production is highly recommended. Store your ongoing crochet projects inside a clean, zippered cotton project bag or a plastic storage bin whenever you are not actively working on them. If your finished toy ever accumulates dirt over time, gently hand wash it in cool water with a mild detergent, reshape it carefully, and let it air dry completely.
Blocking your smaller, flat components like the wings before sewing them onto the main body can also elevate the final look of your plush creation. Simply pin the flat pieces onto a foam blocking mat, mist them lightly with clean water, and allow them to dry completely overnight to flatten out curling edges. This extra step ensures that your sewing process is significantly easier and that the wings lay completely flat against the spherical body just as intended.
Finally, do not be afraid to customize this comprehensive amigurumi owl – tutorial to express your own unique creativity and artistic vision. You can easily experiment with variegated yarns to create a beautiful, multi-colored plumage effect without having to manually change yarn colors every few rows. Adding a tiny crocheted flower near one of the ears or a small bow tie under the beak can infuse your handmade creation with a wonderful sense of individuality.
FAQ
What is the best type of yarn for a beginner starting this project?
The absolute best yarn for a beginner tackling this project is a 100% cotton yarn or a high-quality acrylic blend in a medium worsted weight (category 4). Cotton yarn is highly recommended because it offers incredible stitch clarity, does not fray easily, and creates a highly structured fabric that prevents stuffing from showing through. Avoid highly textured, fuzzy, or novelty yarns for your first few projects, as they make it incredibly difficult to see and count your stitches accurately.
How do I prevent large gaps from appearing between my crochet stitches?
To completely prevent gaps in your work, you must use a crochet hook that is one or two sizes smaller than the size recommended on your yarn’s paper label. Additionally, maintaining a firm, consistent tension on your working yarn throughout the project will naturally pull the loops closer together. Utilizing the invisible decrease technique instead of a standard decrease is another essential trick that completely eliminates gaps when narrowing down your shapes.
Can I safely wash my completed plush toy in a standard washing machine?
Yes, you can wash your completed plush toy, provided that you used machine-washable cotton or acrylic yarn and securely fastened all safety components and yarn tails. It is highly recommended to place the toy inside a mesh laundry bag and wash it on a delicate cycle using cool water and a very mild detergent. Always avoid using a heated clothes dryer; instead, gently reshape the toy by hand and allow it to air dry completely in a well-ventilated area.
Are plastic safety eyes completely safe for toys intended for newborn babies?
While plastic safety eyes are incredibly secure when installed with their proper backing washers, they can still present a potential choking hazard for infants under three years old if the fabric degrades. For toys intended for newborns or toddlers, it is always best practice to completely omit plastic pieces and instead embroider the eyes using black yarn or embroidery floss. Embroidered eyes are completely safe, highly durable, and give the finished toy an incredibly sweet, classic heritage appearance.
Why is my project starting to look distorted or turning into a strange shape?
If your project is losing its symmetry, it is highly likely that you accidentally missed a stitch or added an extra increase somewhere along the previous rounds. This is why using a locking stitch marker to track the beginning of every single row and strictly counting your stitches at the end of each round is vital. If your stitch count is off, it is best to carefully unravel your work back to the last correct row and start fresh.
Conclusion
In this comprehensive amigurumi owl – tutorial, we have thoroughly explored every essential step required to create a beautiful, professional-quality handmade plush toy from scratch.
From selecting the ideal cotton yarn and downsized hook to mastering the magic ring, single crochets, and seamless color changes, you now possess the core skills needed for success. We also reviewed the critical importance of secure assembly, facial embroidery, and proper stuffing techniques to ensure your gorgeous creation remains durable, upright, and full of whimsical personality for many years to come.