Log Cabin with Curve – Tutorial is one of the most fascinating projects you can dive into if you love quilting, texturing, and creating stunning visual illusions with fabric. Quilting has always been a beautiful way to express creativity, but when you learn how to manipulate traditional straight lines into sweeping, fluid motions, the craft reaches a whole new level. This specific technique takes a timeless American quilting block and completely re-invents it by playing with contrast, precise measurements, and varying strip widths, allowing you to create curves without actually sewing a single curved seam.
Whether you are a seasoned quilter looking for a fresh challenge or an enthusiastic beginner eager to expand your skillset, mastering a Log Cabin with Curve – Tutorial will open up an entirely new world of design possibilities. The beauty of this block lies in its deceptive simplicity; looking at the finished quilt, anyone would think you spent hours wrestling with difficult, rounded seams, when in reality, the magic happens entirely through clever math and fabric placement. In this comprehensive guide, we will break down every single step, ensuring you have all the knowledge, tips, and confidence needed to build your very own curved masterpiece from scratch.
By focusing on high-quality fabrics, precise cutting, and structured color curation, you will see how straight strips of fabric can miraculously transform into a dynamic, twisting wave of color and motion. Throughout this Log Cabin with Curve – Tutorial, we are going to explore the precise layouts, sewing strategies, and design arrangements that make this pattern stand out in modern textile art. Prepare your cutting mat, fire up your sewing machine, and let’s dive deep into the ultimate guide to creating a flawless, eye-catching curved log cabin block that will leave your friends, family, and blog readers absolutely amazed.
1. Understanding the Magic Behind the Curved Illusion
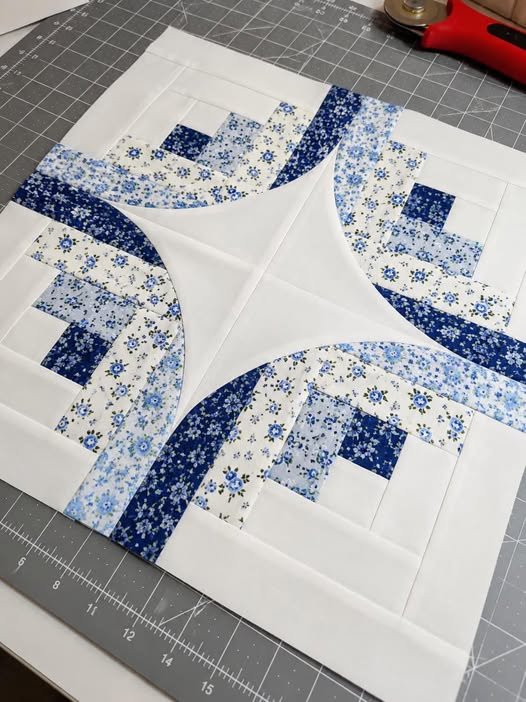
The fundamental secret to creating a Log Cabin with Curve – Tutorial project lies within a clever visual trick that relies entirely on varying the widths of your fabric strips. In a traditional log cabin block, every single strip or “log” is cut to the exact same width, resulting in a perfectly symmetrical, square design that expands evenly from the center. However, when you deliberately cut the strips on one side of the block narrower and the strips on the adjacent side wider, the entire block visually warps, creating a stunning optical illusion of a rounded curve.
To achieve this fluid effect without ever having to cut or sew actual rounded edges, you must understand how human eyes perceive contrast and proportion. By systematically placing your narrow fabric strips next to your wide fabric strips in a specific, repeating order, the geometric grid begins to bend before your eyes. This means you can easily avoid the frustration of puckered seams and difficult pinning that usually comes with sewing traditional circles or drunkard’s path blocks, making this approach highly accessible and incredibly satisfying.
Color selection also plays a massive role in making this curved illusion truly pop off the surface of your finished quilt top. Traditionally, log cabin blocks are divided diagonally into light and dark halves, which helps define the shape and direction of the design. When you combine this classic light-and-dark value contrast with the shifting widths of the logs, the curved movement becomes incredibly pronounced, giving your textile art an amazing sense of depth, three-dimensional texture, and energetic motion.
When planning your layout, it helps to sketch your ideas on graph paper or use digital design software to visualize how the changing widths interact with one another. Seeing how a 1-inch strip looks when placed opposite a 2-inch strip gives you a clear blueprint of how dramatic your final curve will actually appear. The greater the difference between the narrow strips and the wide strips, the more intense and sharp the resulting curve will look once the blocks are pieced together.
As you prepare to select your materials for this Log Cabin with Curve – Tutorial, keep in mind that consistency is absolutely paramount to pulling off this geometric illusion successfully. Every single block needs to follow the exact same structural formula so that when you join multiple blocks together, the curves connect seamlessly to form larger circles, waves, or winding ribbons of fabric. This predictability in construction is what allows you to experiment so freely with the ultimate layout and overall design structure later on.
Ultimately, understanding the theory behind this technique removes the intimidation factor and allows you to look at fabric strips as building blocks for complex optical art. Once you grasp how alternating widths trick the eye into seeing soft curves where only straight lines exist, you will feel completely empowered to experiment with your own variations. It is a beautiful marriage of simple geometry and creative color theory, proving that you do not need advanced, frustrating techniques to create a sophisticated and modern quilt.
2. Choosing Fabrics and Tools for Ultimate Precision
Selecting the right materials is a crucial step in ensuring your Log Cabin with Curve – Tutorial turns out beautifully, as fabric stability and contrast directly impact the precision of your lines. High-quality quilting cotton is highly recommended for this project because it holds its shape perfectly, resists stretching along the grain, and comes in an endless array of vibrant colors and subtle prints. Because this pattern relies heavily on distinct lines to form the illusion of a curve, avoiding overly chaotic or massive prints will help keep your design looking clean, sharp, and intentional.
When gathering your tools, a rotary cutter with a fresh, sharp blade is absolutely indispensable for achieving the perfectly straight edges required for successful piecing. Alongside your cutter, you will need a high-quality acrylic quilting ruler, preferably one with clear grid lines that allow you to accurately measure both your narrow and wide strips down to the fraction of an inch. A self-healing cutting mat is another essential item, providing a stable, non-slip surface that protects your table and ensures your fabric does not shift while you are cutting.
For your fabric palette, try choosing a cohesive blend of high-contrast colors, separating them clearly into a “light side” and a “dark side” to maximize the depth of the illusion. You can opt for a monochromatic look using various shades of a single color, or go bold with complementary colors like deep blues paired with warm, golden oranges. The most important factor is that there is a undeniable distinction between your values, ensuring that the narrow logs and wide logs do not get lost or blend into one another.
In addition to your fabric and cutting tools, using the correct sewing machine accessories will make the assembly process much smoother and significantly more enjoyable. A quarter-inch presser foot is an absolute lifesaver for this project, as it helps you maintain a completely consistent seam allowance from the first block to the very last. A high-quality, neutral-colored cotton thread, such as a 50-weight thread, will keep your seams flat and durable without adding unnecessary bulk to your delicate intersecting corners.
Before you make a single cut into your beautiful fabric, it is highly beneficial to pre-wash and press your cotton to eliminate any potential shrinkage or color bleeding later on. Using a bit of fabric starch or a starch alternative while pressing your fabric can give the cotton an extra crisp texture, making it much easier to cut narrow strips without them fraying or warping. Taking these extra preparation steps might seem tedious at first, but they pay off massively when it comes to matching up your seams perfectly.
Having a dedicated workspace with an iron and ironing board positioned right next to your sewing machine will also save you time and keep your workflow efficient. Because every single log added to the block requires immediate pressing, you will be moving back and forth between sewing and pressing constantly throughout the creation process. Equipping yourself with the right mindset, proper organization, and accurate tools sets a solid foundation for a stress-free and highly successful crafting experience.
3. Step by Step Block Assembly and Stitching Guide
Now that your tools are ready and your fabric is prepped, it is time to begin the actual construction phase of our Log Cabin with Curve – Tutorial journey. You will want to start by cutting your central squares, often referred to as the “hearth” of the log cabin, which traditionally look best when cut from a bright, solid color. From there, carefully cut your narrow strips (for example, 1 inch wide) and your wide strips (for example, 2 inches wide), keeping them meticulously organized in separate piles so you don’t mix them up.
To begin piecing, take your center square and sew your first narrow strip along one side, keeping your raw edges perfectly aligned and using a precise quarter-inch seam allowance. Once stitched, finger-press the seam toward the newly added strip, and then press it firmly with a hot, dry iron to ensure the fabric lays completely flat. Next, rotate the block ninety degrees clockwise, and sew your second narrow strip to the adjacent side of the center square, pressing carefully once again.
Now comes the twist that creates the beautiful curved effect: for the remaining two sides of the square, you will repeat the exact same process but use your wide fabric strips instead. Sew the first wide strip to the third side of the block, press the seam outward, rotate the block clockwise, and attach the second wide strip to the final side. By completing this first full round, you have successfully established the asymmetrical foundation that will cause your design to curve beautifully as it grows.
As you move on to the second round of logs, always remember to maintain the exact same rotation direction and fabric width pattern throughout the entire process. You will always attach narrow strips to the sides that already have narrow strips, and wide strips to the sides that already feature wide strips. This consistency ensures that one half of your block remains compact and tightly wound, while the opposite half expands rapidly, forcing the visual center to shift dynamically.
As your block grows larger with each consecutive round, it is highly recommended to use your acrylic ruler periodically to trim and square up the block. Even the tiniest variation in your seam allowance can compound over multiple rounds, causing the block to become slightly distorted or uneven along the outer edges. Trimming away any minor excesses after every round keeps your block perfectly square, making the eventual quilt top assembly incredibly smooth and frustration-free.
Continue adding rounds until your block reaches your desired final size, which is typically anywhere from three to five full rounds of fabric logs. Once you finish sewing the final strip, give the completed block a thorough, gentle press from both the front and the back, being careful not to stretch the outer edges. Step back and admire your work; you will immediately notice how the straight lines have miraculously taken on the distinct, sweeping appearance of a beautifully rounded curve.
4. Designing Innovative Layouts and Creative Variations
The true excitement of completing a Log Cabin with Curve – Tutorial block comes alive when you assemble multiple units together on a design wall or large flat surface. Because each individual block is asymmetrical, rotating them in different directions allows you to create an astonishing variety of large-scale geometric patterns. By simply turning the blocks ninety or one hundred and eighty degrees, you can transform a simple grid into interlocking circles, dramatic waves, or spiraling pinwheels.
One of the most popular and breathtaking arrangements is the Circular Layout, which is achieved by placing four blocks together so that their narrow corners all meet in the very center. This arrangement forces the wider sections to expand outward, creating a massive, fluid circle that looks incredibly complex and professionally designed. Alternatively, alternating the direction of the blocks row by row can create a gorgeous, serpentine wave pattern that guides the viewer’s eye beautifully across the entire textile canvas.
If you want to experiment with a more contemporary and artistic aesthetic, you can try mixing your curved blocks with traditional, symmetrical log cabin blocks. This hybrid approach allows you to create sharp contrast between rigid, structured grids and fluid, organic-looking movements, giving your quilt a highly unique and customized feel. You can also play with asymmetry on a larger scale, letting the curved lines wander aimlessly across the quilt top for a modern, abstract look.
Another fantastic way to customize your project is by experimenting with the gradient or Ombré effect within your chosen color palette. By transitioning your fabric values from very dark in the narrow sections to exceptionally light in the wide sections, you amplify the optical illusion to its absolute maximum potential. This technique adds a glowing, luminous quality to the fabric, making the curved sections appear as though they are being touched by a soft, directional light source.
Do not be afraid to play with the actual widths of your strips in future projects to discover completely new design variations and visual effects. For instance, using an extreme contrast like 0.5-inch narrow strips and 2.5-inch wide strips will create an incredibly sharp, dramatic curve with an intense perspective shift. On the other hand, using closer measurements like 1.25 inches and 1.75 inches will result in a much softer, gentler wave that feels calm and elegant.
The possibilities are truly endless, limited only by your imagination and your willingness to play around with different block rotations before sewing them together permanently. Setting up a temporary design wall using a piece of inexpensive flannel fabric or batting is a wonderful way to audition various layouts risk-free. Take photos of each option with your smartphone, as looking at the designs through a camera lens often helps you see the overall flow and contrast much more clearly.
Frequently Asked Questions (FAQ)
What is the main difference between a traditional log cabin and a curved log cabin block?
The main difference lies entirely in the width of the fabric strips used during construction. A traditional log cabin block uses strips that are all cut to the exact same width, resulting in a perfectly balanced, symmetrical square. A curved log cabin block uses narrow strips on two adjacent sides and wider strips on the other two sides, creating an asymmetrical shape that creates the optical illusion of a curve.
Do I need to sew actual curved seams for this pattern?
No, you do not need to sew any rounded or curved seams at all for this project! The beautiful curved appearance is a total optical illusion created entirely by combining straight fabric strips of different widths. This makes it an excellent project for quilters who want the look of fluid curves without dealing with the difficulty of pinning and sewing curved fabric edges.
What are the best fabric strip sizes to use for beginners?
For beginners starting their first Log Cabin with Curve – Tutorial project, a highly recommended and easy-to-manage combination is 1-inch wide strips for the narrow side and 2-inch wide strips for the wide side. This distinct 1:2 ratio provides a very noticeable, dramatic curve while still giving you enough fabric width to handle and sew comfortably without straining your fingers.
How do I stop my curved log cabin blocks from becoming distorted?
The best way to prevent distortion is to maintain a strictly consistent quarter-inch seam allowance and avoid pulling or stretching your fabric strips as you guide them through your sewing machine. Additionally, pressing your seams carefully with a hot iron rather than pushing or sliding the iron across the fabric helps preserve the straight grain of the cotton and keeps the block perfectly square.
Can I use scrap fabric or old clothing like denim for this tutorial?
Absolutely! This pattern is incredibly versatile and works wonderfully with scrap fabric or upcycled clothing materials like old denim cotton jeans. If you choose to use upcycled fabrics, just make sure that the fabric weights are relatively similar throughout the block so that the seams lay flat and the overall block remains easy to square up and sew together.
Why is it important to use high-contrast colors for this specific quilt block?
High-contrast colors, especially when divided into clear light and dark values, are essential because they define the lines and shapes that trick the human eye into seeing a curve. If your colors are too similar in value, the boundaries between the narrow and wide logs will blur together, causing the beautiful curved optical illusion to lose its impact and look muddy.
Conclusion
In conclusion, this Log Cabin with Curve – Tutorial demonstrates just how magical and rewarding the art of quilting can be when you combine simple geometry with creative fabric placement. By mastering the simple technique of alternating narrow and wide fabric strips, you can easily create complex, fluid optical illusions without ever having to sew a single difficult curved seam.
This project perfectly balances traditional crafting roots with modern, dynamic design, making it a stellar addition to your creative portfolio and a guaranteed showstopper in any home. We genuinely hope this step-by-step guide has inspired you to grab your rotary cutter, explore your fabric stash, and start piecing together your own gorgeous waves and circles.