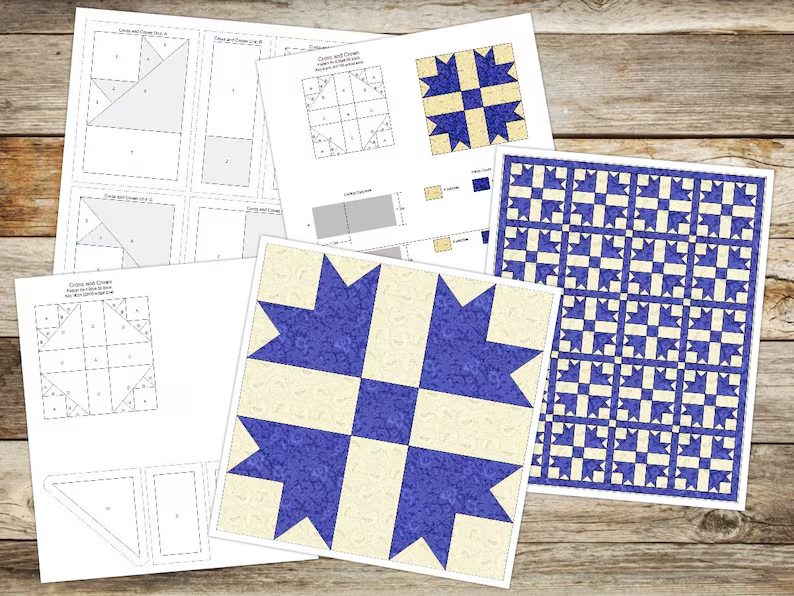
Integrating classic quilting patterns into your needlework brings a beautiful, timeless aesthetic to your handmade crafts. As shown in the provided pattern sheets, geometric layouts like the traditional “Cross and Crown” block make perfect blueprints for needlework projects. This Block with Cross Stitch – Tutorial will teach you exactly how to break down complex fabric templates, read foundational blueprints, and convert sewing layouts into crisp, balanced embroidered artwork.
Understanding the relationship between paper guidelines and physical stitches is the absolute key to elevating your textile skills. Looking closely at the template sheets, you can see how large visual layouts are systematically divided into smaller, numbered units and lettered sections. By treating these sections as coordinates on a grid, you can easily plan your color changes and stitch placement to build complex shapes seamlessly.
In this guide, we will analyze the structure of the block pattern provided in the image, prepare your workspace using strategic guidelines, and translate the visual sections into physical thread work. Whether you are aiming to create a single standout framed piece or a repeating grid that mimics a full quilt, these steps will help you achieve perfect accuracy. Let us dive into the details of turning these classic design templates into a stunning embroidered reality.
1. Deconstructing the Geometric Template and Color Map
To successfully execute this Block with Cross Stitch – Tutorial, your first step is to analyze the structural components of the pattern template sheet. The design shown is a classic “Cross and Crown” block, which relies heavily on mirrored symmetry and a balanced arrangement of negative and positive space. In the visual instructions, the layout is broken down into specific units, which helps you visualize how individual sections fit together to form the larger crown shapes.
Notice that the pattern uses a highly effective two-tone color scheme consisting of a rich, textured blue and a soft, cream-colored background. When translating this to your fabric grid, this clear color separation allows you to easily identify which areas require solid stitching and which areas serve as empty space. The central square acts as the anchor for the entire composition, pulling the four surrounding corner crowns into a cohesive geometric formation.
The template sheets also include a detailed piece key, showing labeled triangles and rectangles that make up each individual corner unit. For a needlework project, these distinct angular lines will be represented by your stitch placement, where the boundaries between colors create sharp, clean visual diagonals. Studying these pieces beforehand ensures that you understand the flow of the design before making your first mark on the canvas.
Properly mapping out these color blocks on your material prevents you from miscounting rows or placing a color section in the wrong quadrant. You can treat each labeled section on the paper template as a standalone zone, tackling one crown unit at a time to keep the project manageable. This organized, zone-based approach ensures that your geometric layout remains perfectly symmetrical across the entire surface of your fabric.
Additionally, the pattern sheet displays a full repeating grid illustration, demonstrating how multiple individual blocks look when joined together. If you choose to expand your project into a larger tapestry, this repeating view helps you plan the spacing and borders needed between each block. It shows how the points of the crowns interact with neighboring blocks to create a beautiful, secondary interlocking pattern.
By fully understanding the blueprint’s structure, symbols, and layout options, you remove all guesswork from the crafting process. You can confidently select your thread shades to match the high-contrast look of the template, ensuring your finished work has the same striking impact. With the visual map thoroughly analyzed, you are ready to prepare your working materials and establish your starting grid lines.
2. Setting Up Your Grid and Aligning the Pattern
The true secret to a flawless layout in this Block with Cross Stitch – Tutorial lies in the precision of your initial alignment and grid preparation. Because geometric patterns like the “Cross and Crown” rely on absolute symmetry, a counting error of just one single square can misalign an entire corner. To prevent this, you must find the exact center of your fabric by folding it into equal quadrants and marking the central intersection.
Looking at the provided template, the central blue square serves as the perfect mathematical starting point for your entire needlework project. By aligning this central square with the physical center mark on your fabric, you guarantee that the surrounding crown units will expand outward evenly. This centralized planning leaves an equal amount of blank fabric border on all sides, making final framing or sewing much easier.
To make tracking the pattern even simpler, you can use a water-soluble fabric marker to draw a light 10×10 grid on your material, mirroring the lines on a chart. This temporary grid acts as a safety net, allowing you to quickly cross-reference your fabric placement with the paper template zones. It eliminates the need to constantly count long rows of empty space, significantly reducing eye strain and mistakes.
Once your fabric is marked, mount it securely into a sturdy embroidery hoop or a scroll frame to maintain high, uniform tension across the surface. If the fabric is loose, your stitches will unevenly distort the material, warping the straight lines of the crown points into wavy, irregular shapes. The fabric should remain perfectly flat and taut, resembling the smooth, stretched appearance of the paper layouts in the illustration.
It is also beneficial to organize your thread colors beforehand, keeping your dark blue and cream skeins clearly separated and labeled. Cut your working threads into manageable lengths of around 18 inches to prevent the cotton strands from twisting or knotting as you pull them through the grid. Having your tools organized and your canvas perfectly aligned sets a calm, productive tone for your entire crafting session.
Taking these deliberate preparation steps might feel time-consuming, but it saves an immense amount of time and effort during the actual stitching phase. A well-prepared canvas allows you to fall into a smooth, rhythmic stitching pattern without constantly pausing to fix alignment errors. With your grid perfectly aligned and your fabric secured, you can begin executing the foundational stitches to bring the shapes to life.
3. Stitching the Crowns with Crisp Geometric Lines
As you begin the hands-on stitching phase of our Block with Cross Stitch – Tutorial, your primary focus will be creating clean boundaries between the color sections. The points of the crowns in the “Cross and Crown” template require sharp, well-defined edges to maintain their majestic, architectural look. To achieve this crispness, ensure that every single one of your individual cross stitches crosses in the exact same direction throughout the project.
Start by working the central blue square, using dense, even stitches to create a solid block of color that grounds the entire design. From there, move outward to the corner crown units, working the solid blue sections row by row using the efficient traditional method. By completing all the half-stitches in a row before returning to finish the crosses, you ensure a uniform, light-reflecting surface finish.
When you reach the angled sections of the crown points, pay extra attention to where the blue thread meets the cream-colored background. To perfectly replicate the sharp diagonal lines shown on the paper pattern pieces, you can utilize fractional stitches, such as quarter or three-quarter stitches. These specialized techniques allow you to fill only a portion of a grid square, creating a smooth diagonal edge rather than a jagged, pixelated staircase effect.
After completing the dark blue structural elements, fill in the surrounding negative space with your soft cream or off-white embroidery floss. Filling the background completely gives the textile a rich, heavy, and professional feel that perfectly mimics the look of a traditional quilted fabric block. Ensure your background thread tension matches your foreground tension exactly to keep the fabric surface completely flat and free of puckering.
To give the geometric shapes an extra level of definition and make them pop off the fabric, consider adding a thin backstitch border. Using a single strand of a slightly darker blue or black thread, trace along the outermost edges of the completed crown shapes. This simple outlining technique mimics the clean seam lines seen in the pattern illustration, giving your needlework a beautifully illustrative quality.
Take your time during these detailed transitions, checking your progress against the visual template every few rows to ensure total accuracy. Watching the fabric transform from an empty grid into a bold, sharply defined geometric motif is an incredibly rewarding and satisfying experience. By focusing on consistency and edge definition, your stitched block will look just as clean and precise as the printed pattern sheet.
4. Expanding to a Repeating Grid and Project Preservation
The final stage of this Block with Cross Stitch – Tutorial focuses on expanding your design into a larger composition and preserving your finished artwork. If you look at the right side of the template illustration, you can see the incredible visual impact of repeating the block pattern. By stitching multiple blocks in a continuous rows-and-columns format, you create a gorgeous, interlocking geometric tapestry that resembles a full-scale quilt.
If you choose to create a repeating layout, be sure to calculate the exact number of grid squares needed for the spacing between each block. You can separate the blocks using solid rows of cream stitches to act as “sashing,” which provides a clean visual break between the crown points. This repeating project requires a larger piece of fabric and a long-term commitment, but the final, grand-scale result is absolutely breathtaking.
Whether you complete a single block or a large repeating grid, proper post-crafting care is essential to preserve the textile’s vibrant colors and textures. Remove the finished piece from your working hoop and inspect it for any loose thread tails or surface dust picked up during construction. Secure any loose ends on the reverse side by weaving them under existing stitches, ensuring no knots are present.
Gently wash the embroidered textile in a basin of cool water with a mild, clear soap to remove any remaining water-soluble grid markings. Rinse the fabric thoroughly, then press it face down onto a soft, plush towel using a warm, dry iron on the reverse side. Pressing from the back protects the raised, textured surfaces of your cross stitches from being flattened, keeping the design looking rich and dimensional.
For a modern display that honors the template’s clean lines, mount your pressed fabric into a polished wooden embroidery hoop or a minimalist square frame. If you are using a traditional glass frame, use a mat board to prevent the glass from resting directly against the threads. This protective barrier allows air to circulate, preventing moisture buildup and preserving the integrity of the cotton fibers for generations.
Display your completed masterpiece in a location away from direct sunlight to protect the rich blue and cream threads from premature fading. Every hour of careful alignment, counting, and stitching culminates in a beautiful, handmade piece of history that bridges the gap between quilting and needlework. Your completed geometric block is now ready to bring warmth, texture, and artistic elegance to your home decor.
Frequently Asked Questions (FAQ)
How do I translate the angled pattern pieces into cross stitches?
To replicate the sharp, angled lines of the triangles shown on the template, you can use fractional stitches, such as quarter and three-quarter stitches. These allow you to split a single fabric square diagonally, allowing two different colors to meet sharply within the same grid coordinate for a clean edge.
What is the best way to handle the large areas of cream background color?
When filling in large background blocks, use the danish method (stitching a full row of half-stitches, then returning) to keep your tension completely uniform. Working in consistent horizontal or vertical blocks prevents the background from looking patchy or uneven when viewed under ambient room light.
Can I use these embroidery blocks to make a physical cushion cover?
Yes, these geometric block designs are perfect for functional home decor items like throw pillows or cushion covers. Just ensure you leave a generous two-inch unstitched fabric border around your finished embroidery to provide ample room for sewing machine seams and backing attachments.
Why does the template show numbered units and lettered pieces?
The numbers and letters on the pattern sheets are standard quilting guides that show how individual fabric pieces assemble to form the crown. In needlework, these guides help you break down a large, intimidating pattern into smaller, easily countable sections that you can stitch one zone at a time.
Conclusion
In this comprehensive Block with Cross Stitch – Tutorial, we have analyzed how to successfully translate a traditional geometric “Cross and Crown” quilt pattern into a beautiful embroidered masterpiece.
We explored the structure of the pattern templates, mapped out the placement lines using strategic grid techniques, and focused on creating sharp, uniform stitches for clean geometric edges. Finally, we discussed how to expand the design into a gorgeous repeating layout and properly wash, press, and frame your finished textile art for long-term preservation.