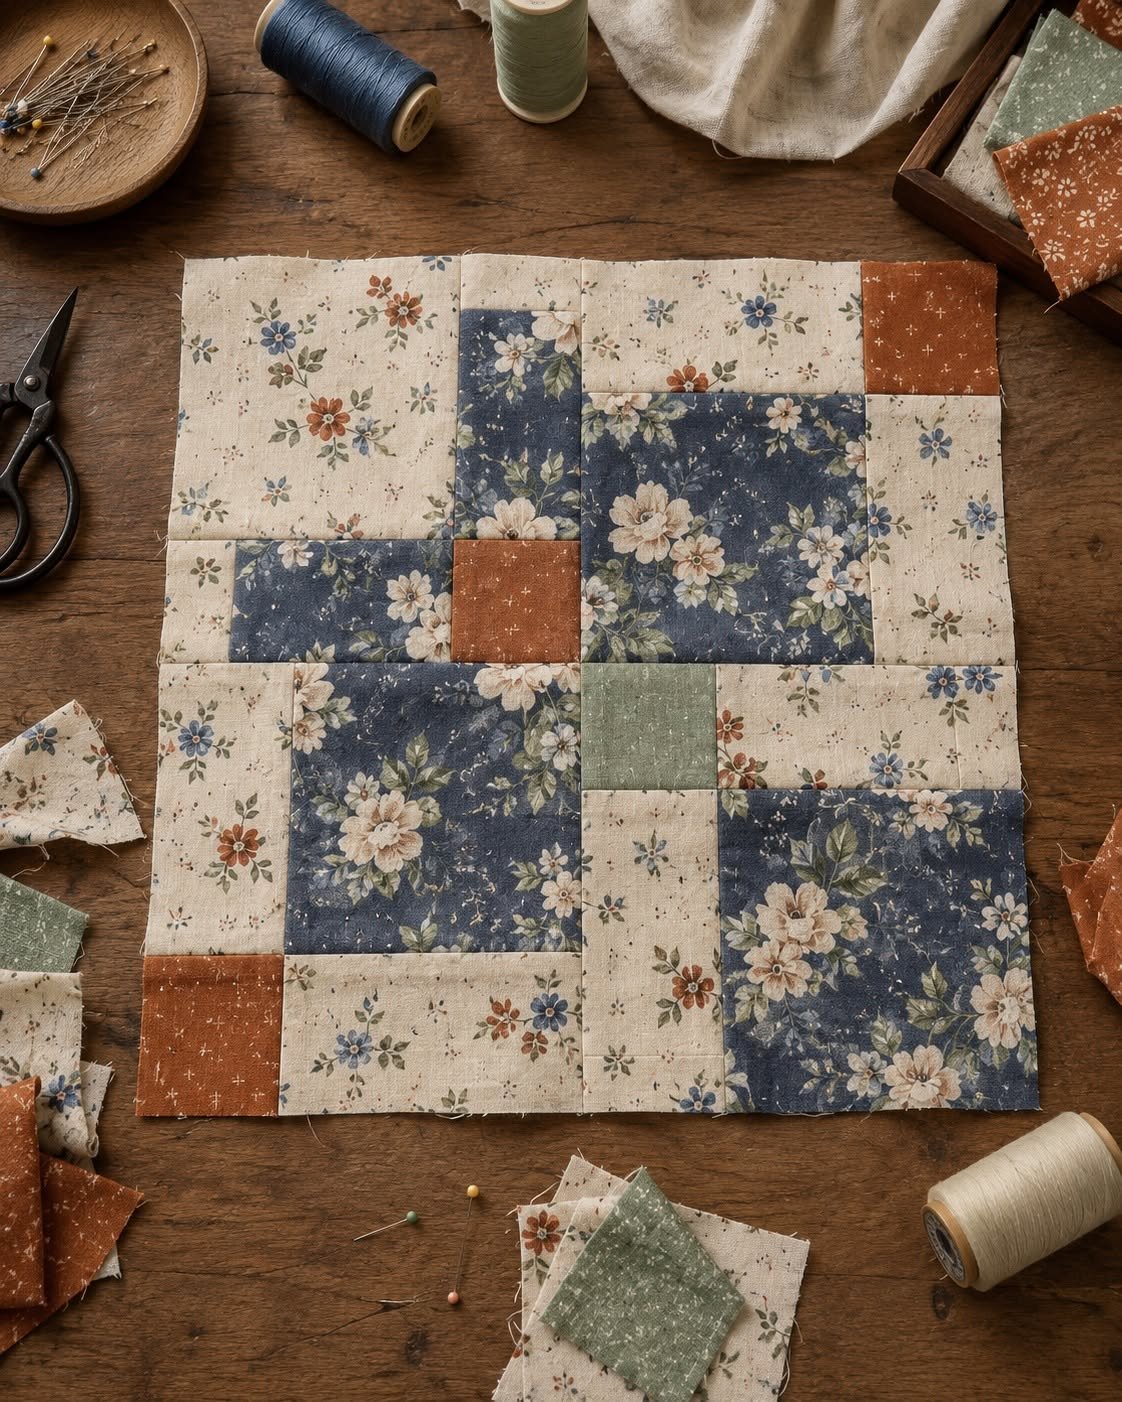
Bring the beauty of a sunlit garden indoors with this gorgeous Floral Window Quilt Block – Tutorial, designed to help you create a stunning, picture-perfect project. Quilting has always been a wonderful way to combine artistic expression with cozy, practical craftsmanship. This specific design captures the illusion of looking through a classic window frame into a vibrant, blossoming garden, making it a favorite for intermediate quilters and ambitious beginners alike. Whether you plan to use this block as a centerpiece for a full-sized quilt, a charming wall hanging, or a decorative pillow cover, the visual impact is absolutely timeless.
Creating a three-dimensional illusion on a flat surface might seem intimidating, but with the right techniques, it becomes an enjoyable and deeply rewarding process. The secret lies in the contrast between your “frame” fabrics and your “focal” floral prints, which establishes depth and shadow. In this comprehensive guide, we will break down every single step, from selecting your color palette to squaring up your finished pieces. By mastering this block, you will sharpen your piecing skills and gain a deeper understanding of how value and contrast function in quilt design.
Gathering your materials with a clear plan ensures a smooth crafting experience from start to finish. For this project, you will want to select high-quality cotton fabrics that press beautifully and hold their shape during handling. As we dive into this Floral Window Quilt Block – Tutorial, remember that patience and precise cutting are your best friends. Let’s explore the step-by-step journey of transforming simple fabric strips into a captivating work of textile art that will brighten any room in your home.
1. Selecting the Perfect Fabrics for Visual Depth
The success of your Floral Window Quilt Block pattern relies heavily on the fabric choices you make before making your very first cut. To create the distinct look of a window pane, you need a strong contrast between the frame and the background scenery. Look for a bold, eye-catching floral print to serve as the view outside your window, ensuring it contains a mix of vibrant colors.
For the window frame itself, choosing a solid dark fabric or a subtle tone-on-tone print works best to mimic real architectural shadows. A crisp white, soft cream, or deep charcoal gray can instantly make your central floral pieces pop forward visually. This contrast is the core mechanism that generates the lovely three-dimensional effect that defines this specific style.
When shopping for your quilting fabric, always opt for 100% quilting cotton because of its stable weave and minimal stretching. Since this block involves piecing small strips and squares together, fabric that shifts too much can throw off your alignment later on. Take a moment to lay your selected fabrics next to one another under natural light to verify they complement each other beautifully.
Pre-washing your fabric is a personal choice, but it is highly recommended if you are working with deeply saturated colors like dark reds or blues next to bright whites. A quick wash prevents unwanted color bleeding later when you wash your finished masterpiece for the first time. If you choose not to pre-wash, using starch can give your fabric extra crispness, making precise cutting much easier.
Don’t be afraid to experiment with different scales of prints for your garden view inside the frame. A large-scale floral print allows different sections of the blossom to appear in separate panes, creating a realistic, continuous landscape effect. On the other hand, small-scale prints offer a whimsical, detailed mosaic look that is equally charming and fun to assemble.
Ultimately, your fabric selection sets the entire mood for your patchwork window design, ranging from a cozy cottage aesthetic to a sleek, modern gallery look. Trust your creative instincts, keep an eye on value contrast, and enjoy the process of curation. Once you are completely satisfied with your fabric pull, you are ready to move on to the cutting phase.
2. Cutting Your Fabric Pieces with Total Precision
Accurate cutting is the absolute foundation of successful patchwork, especially when executing the intricate steps of this Floral Window Quilt Block – Tutorial. Before you pick up your rotary cutter, ensure your mat is clean and your acrylic ruler is firmly in place. A fresh, sharp blade in your rotary cutter prevents frayed edges and inaccurate strips that can distort your block.
Begin by cutting your focal floral fabric into the precise squares that will represent your window panes. For a standard twelve-inch finished block, cutting four matching four-inch squares of your favorite floral print provides an excellent starting point. Take your time to fussy-cut specific blooms if you want certain flowers centered perfectly within individual window frames.
Next, focus on your frame and sashing fabric, which will form the structure of your window layout. Cut your contrasting frame fabric into strips measuring one and a half inches wide, as this width provides a clean, elegant border without overpowering the design. You will need a mix of short sashing strips for individual panes and longer strips for the outer edges of the block.
To create the illusion of light and shadow on the window frame, you can introduce a secondary accent fabric for the inner borders. Cut these accent strips slightly narrower, around one inch wide, to act as a delicate highlight line along the inner edges of the frame. This subtle detail mimics the way natural light catches the trim of a real window, elevating your overall design.
Organize your freshly cut pieces into separate piles on your cutting table or a handy design board to keep track of your progress. Labeling your fabric piles with sticky notes according to their sizes can save you a significant amount of time during assembly. Organization reduces the risk of accidentally grabbing the wrong strip size during a busy sewing session.
Double-check your measurements against your pattern requirements one final time before turning on your sewing machine. It is always better to measure twice and cut once than to waste your favorite fabric on a minor oversight. With all your pieces perfectly cut and neatly sorted, you are fully prepared to start piecing your block together.
3. Assembling the Panes and Sashing Step by Step
Now that your fabric is ready, it is time to bring the Floral Window Quilt Block – Tutorial to life at your sewing machine. Set your machine to a standard piecing stitch length, and ensure your quarter-inch seam allowance is tuned perfectly. Consistent seam allowances are vital for ensuring that all your window panes align beautifully at the center crossroads.
Start by sewing your narrow inner accent strips to the sides of your focal floral squares. Chain piecing, which involves feeding the fabric pairs through the machine one after another without cutting the threads between them, speeds up this process. Once the side strips are attached, press your seams carefully toward the darker fabric to prevent bulk.
Next, attach the remaining accent strips to the top and bottom edges of each individual floral square to complete the inner frame. You should now have four larger, identical squares that showcase your beautiful floral fabric nestled inside a thin, neat border. Give each completed unit a gentle press with your iron, taking care not to stretch the bias edges.
To join these four window units together, you will need to insert the central sashing strips that form the main window cross. Sew a vertical sashing strip between two of your window units to create the top row of your window frame. Repeat this identical process with the remaining two window units to create the bottom row of your block.
Press the seams of your top row to the left and the seams of your bottom row to the right. This opposite pressing technique allows your seams to nest perfectly together when you join the top and bottom rows with your horizontal sashing strip. Pin generously at the central intersection to ensure your window cross aligned flawlessly without shifting.
Slowly sew across the long horizontal sashing strip, removing pins just before your needle reaches them to avoid breaking a needle. Once stitched, open your block up and press the long final seam flat to reveal your beautiful assembled structure. You can now see the stunning window effect taking shape right before your eyes.
4. Finishing Borders and Squaring Up the Block
The final construction phase of our Floral Window Quilt Block – Tutorial involves adding the outer borders to anchor your design completely. These outer borders frame the entire window, providing structural stability and giving the eye a peaceful place to rest. Measure the length of your assembled center units before cutting your border strips to account for minor variations.
Sew your outer border strips to the left and right sides of your block first, smoothing the fabric gently as you guide it. Trim any excess fabric carefully, then press the seams outward toward the new border to keep the center flat. This creates a clean, square edge that prepares the block beautifully for the final two borders.
Attach the top and bottom outer border strips in the exact same manner, pinning at the ends and the center point. Sewing from the center outward can help distribute fabric evenly and minimize puckering along the long edges. Once these final seams are stitched and pressed, your block construction is officially complete.
Now comes the crucial step of squaring up your finished block to ensure it integrates perfectly into your larger quilt project. Place a large square acrylic ruler over your block, aligning the ruler’s diagonal lines with the center crossroads of your window sashing. This step ensures your block remains perfectly symmetrical and balanced from the exact center outward.
Carefully trim away any tiny slivers of fabric that extend past your desired finished size using a sharp rotary cutter. Squaring up fixes minor imperfections and ensures that sewing multiple blocks together down the road will be an absolute breeze. Take your time during this step, as a perfectly squared block makes the final quilt assembly highly satisfying.
Stand back and admire your gorgeous, completed floral quilt masterpiece resting beautifully on your design table. The combination of vibrant blossoms and structured framing creates a captivating visual anchor for any sewing project you choose. With practice, this block will become a versatile favorite in your creative quilting repertoire.
FAQ – Frequently Asked Questions
What is a Floral Window Quilt Block?
A Floral Window Quilt Block is a popular patchwork design that combines structured borders and sashing to frame vibrant floral fabrics. This clever layout creates a beautiful three-dimensional illusion, making the viewer feel as though they are gazing through a real window into a blossoming garden landscape.
What is the best fabric for this specific block?
High-quality 100% quilting cotton is highly recommended for this project due to its excellent stability and ease of pressing. Choosing a bold floral print for the window panes and solid or subtle prints for the frame maximizes the necessary visual contrast.
Why is a precise quarter-inch seam allowance so important?
A precise quarter-inch seam allowance ensures that all the intricate pieces of your window frame align perfectly at the intersections. Even a minor deviation can cause your window sashing to look crooked or result in an finished block that is uneven.
Can a beginner successfully complete this quilt block?
Yes, an adventurous beginner can absolutely complete this block by following the steps patiently and focusing on accurate cutting. Taking your time with pressing and pinning will help you achieve clean lines and gorgeous results on your very first try.
How do I choose the right size for my window frame strips?
For a standard twelve-inch finished block, using one and a half inch strips for the main frame works beautifully. You can adjust the width of these strips if you decide to scale the block size up or down for different projects.
How should I press my seams to avoid unnecessary bulk?
It is generally best to press your seams toward the darker fabric to prevent them from showing through lighter areas. When joining your rows, pressing alternating rows in opposite directions allows your seams to nest together perfectly for flat intersections.
Conclusion
This comprehensive Floral Window Quilt Block – Tutorial guides you through the rewarding creative process of building a visually striking, three-dimensional patchwork design.
By focusing on strong fabric contrast, precise cutting habits, steady seam allowances, and careful squaring up, you can easily achieve professional results that bring a touch of nature indoors. This classic block design opens up endless design possibilities, allowing you to play with various color stories and print scales to match your personal home decor style.