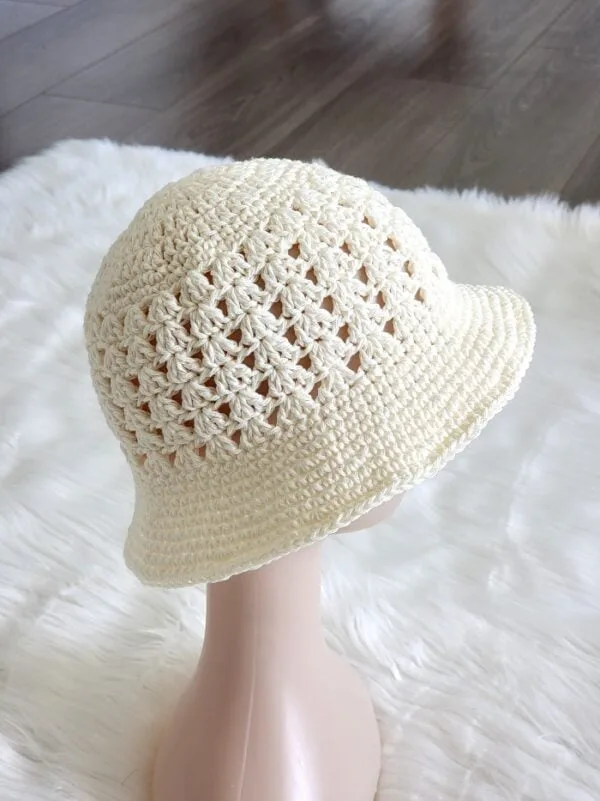
Crochet Bucket Hat – Tutorial: If you are looking for a stylish, functional, and deeply rewarding DIY project, learning how to craft your own headwear is the perfect place to start. The crochet bucket hat has officially taken the fashion world by storm, transitioning from a vintage 90s throwback to a modern wardrobe staple worn by influencers and crafters alike. This comprehensive guide will walk you through the entire process from scratch, ensuring that even if you are a complete beginner, you can follow along with this crochet bucket hat – tutorial and create something truly beautiful.
Engaging in textile arts is not just about the final product; it is a therapeutic journey that allows you to express your unique personality through color, texture, and shape. By mastering a few basic stitches, you will unlock the ability to customize your accessories to match any outfit or season. This crochet bucket hat – tutorial focuses on simplicity, using easy-to-follow techniques that build your confidence row by row.
Before we dive into the step-by-step instructions, it is essential to understand why this specific design is so popular among the crafting community. A crochet bucket hat offers incredible versatility, allowing you to experiment with different yarn weights, brim widths, and color patterns. In this guide, we will break down the essential materials, the foundational stitches, the crown construction, and the final assembly so you can successfully complete your first crochet bucket hat – tutorial with ease.
1. Choosing the Right Yarn and Tools for Your Crochet Bucket Hat – Tutorial
Selecting the perfect materials is the foundational step of our crochet bucket hat – tutorial, as the fiber you choose determines the structure, breathability, and overall look of your finished accessory. For a classic summer look, cotton yarn is highly recommended because it is durable, holds its shape exceptionally well, and keeps your head cool during warm days. Alternatively, soft acrylic yarn or blended fibers can be used if you prefer a cozier, more flexible fit for the autumn and winter months.
Along with your yarn, choosing the correct crochet hook size is vital to achieving the right tension and stitch density. For most medium-weight yarns (also known as worsted weight or number 4 yarn), a 4.5mm or 5.0mm hook works beautifully, ensuring your stitches are tight enough to block out the sun but loose enough to maintain flexibility. Having a pair of sharp scissors and a blunt tapestry needle on hand will also make weaving in your loose ends a breeze.
To ensure your hat fits perfectly, you should also grab a flexible measuring tape before starting this crochet bucket hat – tutorial. Measuring the circumference of your head right above the ears will give you the exact dimensions needed to customize the hat size. Most adult heads measure between 21 and 23 inches, which we will use as our standard reference throughout the shaping process.
Another incredibly helpful tool for beginners practicing this crochet bucket hat – tutorial is the humble stitch marker. Because a bucket hat is typically worked in continuous rounds, it can be very easy to lose track of where a new row begins. Placing a marker in the first stitch of each round saves you from the frustration of counting miscalculations later on.
As you gather your supplies, think about the color palette you want to explore, whether it is a solid neutral tone, a vibrant neon, or a variegated yarn that changes colors automatically. The beauty of making your own crochet bucket hat is that you are the lead designer, and you can customize every single detail to fit your personal aesthetic.
Now that your crafting table is stocked with the ideal yarn, the correct hook, your measuring tape, and your stitch markers, you are fully prepared to begin. Let us move on to the core techniques that will form the backbone of this entire crochet bucket hat – tutorial.
2. Mastering the Basic Stitches and the Magic Ring
Every great project begins with a strong foundation, and for this crochet bucket hat – tutorial, our journey starts with a technique known as the magic ring. The magic ring, or magic circle, is an essential skill for crocheting in the round because it allows you to pull the center hole completely shut, leaving no gaps at the very top of your hat.
Once your magic ring is formed, the primary building block for this project will be the single crochet stitch. This stitch is favored for hats because it creates a dense, sturdy fabric that protects your head and holds the iconic bucket shape without sagging. If you want a faster project with a slightly softer texture, you can substitute this with the half double crochet stitch.
To practice your stitches for this crochet bucket hat – tutorial, pull up a loop through your magic ring, yarn over, and pull through both loops on your hook to complete your first single crochet. You will typically want to place six to eight stitches into the ring for the very first round of your hat. Once the stitches are in place, firmly pull the tail of the yarn to close the center loop tightly.
Understanding how to execute a slip stitch is also important, especially if you prefer joined rounds over continuous spiral rounds. A slip stitch connects the final stitch of your round to the very first stitch, creating a clean, defined circular border before you chain up to start the next row.
Tension control is another key factor to keep in mind as you practice these basic movements for your crochet bucket hat – tutorial. Try to keep your hands relaxed; pulling your yarn too tight will make it difficult to insert your hook in subsequent rows, while keeping it too loose might result in a floppy, oversized hat.
With these foundational stitches securely under your belt, you have successfully unlocked the core mechanics of crochet. You are now ready to apply these skills to the actual construction phase of our crochet bucket hat – tutorial, beginning with the crown.
3. Shaping the Crown and the Sides of Your Hat
The crown is the flat, circular top portion of your headwear, and shaping it correctly is the most critical structural phase of this crochet bucket hat – tutorial. To make the circle expand flat rather than curling into a bowl immediately, you must implement a systematic pattern of crochet increases. An increase simply means placing two stitches into the exact same space from the previous row.
During the first few rounds, your pattern will follow a strict mathematical progression, such as increasing in every stitch, then increasing in every second stitch, followed by every third stitch. This uniform expansion ensures the top of your crochet bucket hat remains perfectly flat and matches the top diameter of your head, which is usually around 6 to 6.5 inches for adults.
Once your crown reaches the desired diameter based on your measurements, it is time to stop increasing entirely. By transitioning to placing just one single stitch into each space, you will watch a magical transformation occur as the flat circle naturally begins to curve downward, forming the sides or the “body” of your hat.
As you work down the sides during this stage of the crochet bucket hat – tutorial, you will maintain a consistent stitch count for several rows. This section should cover your forehead and stop just above your ears, which typically requires working around 15 to 18 rows of straight stitching without any modifications.
This middle section of the crochet bucket hat is the perfect place to experiment with color changes if you want to add stripes or patterns. Simply introduce a new yarn color on the final pull-through of the last stitch of a row to create a seamless, professional color transition.
Keep trying the hat on your head as you work through these repeating rounds to check the depth and ensure maximum comfort. Once the body of the hat reaches the top of your ears, you are ready to move to the final and most exciting structural phase of our crochet bucket hat – tutorial.
4. Crocheting the Brim and Adding Personal Customizations
The brim is what gives the modern crochet bucket hat its unmistakable silhouette, acting as both a stylistic statement and a practical sun shield. To make the fabric flare outward rather than continuing straight down, we must introduce a new sequence of strategic increases.
For a classic, subtle flare, a common method in this crochet bucket hat – tutorial is to place an increase into every fifth or sixth stitch in the first row of the brim. If you prefer a dramatic, wavy, or oversized 90s aesthetic, you can increase more frequently, such as every third stitch, to give the brim extra volume.
After that initial increase row, you will alternate with rows of standard stitches to build the length of the brim gradually. Usually, working an additional 4 to 6 rows gives you the perfect amount of shade without obstructing your vision, keeping your crochet bucket hat perfectly balanced.
When you reach your desired brim width, it is time to fasten off your work securely. Cut your yarn, leaving a tail of about six inches, pull it through the final loop, and use your tapestry needle to weave the remaining thread invisibly into the inside stitches so it never unravels.
Now that the structure is complete, you can explore creative customizations to make your project stand out. Consider adding a whimsical crochet flower, a trendy embroidered smiley face, or even a contrasting border color around the very edge of the brim to give it a polished, boutique-style finish.
Congratulations, you have officially completed the practical portion of this crochet bucket hat – tutorial! Taking care of your hand-carved accessory by washing it gently by hand and drying it flat will keep it looking brand new and perfectly shaped for many years to come.
FAQ
What is the best type of yarn for a crochet bucket hat?
The absolute best choice for a sturdy, breathable wardrobe item is cotton yarn. It provides excellent stitch definition, does not stretch out of shape easily over time, and feels lightweight on the head. Acrylic yarn can also be used for a softer, warmer feel, but cotton remains the gold standard for that classic structure.
How do I know what size to make my bucket hat?
You can easily customize the size by measuring the circumference of your head using a flexible tape measure. The flat crown of your hat should match the diameter of your head divided by 3.14 ($C = \pi d$). For most standard adults, stopping your crown increases once the circle measures 6 to 6.5 inches across results in a perfect fit.
Can a total beginner complete this crochet bucket hat – tutorial?
Absolutely! This project is highly recommended for beginners because it relies almost entirely on basic techniques like the magic ring and the single crochet stitch. Take your time, use a stitch marker to keep track of your rounds, and remember that making mistakes is simply a natural part of the learning process.
Why is my bucket hat rippling or curling up too early?
If your crown is rippling like a wave, it means you are adding too many increases too quickly, or your tension is too loose. If it is curling into a bowl shape before it reaches the correct width, you are likely missing increases or your stitches are too tight. Matching your measurements to the guide steps helps prevent this.
How many hours does it take to finish a crochet bucket hat?
For most intermediate crafters, a standard crochet bucket hat can be completed in about 2 to 4 hours of focused work. If you are a beginner, it might take you a bit longer as you get used to holding the hook and maintaining consistent tension, making it an ideal weekend project.
How should I clean and wash my handmade crochet hat?
To protect the integrity of your handiwork, it is highly recommended to hand wash your hat in cold water using a mild detergent. Avoid twisting or wringing the fabric aggressively. Instead, gently press out the excess water with a towel, reshape the hat with your hands, and lay it flat to air dry.
Conclusion
Throughout this comprehensive crochet bucket hat – tutorial, we have covered everything from selecting the ideal cotton yarn and managing your stitch markers to mastering the foundational magic ring, building a flat crown, and flaring out a beautiful brim.
By breaking down the process into structured, digestible steps, you now possess the knowledge and skills required to transform a simple skein of yarn into a wearable piece of contemporary fashion. Crafting your own accessories is an empowering experience that combines patience, creativity, and practical design.