Rainbow Crochet Scarf – Tutorial: If you have ever wanted to inject a burst of joyful color into your winter wardrobe while mastering a delightful new craft, you are in the exact right place. Crocheting your own accessories is not just a rewarding hobby, but it also allows you to create completely customized, wearable art that reflects your unique personality. This comprehensive guide will walk you through every single step required to craft a stunning, vibrant accessory that will brighten up even the gloomiest of chilly days.
The beauty of a rainbow crochet scarf lies in its absolute versatility and the pure happiness that stitching with a spectrum of colors brings to your crafting table. Whether you are an absolute beginner picking up a hook for the very first time or an experienced crafter looking for a relaxing, rhythmic project, this vibrant design offers the perfect balance of simplicity and visual impact. By choosing the right materials and mastering a few fundamental stitches, you will watch a beautiful canvas of colors come to life right before your eyes.
In this ultimate Rainbow Crochet Scarf – Tutorial, we are going to dive deep into everything you need to know to ensure your stitching journey is smooth, enjoyable, and incredibly successful. From selecting the perfect yarn fibers and understanding hook sizes to exploring creative color transitions and edge-finishing techniques, no detail will be left behind. Grab your favorite beverage, clear off your crafting table, get your colorful yarn skeins ready, and let us embark on this wonderful creative adventure together.
1. Choosing the Perfect Yarn and Tools for Your Rainbow Crochet Scarf – Tutorial
When you begin planning your project, selecting the right materials is the absolute foundation of your success. For a truly spectacular rainbow crochet scarf, you want to look for a yarn that offers vivid, saturated hues that accurately mimic the natural spectrum of a rainbow. Acrylic yarn is an exceptional choice for beginners because it is highly affordable, comes in every shade imaginable, and is incredibly easy to wash and maintain over time.
If you prefer a more luxurious feel against your skin, you might want to opt for a high-quality wool blend or a premium cotton-acrylic mix. These fibers provide excellent stitch definition and a beautiful drape, ensuring your finished piece looks polished and professional. Pay close attention to the yarn weight as well; a worsted weight (medium number 4) yarn is highly recommended for this specific project because it works up quickly without feeling overly bulky around your neck.
Equally important to your yarn selection is choosing the correct crochet hook size to match your chosen fiber. For standard worsted weight yarn, a 5.0 mm (H-8) or 5.5 mm (I-9) hook is usually the sweet spot for achieving the ideal tension. If you tend to crochet very tightly, moving up a half size can help keep your stitches soft, flexible, and wonderfully cozy.
In addition to your primary hook and yarn, you will need a few essential notions to keep nearby in your crafting basket. A sturdy pair of sharp embroidery scissors is vital for cleanly cutting your yarn strands whenever you change colors across the spectrum. You will also want to keep a couple of locking stitch markers handy to help track your rows and prevent you from accidentally losing stitches at the edges.
Lastly, never underestimate the importance of a high-quality tapestry needle, which is sometimes referred to as a yarn needle. Because a traditional rainbow design requires switching between multiple colors, you will inevitably have several loose yarn tails to deal with at the ends of your rows. A good blunt-tipped needle makes the process of weaving in these loose ends quick, seamless, and completely secure.
By gathering all of these high-quality tools before making your very first slip knot, you set yourself up for a stress-free crafting experience. Taking the time to organize your workspace and select colors that truly make your heart sing will boost your motivation. Once your supplies are neatly arranged in front of you, you are officially ready to move on to the fundamental techniques of this Rainbow Crochet Scarf – Tutorial.
2. Mastering the Essential Stitches and Color Transitions
Before you jump directly into the full pattern, it is incredibly beneficial to review the core stitches that form the backbone of this design. The entire foundation of your work relies on the classic crochet chain stitch, which creates the initial base row from which your scarf will grow. Keeping your starting chain relatively loose is a great insider trick, as this prevents the bottom edge of your work from pulling or curling awkwardly.
The main body of this colorful garment is constructed using the elegant double crochet stitch, which is favored by crafters worldwide for its excellent height and beautiful texture. This particular stitch allows your project to progress rapidly while creating a fabric that is wonderfully pliable, warm, and breathable. Mastering the rhythm of yarn-overs and pulling through loops will quickly become second nature as you work your way through the rows.
Achieving a clean, professional look in a multi-colored project depends heavily on how you handle your color changes at the end of your rows. To create a completely flawless transition between your rainbow stripes, you should introduce your new color during the very last pull-through of the final stitch in a row. This clever technique ensures that the top loops of your previous row match perfectly, preventing any unsightly color bleeding.
Once you have successfully pulled the new color through your remaining loops, you will secure the old yarn strand by cutting it, leaving a tail of at least six inches. Leaving a substantial tail is a crucial step because it gives you plenty of material to securely weave into your fabric later on. Skipping this step or cutting the yarn too close to the knot can cause your beautiful handiwork to unravel after a few washes.
As you progress through the traditional order of red, orange, yellow, green, blue, and purple, consistency in your row counts is absolutely paramount. Deciding ahead of time exactly how many rows you want to allocate to each color band will give your project a beautifully balanced, intentional appearance. For instance, working four consecutive rows of each color creates substantial, eye-catching stripes that beautifully showcase each unique shade.
Remember to pause every few rows to check your total stitch count and ensure you haven’t accidentally added or subtracted stitches at the turn. It is incredibly easy for beginners to misidentify the turning chain as a regular stitch, which can cause the edges to slowly taper inward or outward. Keeping a steady count guarantees that your colorful creation maintains perfectly straight, neat, and parallel side margins from start to finish.
3. Step-by-Step Construction Guide for a Flawless Finish
Now that you have mastered the fundamental stitches and color-changing mechanics, it is time to assemble the actual body of your garment. To begin, take your vibrant red yarn and create a secure slip knot on your hook, ensuring it can slide smoothly back and forth. You will then chain a total of thirty-five stitches, which typically yields a comfortable, standard width of approximately seven to eight inches.
Once your foundation chain is complete, skip the first three chains from your hook—which will cleverly count as your very first double crochet stitch—and insert your hook into the fourth chain. Work one complete stitch into that chain, and then proceed to place one stitch into every single remaining chain across the row. When you reach the very end of this first row, you should have a total of thirty-three active stitches.
For the second row, you will chain three to serve as your turning stitch, flip your work horizontally, and continue placing stitches across the entire row. Repeat this straightforward, meditative process for two more rows until you have a beautiful, solid block of red fabric. On the final pull-through of the very last stitch of row four, seamlessly introduce your bright orange yarn using the transition technique described earlier.
Continue this exact structural pattern, working precisely four rows for each subsequent color of the magnificent rainbow spectrum. As you transition from orange to yellow, yellow to green, green to blue, and blue to violet, you will watch your accessory grow in beauty and length. You can repeat the entire color sequence multiple times until the garment reaches your desired total length, which is typically around sixty to seventy inches.
When you finally complete your very last row of deep purple, wrap your yarn over the hook one final time and pull it completely through to fasten off. Give the yarn tail a firm, gentle tug to lock the stitch securely in place so it cannot accidentally loosen over time. At this stage, your project will feature a magnificent display of colors, along with a collection of loose yarn tails along the outer edges.
The final phase of construction involves using your trusty tapestry needle to neatly weave all of those loose yarn ends directly into the matching color blocks. Pass the needle back and forth through the center of your stitches in multiple opposite directions to ensure the yarn tails are completely locked into the fabric. Once all the ends are hidden away and trimmed close to the work, your accessory will look incredibly clean, tidy, and ready to wear.
4. Creative Ways to Personalize and Style Your New Accessory
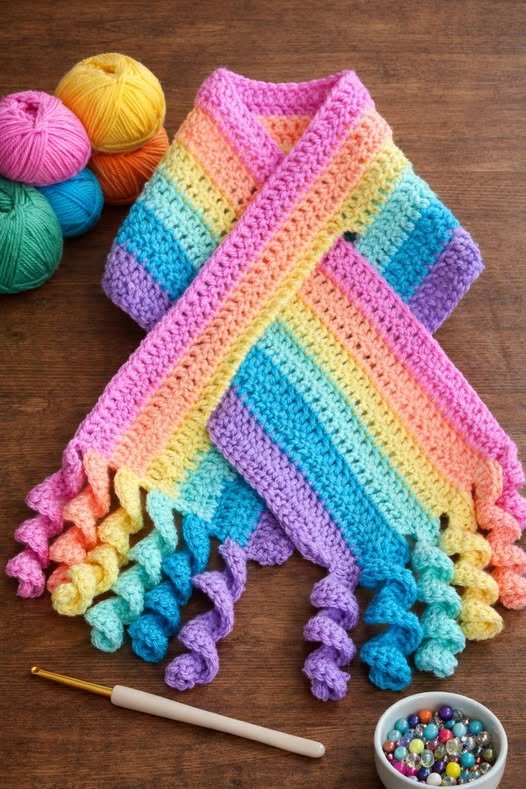
One of the most exciting aspects of completing a handmade project is finding creative ways to add your own personal, artistic flair to the design. A timeless method for elevating a simple scarf is to add a row of long, playful yarn fringes to both of the short ends. To do this, simply cut multiple strands of yarn to double your desired length, fold them in half, and use your hook to loop them securely through the edge stitches.
If fringes aren’t quite your style, you can instead opt to crochet a sleek, minimalist border entirely around the outer perimeter of your work. A simple row of single crochet stitches using a neutral black or crisp white yarn can act like a frame around a painting, making the internal rainbow colors pop intensely. This border technique also does a wonderful job of smoothing out any minor imperfections or tension variances along your side edges.
For those who love a cozy, modern aesthetic, you can easily transform your flat garment into a trendy infinity scarf by joining the two ends together. Simply align the first row of red with the final row of purple and use a slip stitch or a mattress stitch to sew them into a continuous loop. This style is fantastic for wrapping snugly around your neck multiple times without ever having to worry about loose ends flapping around in the wind.
When it comes to everyday fashion styling, this vibrant accessory is an absolute powerhouse capable of completely transforming a basic winter outfit. Try pairing your colorful creation with a neutral, solid-colored coat—such as classic navy blue, slate gray, beige, or deep black—to let the rainbow shades truly take center stage. The stark contrast between a muted jacket and your bright, handmade stitches creates an instantly chic, cheerful, and eye-catching ensemble.
Don’t be afraid to experiment with different ways of wrapping, draping, and knotting your piece to suit your mood and the changing weather conditions. You can wear it long and loose to showcase the full length of the color gradient, or tuck it deeply into your coat for maximum warmth on freezing days. Because you crafted it yourself, you can wear it with an immense sense of pride, knowing that it is a completely unique expression of your creativity.
Finally, remember that handmade items make incredibly thoughtful, cherished gifts for your close friends, family members, teachers, or coworkers. Crafting a beautiful, warm accessory in someone’s favorite color palette shows an immense amount of love, care, and dedication of your personal time. Now that you have all the knowledge needed to create this piece, let us address some of the most common questions crafters encounter.
Frequently Asked Questions (FAQ)
How long does it typically take a beginner to complete this project?
For a complete beginner, finishing a full-sized scarf usually takes anywhere from six to ten hours of active stitching time. Because the pattern uses a highly repetitive and tall stitch, you will notice that the fabric grows surprisingly quickly once you find your rhythmic momentum. Breaking the work down into a single color block per day is a fantastic, stress-free way to enjoy the crafting process without feeling overwhelmed.
Can I use a self-striping cake yarn instead of buying multiple individual yarn skeins?
Yes, you absolutely can use a self-striping or gradient cake yarn that features a built-in rainbow colorway. Using a cake yarn is incredibly convenient because it completely eliminates the need to manually cut your yarn and tie in new colors at the end of your rows. This option drastically reduces the number of loose yarn ends you will have to weave in at the very end of your project.
What should I do if the sides of my scarf are starting to look uneven or crooked?
If you notice your edges are bowing inward or outward, it almost always means you are accidentally losing or adding stitches at the ends of your rows. To fix this common issue, it is best to carefully unravel your work back to the point where the edges were straight and start fresh. Using locking stitch markers in the very first and very last stitch of every single row will guarantee you never miss a turning stitch again.
Is this specific project considered safe and suitable for a child to wear safely?
Yes, this design is perfectly safe for children, but you should keep a few practical design modifications in mind for younger wearers. For children, it is highly recommended to make the length significantly shorter so it does not drag on the ground or pose a tripping hazard. Additionally, you should consider skipping the long yarn fringes or making them very short to prevent them from getting caught in zippers or playground equipment.
How should I wash and care for my completed handmade item to ensure it lasts?
The exact care instructions will depend entirely on the specific fiber content listed on your yarn wrappers. If you used standard premium acrylic yarn, you can safely machine wash the item on a gentle, cold cycle inside a mesh laundry bag. Always lay the garment completely flat on a clean, dry towel to air dry, as hanging it up while wet can stretch out the stitches.
Conclusion
In this Rainbow Crochet Scarf – Tutorial, we have covered every single essential element needed to design, stitch, and finish a breathtakingly vibrant winter accessory from scratch.
You have learned how to select the best yarn types and hook sizes, master the fundamental double crochet stitch, execute clean color changes, and add gorgeous finishing touches like borders and fringes. With these foundational skills in your crafting toolkit, you are fully equipped to create a cozy, stunning masterpiece that brings warmth and color to everyone around you.