Owl-shaped pot holders – tutorial: If you are looking for a fun, functional, and incredibly charming way to brighten up your kitchen, you have come to the right place. Creating handmade kitchen accessories is one of the most rewarding ways to express your creativity while making items that get used every single day. In this comprehensive guide, we will dive deep into how you can create your very own whimsical kitchen companions using simple materials and basic sewing skills.
Handmade potholders make fantastic gifts for housewarmings, holidays, or birthdays because they combine practical utility with a deeply personal touch. Owls, with their big, expressive eyes and lovely layered feathers, lend themselves perfectly to fabric art and patchwork. By using this owl-shaped pot holders – tutorial, you will learn how to transform simple fabric scraps into heat-resistant works of art that protect your hands and make everyone smile.
Before we begin stepping through the creative process, it is essential to focus on both safety and style. A good potholder needs to look beautiful on your counter, but its primary job is to shield your skin from scorching hot pans and baking sheets. We will discuss the absolute best materials to ensure your safety, walk you through the cutting process, and guide you through assembly and finishing touches. Let us gather our supplies and get ready to sew a delightful set of kitchen helpers.
1. Choosing the Right Materials for Your Owl Potholder
When embarking on an owl-shaped pot holders – tutorial, selecting the correct fabric is the most critical step for a successful project. You must always use 100% cotton fabric for every single visible part of your potholder, including the main body, the eyes, the beak, and the binding. Synthetic fibers like polyester or nylon will melt instantly when exposed to high heat, which can cause severe burns or ruin your expensive cookware.
Beyond the outer fabric, the hidden interior layers are what truly provide the necessary thermal defense for your hands. Standard polyester batting should be completely avoided because it offers zero heat resistance and will degrade quickly under kitchen conditions. Instead, you should invest in a specialized heat-resistant batting, such as Insul-Bright, which features hollow fibers and a metallic mylar film to reflect energy back.
To achieve the ultimate level of safety and comfort, it is highly recommended to pair one layer of heat-resistant batting with one or two layers of 100% cotton batting. This specific combination creates a thick, plush barrier that easily blocks intense heat while remaining flexible enough to grip pan handles securely. Mixing these materials gives your fabric project the structural integrity it needs to endure daily kitchen wear and tear.
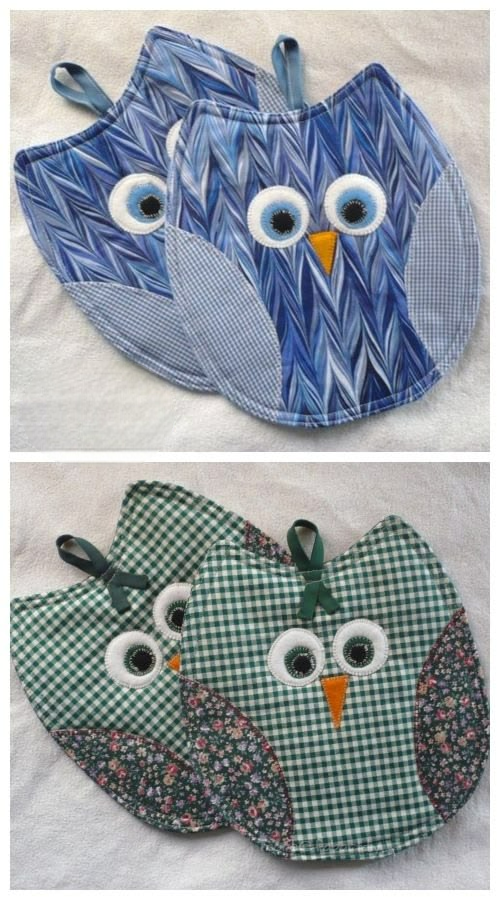
Now comes the most enjoyable part of the preparation process: choosing your colors, patterns, and visual design layouts. Owls look fantastic in traditional rustic tones like warm browns, deep oranges, and forest greens, which give a cozy farmhouse vibe to the kitchen. However, do not be afraid to experiment with modern aesthetics by selecting bright teal, vibrant magenta, or whimsical floral prints for a contemporary look.
Because this project relies heavily on applique for the facial features, it is a spectacular opportunity to utilize your scrap fabric stash. The big circular eyes, the sharp little triangular beak, and the curved wing pieces require very small amounts of material to stand out beautifully. Gathering a diverse mix of dots, stripes, and solid fabrics will give your finished kitchen accessory an abundance of unique personality.
Before making your first fabric cut, make sure to pre-wash all of your cotton materials to prevent future shrinkage or color bleeding. Because kitchen items require frequent washing due to food spills and grease, pre-washing ensures your project maintains its shape permanently. Once your fabrics are washed, dried, and thoroughly ironed flat, you are officially ready to move on to the next exciting phase.
2. Cutting the Fabric Pieces and Preparing the Applique
To begin shaping your project, you will need a reliable template that captures the classic, rounded silhouette of a woodland bird. You can easily draw a basic egg-shaped outline on a piece of sturdy cardstock, flattening the bottom slightly so it sits upright, and adding two small tufts at the top for ears. This main body shape will serve as the foundation for your entire owl-shaped pot holders – tutorial workspace.
Using your template, cut out two matching pieces of your main body fabric, which will become the front and the back of the potholder. Next, use the exact same template to cut one layer of your specialized heat-resistant batting and two layers of your standard cotton batting. Having all these base layers cut out cleanly ahead of time makes the final assembly process go incredibly smoothly.
Now we can shift our attention to cutting out the small, distinct facial features that will bring your character to life. You will need to cut two large white circles for the outer eyes, two slightly smaller black or dark blue circles for the pupils, and a sharp orange triangle for the beak. For the wings, cut two curved semi-ovals that will sit elegantly on the left and right sides of the main body fabric.
To make the sewing process infinitely easier, apply a lightweight, double-sided fusible web adhesive to the back of your small accent fabrics before cutting them. Fusible web acts like a temporary glue when ironed, holding the tiny eyes, pupils, and beak firmly in place on the front body piece. This completely eliminates the need for pins, preventing the small pieces from shifting or wrinkling as you sew them down.
Once your pieces are cut and the adhesive backing is peeled off, arrange the face carefully on the right side of the front body fabric. Center the large white circles side by side, place the pupils looking in your preferred direction, and tuck the orange beak slightly underneath the eyes. Place the wing pieces on the sides, iron the entire layout flat with a warm iron, and watch your character instantly appear.
With everything securely fused in place, use a tight zigzag stitch, a blanket stitch, or a free-motion raw-edge stitch around every single applique piece. Take your time around the circular curves of the eyes, turning the fabric slowly to maintain a neat, professional look. Sewing these edges down securely ensures that the facial details will never fray or peel away in the washing machine.
3. Layering, Quilting, and Assembling the Potholder Body
With the decorated front face completely finished, it is time to build the protective sandwich that makes this item functional. Lay your back fabric piece flat on your table with the pretty, right side facing downwards toward the surface. On top of this back piece, stack your two layers of pure cotton batting, followed closely by the single layer of heat-resistant reflective batting.
Finally, place your beautifully stitched owl face piece right side up on the very top of the stack, completing your multi-layered fabric sandwich. Take a few moments to smooth out any wrinkles from the center outward, ensuring all the edges align as perfectly as possible. Use several heavy-duty quilting pins or handy sewing clips around the perimeter to keep all five layers locked securely together.
To give your project structural stability and a gorgeous professional finish, you will want to perform some basic quilting across the body. You can sew straight diagonal lines across the tummy area to simulate the texture of feathers, or quilt around the contours of the wings. Quilting is essential because it bonds all the inner insulation layers together, preventing them from bunching up or shifting during future washes.
When sewing through these thick layers, it is highly beneficial to install a walking foot or an even-feed foot onto your sewing machine. A walking foot pulls the top layer of fabric at the exact same speed as the machine’s feed dogs pull the bottom layer. This completely prevents puckering, shifting, and uneven stitching, allowing your machine to glide effortlessly through the dense layers of insulation.
Once your quilting lines are complete, sew a very gentle basting stitch around the entire outer edge of the shape, about an eighth of an inch from the border. This basting stitch permanently secures the loose edges, making it much easier to apply the final binding without worrying about layers slipping. After basting, use sharp fabric shears to trim away any uneven batting or stray threads poking out.
Before moving to the final stage, consider adding a small fabric loop to the top of your project so it can hang beautifully on a kitchen wall hook. Cut a small strip of matching cotton fabric, fold it lengthwise into a thin strap, stitch down the edge, and fold it into a loop. Baste this loop securely to the top center of the back fabric piece, pointing downwards so it is ready for the binding.
4. Applying the Binding and Adding Final Touches
The final step in this owl-shaped pot holders – tutorial is applying a clean fabric binding to enclose all the raw edges beautifully. You can create your own custom bias tape from coordinating fabric scraps or use high-quality, store-bought double-fold bias tape. Bias tape is absolutely essential for this project because it has inherent stretch, allowing it to conform smoothly to the rounded curves and ear tufts.
Unfold one side of your bias tape and align its raw edge with the raw edge of your potholder’s back side, pinning it carefully around the curves. Sew slowly along the crease line of the tape, taking extra care when navigating the tight corners near the top ears. When you reach the starting point, overlap the ends of the tape by half an inch, trim away the excess, and fold the ends down cleanly.
Flip the entire potholder over to the front side and fold the bias tape over the raw edges, wrapping it tightly to conceal the previous stitching line. Use plenty of sewing clips to hold the binding flat against the front face, ensuring a uniform width all the way around. Using clips instead of pins here prevents distortion and keeps the thick layers perfectly compressed while you prepare to sew.
Using a matching thread color, stitch very close to the inside edge of the binding all the way around the shape of the bird. This stitch will catch the folded edge of the tape on the front while keeping the back side looking incredibly neat and uniform. Go slowly around the ears, keeping your needle down into the fabric when you need to pivot your machine for crisp corners.
Once the binding is fully attached, pull the hanging loop that you basted earlier upward, so it stands proud above the top of the head. Secure the base of the loop with a few tight forward-and-backward stitches directly over the binding to give it maximum weight-bearing strength. This ensures your beautiful creation can hang safely from any hook without any risk of ripping over time.
Give your finished project one final, thorough press with a hot steam iron to flatten the seams and set the decorative stitches beautifully. Inspect the entire piece for any loose threads, clipping them away closely to complete your gorgeous handmade kitchen accessory. Your delightful, heat-resistant companion is now fully prepared to handle hot dishes or bring joy to a loved one’s home.
Frequently Asked Questions
Can I use regular polyester batting inside this potholder?
No, you should never use standard polyester batting inside any item designed to handle hot cookware. Polyester is a synthetic plastic material that melts rapidly when exposed to high temperatures, which can lead to severe skin burns and ruined kitchen tools. Always use a combination of 100% natural cotton batting and specialized heat-resistant insulated batting to ensure your hands remain completely protected.
Is this sewing project suitable for absolute beginners?
Yes, this project is highly accessible for beginners who have a basic understanding of their sewing machine. The shape is straightforward, and using fusible adhesive web makes managing the small facial applique pieces incredibly easy and stress-free. The trickiest part is sewing the binding around the curved edges, but going slowly and using plenty of clips will yield a beautiful result.
How do I clean and wash my handmade cotton potholders?
Because these items are made from 100% cotton fabric and high-quality batting, they are completely safe to wash in a standard washing machine. Wash them on a gentle cycle with cold water and similar colors to prevent any unexpected dye transfer or premature fading. It is best to air-dry them flat to preserve their shape perfectly, followed by a quick press with a warm iron if needed.
Do I have to use bias tape, or can I use straight-grain fabric strips?
It is highly recommended to use bias tape because it is cut at a 45-degree angle, giving the fabric a natural stretch and flexibility. This elasticity allows the tape to curve smoothly around the rounded base and ears of the bird without gathering, bunching, or wrinkling. Straight-grain strips do not stretch and will create puckers when you attempt to sew them around tight curves.
Can I use fabric glue instead of sewing the eyes and beak?
Fabric glue is wonderful for temporarily positioning pieces, but it should not replace stitching for items that undergo heavy daily use and frequent washing. The high heat from ovens and the agitation of washing machines will quickly break down standard fabric adhesives, causing the face to peel off. Sewing the edges with a zigzag or blanket stitch ensures your design stays beautiful forever.
Conclusion
In this owl-shaped pot holders – tutorial, we have explored every essential step needed to create a beautiful, safe, and highly functional kitchen accessory from scratch. From selecting 100% natural cotton fabrics and advanced heat-resistant batting to cutting precise applique patterns, we covered how to build a durable insulation sandwich.
We also mastered the art of quilting the layers together and applying a flexible bias tape binding to give the finished project a highly polished, professional appearance.